Best Puff Pastry Cream Cake: A Light & Flaky Dessert You’ll Fall in Love With

There’s something unforgettable about a dessert that blends delicate crunch with smooth, cloud-like cream. Maybe it reminds you of childhood birthdays, your first dinner party success, or just a quiet weekend when you needed comfort. The best puff pastry cream cake delivers all that nostalgia and luxury in one bite. And the best part? You don’t need a culinary degree to make it.

best puff pastry cream cake

Whether you’re hosting friends or treating yourself, this recipe is a foolproof way to create something truly impressive. Let’s explore everything you need to master this delicious dessert—from ingredients and assembly tips to creative variations and expert hacks.


What Is a Puff Pastry Cream Cake?

A Flaky Classic with a Creamy Twist

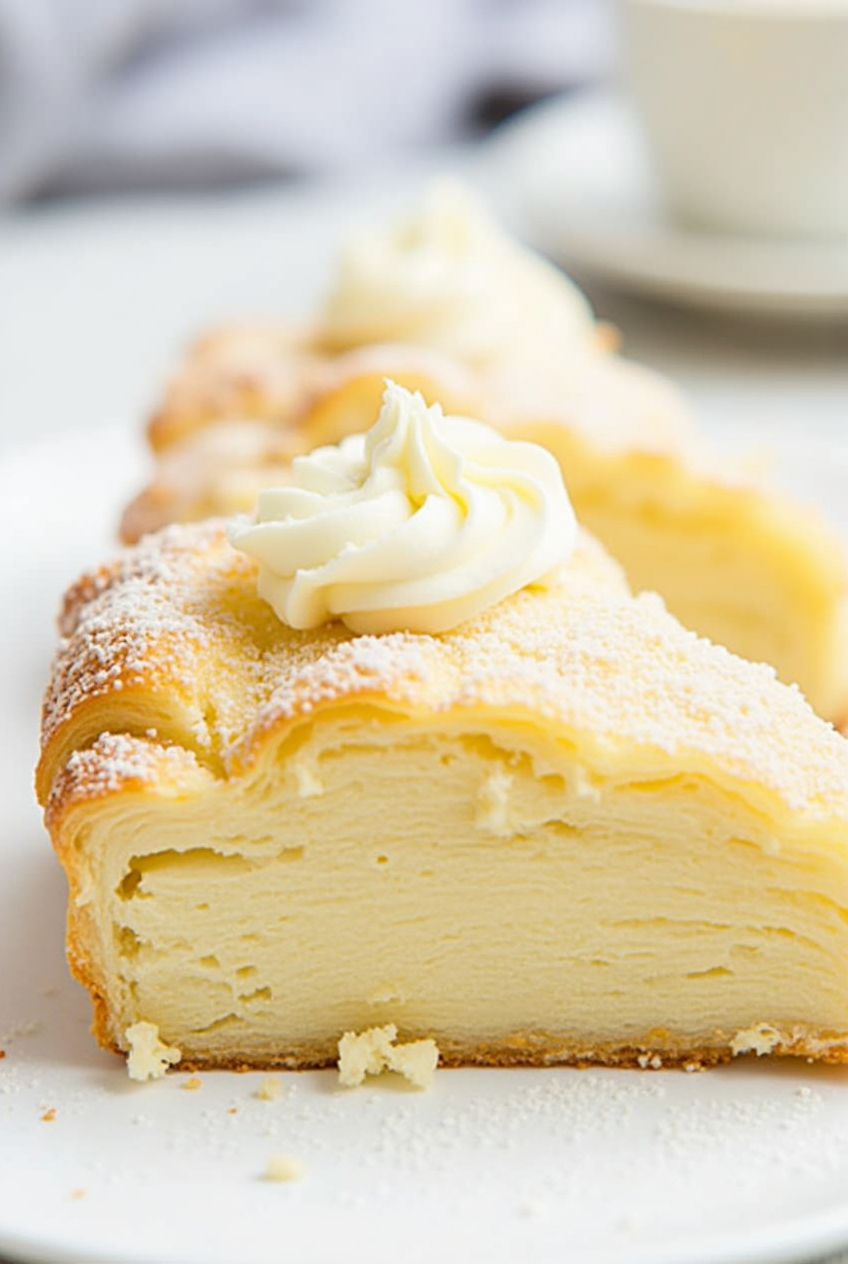
The puff pastry cream cake is exactly what its name promises—a beautiful stack of golden, flaky pastry sheets layered with rich, lightly sweetened cream. It’s often topped with fruit, dusted with powdered sugar, or drizzled with chocolate. The texture contrast is what makes it irresistible.

Why Everyone’s Obsessed

This cake is trending for a reason:

  • Minimal ingredients with maximum impact
  • Elegant presentation without complicated steps
  • Endlessly customizable to fit your taste or dietary needs

Instagram-worthy? Definitely. Effort-heavy? Not at all.


Why You’ll Love This Puff Pastry Cream Cake Recipe

Perfect for Any Occasion

Whether you’re planning a dinner party or looking to upgrade your weekend dessert lineup, this cake fits every scene. It’s light enough to serve after a heavy meal, yet impressive enough to steal the spotlight.

Beginner-Friendly

You don’t need fancy equipment or advanced baking knowledge. If you can handle a whisk and an oven, you’re already halfway there.

Easily Customizable

Love strawberries? Prefer chocolate? You can switch up the filling, toppings, or even the shape of the cake to match the season or your mood.


Ingredients You’ll Need

Here’s everything you need to create the best puff pastry cream cake:

IngredientQuantityNotes
Puff pastry sheets2 sheetsStore-bought or homemade
Heavy cream1 cupChilled, for whipping
Powdered sugar1/3 cupAdjust for sweetness
Vanilla extract1 tspOptional but flavorful
Cornstarch1 tbspHelps stabilize the cream
Fresh berries1/2 cupOptional topping

Optional Additions:

  • Lemon zest
  • Melted chocolate
  • Edible flowers

Step-by-Step Instructions

Preparing the Puff Pastry

  1. Preheat your oven to 400°F (200°C).
  2. Roll out the puff pastry on a lightly floured surface.
  3. Dock the dough (prick with a fork) to prevent excessive puffing.
  4. Place on parchment-lined baking trays.
  5. Bake for 15-18 minutes or until golden and crisp.
  6. Let cool completely before layering.

Making the Cream Filling

  1. In a chilled bowl, pour the cold heavy cream.
  2. Add powdered sugar and vanilla extract.
  3. Sprinkle in the cornstarch.
  4. Whip until soft peaks form.
  5. Chill in the refrigerator for at least 15 minutes.

Assembling the Cake

  1. Cut each pastry sheet into equal rectangular pieces.
  2. Start with one pastry layer on your serving tray.
  3. Pipe or spread a thick layer of whipped cream.
  4. Repeat with additional layers (2-3 is ideal).
  5. Top with fresh berries or a dusting of powdered sugar.

Tip: Use a serrated knife when slicing for clean edges.


Variations to Try

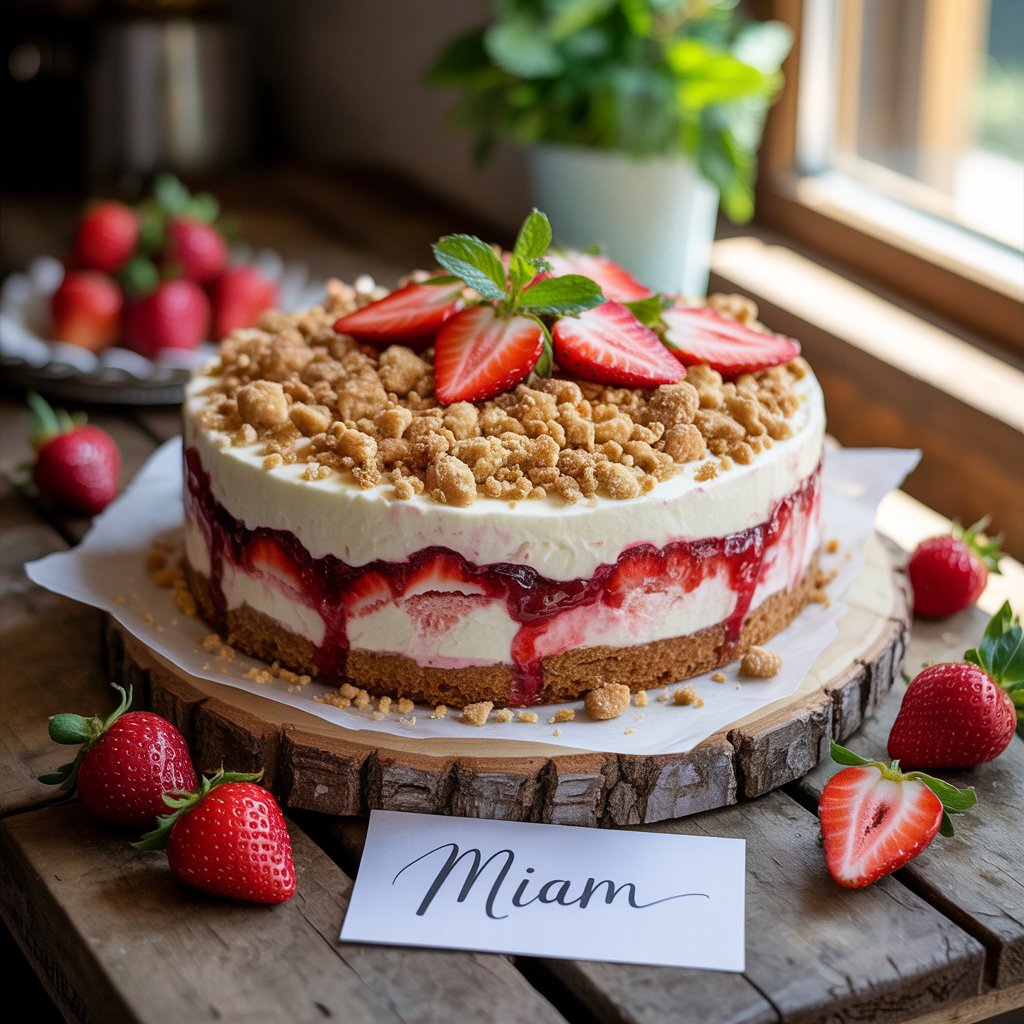
Fruit-Filled Puff Pastry Cream Cake

Add sliced strawberries, blueberries, or peaches between the layers.

Chocolate Hazelnut Delight

Mix a spoonful of Nutella into the whipped cream.

Vegan Adaptation

  • Use plant-based puff pastry.
  • Substitute coconut cream for the filling.
  • Sweeten with maple syrup or agave.

Expert Tips for Success

  • Chill everything: Cream whips better when cold.
  • Use parchment paper to prevent sticking.
  • Layer quickly before the cream warms.
  • Decorate just before serving for best visual appeal.
  • Don’t skip docking—it keeps your pastry layers flat and crispy.

Storing and Serving

How to Store

  • Store leftovers in an airtight container in the fridge.
  • Best enjoyed within 2–3 days.
  • Avoid freezing; cream doesn’t thaw well.

Serving Suggestions

  • Pair with a hot espresso.
  • Serve chilled or at room temperature.
  • Garnish with mint leaves or edible flowers.

FAQ: Best Puff Pastry Cream Cake

Can I freeze the puff pastry cream cake?

It’s not recommended. Freezing will affect the texture of both the pastry and the cream.

What’s the best cream to use?

Cold heavy whipping cream with a bit of cornstarch works best. You can also use pastry cream for a richer taste.

Can I use store-bought puff pastry?

Absolutely. Just make sure to follow baking instructions and dock the dough.

How do I keep the pastry from getting soggy?

Let pastry cool before adding cream, and only assemble shortly before serving.

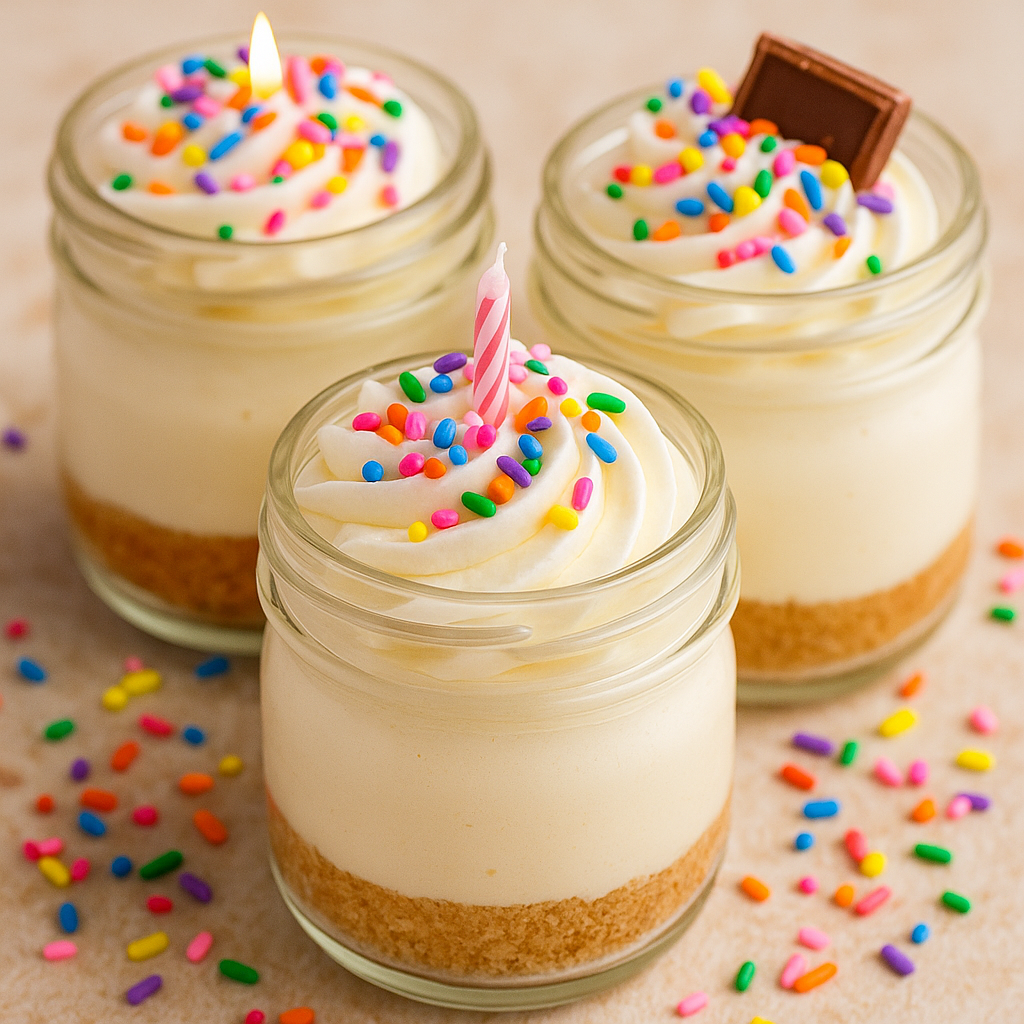
Is this recipe kid-friendly?

Yes! It’s light, sweet, and simple. Plus, kids will enjoy helping with layering and decorating.


Conclusion: Your New Go-To Dessert

You don’t need to visit a bakery or flip through a French cookbook to make something this delightful. The best puff pastry cream cake is just a few ingredients and simple steps away. It’s a treat that feels luxurious, but fits perfectly into your everyday kitchen.

So why not impress your family, wow your friends, or simply treat yourself? This dessert checks every box—light, creamy, flaky, and full of flavor.


Call to Action

Have you made this puff pastry cream cake? Share your masterpiece with us on Instagram using #PuffPastryBliss. Or leave a comment below telling us how you personalized it. Hungry for more? Subscribe to get weekly dessert inspiration straight to your inbo

best puff pastry cream cake

Strawberry Crunch Cake

Strawberry Crunch Cake: The Viral Dessert You Need to Try This Weekend

Why Strawberry Crunch Cake Brings Back Sweet Summer Memories

Strawberry Crunch Cake

There’s something deeply nostalgic about strawberries and cream. Maybe it’s the memory of enjoying a frozen strawberry bar during a hot summer day, or perhaps the way strawberry desserts always seemed to appear at the best family gatherings. If you’re looking for a dessert that brings that same joyful feeling to your kitchen—and tastes like pure happiness—you’ve found it. Strawberry Crunch Cake blends everything you loved as a kid with the ease and elegance you need as a home baker today.

This article will guide you through everything you need to know to recreate this trending dessert—from ingredients to storage, and even customization tips. Whether you’re new to baking or a kitchen pro, this recipe is designed with you in mind.


What Is Strawberry Crunch Cake?

Strawberry Crunch Cake is a delightful hybrid between a traditional strawberry shortcake and those nostalgic ice cream bars from your childhood. It features soft vanilla or strawberry cake layers, a luscious whipped cream or cream cheese frosting, and a crisp, buttery crumble made from crushed cookies and strawberry gelatin.

You’ve probably seen versions of it pop up all over social media—TikTok, Pinterest, and Instagram reels are filled with happy bakers showing off their vibrant pink-and-cream creations. It’s no surprise. This cake isn’t just gorgeous to look at; it’s also irresistibly delicious.

Key Features:

  • Soft, moist cake (vanilla or strawberry flavored)
  • Whipped topping or cream cheese frosting
  • Crunchy strawberry crumble topping
  • Perfect for birthdays, summer BBQs, brunches, or just because

Ingredients You’ll Need

Let’s break it down so you can prepare your shopping list.

Base Ingredients Table

ComponentIngredients
Cake LayerAll-purpose flour, baking powder, salt, granulated sugar, eggs, milk, vanilla, butter (or use a boxed cake mix)
Frosting LayerHeavy whipping cream or cream cheese, powdered sugar, vanilla extract
Crunch ToppingGolden Oreos or vanilla cookies, butter, strawberry gelatin powder, optional freeze-dried strawberries

Make sure to gather everything before you start. Having a well-organized prep space saves you time and stress.


How to Make Strawberry Crunch Cake: Step-by-Step

This is where the magic happens. Follow these steps closely, and you’ll have a show-stopping cake in no time.

Step 1: Prepare Your Cake Layer

If using a boxed mix:

  • Follow package instructions. Let cool completely before decorating.

For homemade:

  1. Preheat your oven to 350°F (175°C). Grease and flour your pan.
  2. In a bowl, whisk dry ingredients: flour, baking powder, salt.
  3. In another bowl, beat sugar and butter until creamy. Add eggs one at a time.
  4. Add milk and vanilla, then combine with dry ingredients.
  5. Pour batter into pan and bake for 30–35 minutes. Let cool fully.

Step 2: Make the Frosting

For a whipped version:

  • Beat cold heavy cream with powdered sugar and vanilla until stiff peaks form.

For a cream cheese version:

  • Beat softened cream cheese, powdered sugar, and vanilla until smooth. Fold in whipped cream.

Chill until ready to use.

Step 3: Prepare the Crunch Topping

  1. Crush cookies in a zip bag or food processor.
  2. Mix with strawberry gelatin powder.
  3. Add melted butter and stir until crumbly.
  4. Optional: Add crushed freeze-dried strawberries for color and flavor.
  5. Toast in the oven at 300°F for 5–8 minutes for extra crunch.

Step 4: Assemble Your Cake

  1. Place cake layer on a serving dish.
  2. Frost generously with your whipped topping.
  3. Sprinkle the strawberry crunch over the top.
  4. For two layers: repeat with another cake round.
  5. Chill for 1–2 hours before serving.

Pro Tips to Elevate Your Strawberry Crunch Cake

  • Add real strawberries: Thinly slice strawberries between layers.
  • No-bake version: Use pound cake and cool whip if you’re short on time.
  • Flavor twist: Add lemon zest or almond extract to your frosting.
  • Color control: Use natural pink food coloring if avoiding artificial dyes.

Storage & Serving Suggestions

Storage

  • Refrigerate cake in an airtight container.
  • Best eaten within 3 days.
  • Add topping right before serving to avoid sogginess.

Serving

  • Serve chilled for best flavor.
  • Pair with iced coffee or lemonade on warm days.
  • Perfect slice size: about 1.5 inches wide.

Nutritional Snapshot (Per Slice Estimate)

NutrientApproximate Amount
Calories350–450
Sugars28g
Fat22g
Protein4g

Note: Values vary based on ingredients used.


Why Strawberry Crunch Cake Deserves a Spot on Your Dessert Table

Think about it—how often do you find a dessert that’s:

  • Easy to make
  • Visually stunning
  • Full of nostalgic flavor
  • Flexible for all occasions

You’re not just baking a cake. You’re making a moment. Whether you post it online or serve it quietly at home, Strawberry Crunch Cake turns ordinary days into something memorable.


FAQ – Strawberry Crunch Cake

Can I make this in advance?

Yes, you can prepare the cake and frosting up to 2 days ahead. Just add the crunch topping fresh.

Can I freeze Strawberry Crunch Cake?

You can freeze the cake and frosting separately. Assembled cake is best fresh.

What if I don’t have strawberry gelatin?

Try using freeze-dried strawberries crushed with sugar as a natural substitute.

Can I make it gluten-free?

Yes, use gluten-free cake mix and cookies.


Final Thoughts: It’s Time to Bake!

You’ve got everything you need—from ingredients to inspiration—to create a Strawberry Crunch Cake that looks impressive and tastes even better. Now it’s your turn.

Call to Action:
Ready to bake this beautiful cake? Snap a picture and tag it with #StrawberryCrunchCakeMagic. Share your creation with your friends—or just savor every bite yourself. Either way, you’ve earned it.

🧁 Mini Cheesecake Jar Recipe: The Sweetest Way to Celebrate Life’s Moments

✨ Tiny Jars, Big Joy — A Dessert That Feels Like a Hug

You know those desserts that make you pause for a second, smile, and remember a moment? That’s what mini cheesecake jars recipe do. These little treats aren’t just about flavor—they’re a whole experience. Whether you’re prepping for a birthday bash, surprising someone special, or just treating yourself (because yes, you deserve it), these creamy, no-bake cheesecake jars check all the boxes: simple, adorable, delicious.

Mini Cheesecake Jar Recipe

And the best part? You don’t need to turn on the oven.


🧁 Why You’ll Love Mini Cheesecake Jars RECIP

🎉 Elegant, Easy, and Loved by Everyone

  • These jars require no baking—less time, less cleanup.
  • They’re individually portioned, making them perfect for parties or gifting.
  • Kid-friendly, adult-approved, and completely customizable.

Right now, mini desserts are making waves on Pinterest and TikTok. From rustic weddings to birthday brunches, these mini cheesecake jars are stealing the spotlight. With search interest for “cheesecake in a jar” up over 40%, you’re not just making a dessert—you’re joining a sweet trend.


🍰 Your No-Bake Mini Cheesecake Jar Recipe

✨ Ingredients at a Glance

IngredientAmountNotes
Graham crackers1 ½ cupsFinely crushed
Butter (melted)⅓ cupSalted or unsalted
Cream cheese1 ½ cupsRoom temperature
Powdered sugar½ cupSifted
Vanilla extract1 tspPure, not imitation
Heavy cream1 cupVery cold
Whipped creamOptionalFor topping
Rainbow sprinklesOptionalFor flair

🍝 Step-by-Step Assembly

  1. Start with the crust
  • Mix your crushed graham crackers with melted butter.
  • Spoon 2 tablespoons into each jar and press down to form the crust.
  • Chill in the fridge while you prep the filling.
  1. Whip it good
  • Whip the cold heavy cream until stiff peaks form. Set aside.
  1. Creamy base magic
  • Beat cream cheese until smooth.
  • Add powdered sugar and vanilla extract. Mix until creamy.
  • Gently fold in the whipped cream to keep the mixture airy.
  1. Jar it up
  • Pipe or spoon the filling over the crust layer in each jar.
  • Top with whipped cream and sprinkles.
  1. Chill to set
  • Refrigerate for at least 2 hours before serving.
  • These stay perfect for up to 3 days.

😍 Insider Tips for Flawless Results

✔️ Storage Tips

  • Use 4 oz or 6 oz jars with lids for freshness and portability.
  • Best enjoyed within 48-72 hours.

🍒 Flavor Twists to Try

  • Berry swirl: Add fresh jam between layers.
  • Cookies & cream: Use crushed Oreos instead of graham crackers.
  • Citrus burst: Add lemon zest to the filling.

☕ Occasions That Deserve Cheesecake Jars

  • Birthday parties
  • Baby showers
  • Dessert tables
  • Corporate events or gift boxes

❓ Frequently Asked Questions (FAQs)

Can I make this mini cheesecake jar recipe in advance?

Absolutely! These jars can be made a day or two in advance and stored in the fridge. Just add the whipped topping and decorations before serving to keep them fresh.

Are these jars freezer-friendly?

Yes—freeze them without the toppings. When ready, thaw in the fridge for a few hours.

How do I make this recipe dairy-free?

You can use plant-based cream cheese and coconut cream. Double-check that your crust ingredients are also dairy-free.

What jar sizes work best?

We recommend 4 oz to 6 oz jars. They’re easy to fill, serve, and stack in the fridge.

Is this recipe good for kids to help make?

Absolutely! Crushing crackers, spooning layers, and decorating with sprinkles make this a fun and safe kitchen activity.


📍 Final Thought: Your Spoonful of Celebration

Every once in a while, a dessert comes along that feels a little magical. These mini cheesecake jars are exactly that. They’re cute, creamy, endlessly customizable, and totally unforgettable.

Whether you’re a pro in the kitchen or a beginner just testing the waters, you can pull these off with ease. So go ahead, mix up some love, chill a few jars, and serve joy by the sp

Mini Cheesecake Jar Recipe

Old-Fashioned Banana Cake That Tastes Like Grandma’s Kitchen

old-fashioned banana cake

You know that comforting feeling you get when you walk into a room and catch the scent of something sweet and nostalgic baking in the oven? That scent might just be a homemade old-fashioned banana cake—a timeless dessert that never fails to bring back memories. Whether you’re reminiscing about your childhood kitchen or simply craving something classic, this recipe brings the warmth of tradition right into your home.

Let’s dive into how you can recreate this delicious throwback that tastes just as good as you remember.


What Makes an Old-Fashioned Banana Recipe So Special?

What sets an old-fashioned banana cake apart from modern versions? It’s not just the simplicity of the ingredients, but the intention behind every bite. This cake is all about using ripe bananas at their sweetest stage, real butter, and no fancy tricks—just pure, homemade goodness.

The tradition of banana cake dates back to the early 20th century when home bakers started using overripe bananas to avoid waste. Its popularity only grew as families passed down their favorite versions, making it a treasured dessert in countless households.


Ingredients for the Perfect Old-Fashioned Banana Cake

Getting your ingredients right is the key to nailing this nostalgic treat. Use fresh, whole ingredients whenever possible for the most authentic flavor.

Classic Banana Cake Ingredients Table

IngredientQuantityNotes
Ripe bananas3 mediumThe spottier, the better
All-purpose flour2 cupsSifted for a lighter texture
Baking soda1 tspHelps with rise
Salt1/2 tspBalances sweetness
Unsalted butter1/2 cupRoom temperature
Sugar1 cupCan substitute brown sugar
Eggs2 largeRoom temperature
Vanilla extract1 tspAdds depth of flavor
Buttermilk or yogurt1/2 cupFor moisture and tang

How to Make an Old-Fashioned Banana Cake Step by Step

You don’t need fancy equipment or culinary school techniques. Just follow these simple instructions and you’ll be savoring a slice of homemade bliss in no time.

Instructions

  1. Preheat your oven to 350°F (175°C).
  2. Grease and lightly flour an 8-inch round or square baking pan.
  3. Mash the ripe bananas in a small bowl and set aside.
  4. In a large bowl, cream the butter and sugar until light and fluffy.
  5. Add eggs one at a time, mixing well after each addition. Stir in vanilla.
  6. In a separate bowl, whisk together the flour, baking soda, and salt.
  7. Gradually add the dry ingredients to the creamed mixture, alternating with buttermilk.
  8. Gently fold in the mashed bananas.
  9. Pour the batter into your prepared pan and smooth the top.
  10. Bake for 35–40 minutes, or until a toothpick inserted into the center comes out clean.
  11. Cool for at least 10 minutes before removing from the pan. Let it cool completely on a wire rack before frosting.

Optional Add-ins

  • 🥜 Chopped walnuts
  • 🍫 Dark chocolate chips
  • ☕ A pinch of cinnamon or nutmeg

Frosting Options for Your Banana Cake

The beauty of this cake is its versatility. You can enjoy it plain, or add a frosting that complements its flavor.

  • Cream Cheese Frosting: A tangy and smooth choice that pairs beautifully with the sweetness.
  • Brown Butter Icing: Adds a rich, nutty flavor that elevates the entire cake.
  • Classic Buttercream: A simple vanilla buttercream for that extra touch of sweetness.

Frosting Tips

  • Always let the cake cool completely before frosting.
  • Store frosted cake in the fridge to maintain freshness.

Storage and Make-Ahead Tips

Life gets busy, but that doesn’t mean you can’t plan ahead. Here’s how you can store your cake for later enjoyment:

  • ☕ Store the cake at room temperature (unfrosted) for 2 days in an airtight container.
  • ❄️ Refrigerate frosted cake for up to 5 days.
  • 🌧️ Freeze unfrosted cake layers for up to 3 months. Wrap in parchment and then foil.

Variations of Old-Fashioned Banana Desserts

Feeling inspired? There are many delicious ways to give the classic banana flavor a fresh twist:

  • 🍪 Banana Cream Pie with a buttery graham cracker crust and whipped topping.
  • Banana Bread Pudding using leftover banana bread.
  • 🍬 Mini Banana Cupcakes with chocolate or caramel drizzle.

Healthier Swaps for a Guilt-Free Banana Cake

Looking to lighten things up? You can tweak this recipe without sacrificing flavor:

  • Replace butter with Greek yogurt or mashed avocado.
  • Swap sugar with honey or maple syrup.
  • Use whole wheat flour or oat flour.

These changes make it easier to enjoy your favorite treat while sticking to your health goals.


FAQ – Old-Fashioned Banana Recipes

Can I use frozen bananas in old-fashioned banana cake?

Absolutely! Thawed frozen bananas work perfectly. Just drain any excess liquid before mashing.

What’s the difference between banana bread and banana cake?

Banana bread is denser and usually not frosted, while banana cake is lighter, fluffier, and often topped with frosting.

How ripe should bananas be for old-fashioned banana cake?

The riper, the better. You want bananas that are heavily spotted or even blackened on the outside.

Can I make this cake gluten-free?

Yes, by using a 1:1 gluten-free flour blend and ensuring other ingredients are certified gluten-free.


Perfect Pairings – What to Serve with Old-Fashioned Banana Cake

This cake is delicious on its own, but these sides can elevate your dessert experience:

  • ☕ A hot cup of tea or coffee
  • 🍦 A scoop of vanilla or cinnamon ice cream
  • 🍇 Fresh berries or caramel drizzle

Reader Tips & Memories – Share Yours!

Have your own version of this cake? Maybe a family story behind it? Share your memories in the comments or on social media. Your twist could inspire someone else!


Conclusion – Why You’ll Always Come Back to This Old-Fashioned Favorite

There’s something timeless about an old-fashioned banana cake. It’s more than just dessert—it’s a reminder of the joy in simplicity. Whether you’re baking for a special occasion or a cozy night in, this cake delivers the comfort you didn’t know you needed.

So go ahead, let those bananas ripen on the counter, gather your ingredients, and bring a piece of the past into your present.


Call to Action

Ready to turn your ripe bananas into something unforgettable? Bake this old-fashioned banana cake today and tag your creation on Instagram using #HeltRecipes. We can’t wait to see your version of this sweet classic!

Irresistible Nutella Swirl Banana Bread – A Guilt-Free Treat You’ll Love

Introduction – Why You’ll Fall in Love With Nutella Swirl Banana Bread

There’s something about the comforting aroma of banana bread baking in the oven that takes you back to warm, familiar moments. Now, imagine elevating that classic recipe with swirls of rich, velvety Nutella. That’s what this guide is all about—helping you make the ultimate Nutella Swirl Banana Bread, naturally sweetened, perfectly moist, and entirely irresistible. Whether you’re baking for your family, impressing guests, or just treating yourself, this recipe brings together comfort and indulgence in every bite.

What Makes Nutella Swirl Banana Bread So Special?

You may be wondering, what’s the big deal about adding Nutella to banana bread? Here’s why this recipe is so beloved:

  • Naturally Sweetened: Thanks to ripe bananas, you won’t need to add refined sugar.
  • Rich Flavor: The chocolate-hazelnut swirl enhances the banana flavor without overpowering it.
  • Soft and Moist Texture: Yogurt helps achieve that perfectly tender crumb.
  • Visual Appeal: The Nutella swirl gives it a bakery-style look right at home.

Whether you enjoy it as breakfast, a snack, or dessert, this bread suits any time of day.

Ingredients Breakdown – What You Need to Make Nutella Swirl Banana Bread

Table of Ingredients

IngredientQuantity
Ripe bananas (mashed)3 medium
Eggs2
Greek yogurt (plain)1/3 cup
Vanilla extract1 tsp
Whole wheat flour1 1/2 cups
Baking soda1 tsp
Ground cinnamon (optional)1/2 tsp
Salt1/4 tsp
Nutella (slightly warmed)1/4 cup

Ingredient Notes

  • Overripe bananas give maximum sweetness and flavor.
  • You can swap Greek yogurt for unsweetened applesauce for a dairy-free version.
  • Want a healthier twist? Opt for sugar-free hazelnut spread instead of Nutella.

Step-by-Step Instructions for the Perfect Nutella Swirl Banana Bread

Nutella Swirl Banana Bread

Preparation Method

Follow these easy steps and you’ll have a gorgeous, delicious loaf in under an hour.

  1. Preheat your oven to 350°F (175°C). Grease a 9×5-inch loaf pan or line with parchment.
  2. Mash the bananas in a large bowl until smooth.
  3. Add the eggs, yogurt, and vanilla. Mix until well combined.
  4. In another bowl, whisk together flour, baking soda, cinnamon, and salt.
  5. Stir the dry ingredients into the wet mixture until just combined—do not overmix.
  6. Pour the batter into the prepared loaf pan.
  7. Drizzle warmed Nutella on top of the batter.
  8. Swirl gently using a knife or toothpick to create a marbled pattern.
  9. Bake for 50-60 minutes or until a toothpick inserted in the center comes out clean.
  10. Cool on a wire rack before slicing and serving.

Storage Tips

  • Room temperature: Store in an airtight container for 2–3 days.
  • Refrigerator: Keeps fresh up to 5 days.
  • Freezer: Wrap slices in plastic and store for up to 3 months.

Healthier Swaps for Your Nutella Banana Bread Recipe

Want to make your banana bread even more nourishing? Here are a few ideas:

  • Flour: Swap with oat flour or almond flour for a gluten-free version.
  • Nutella: Choose no-added-sugar spreads or make your own using hazelnuts and cocoa.
  • Oil-free version: Greek yogurt or applesauce keeps it moist without the fat.
  • Add-ins: Mix in flaxseed, chopped walnuts, or dark chocolate chips for an extra health boost.

Serving Suggestions and Pairing Ideas

  • Warm a slice and top with Greek yogurt and a drizzle of honey.
  • Serve with a cup of almond milk latte or herbal tea for a cozy breakfast.
  • Add a scoop of sugar-free vanilla ice cream for a balanced dessert.
  • Toast it lightly and spread with almond butter for a protein-rich snack.

Bonus Tips for Making the Best Banana Bread Every Time

Baking Advice

  • Always use very ripe bananas with brown spots.
  • Don’t overmix the batter; it makes the bread dense.
  • Let it rest before slicing to keep it from crumbling.
  • Use parchment paper to lift it easily from the pan.

FAQ – Nutella Swirl Banana Bread

Can I make Nutella Swirl Banana Bread gluten-free?

Yes! Use a gluten-free all-purpose flour blend or oat flour. Ensure it’s designed for baking to maintain texture.

Is there a sugar-free version of Nutella I can use?

Definitely. Look for hazelnut spreads sweetened with stevia or monk fruit, or make your own.

Can I bake this recipe as muffins instead of a loaf?

Absolutely. Pour batter into a muffin tin and bake for 20-25 minutes at 350°F.

How ripe should the bananas be?

The best bananas are heavily spotted or almost black. They’re easier to mash and naturally sweet.

Printable Recipe Card

Nutella Swirl Banana Bread (No Sugar Added)

  • Prep time: 10 minutes
  • Cook time: 50-60 minutes
  • Total time: ~1 hour
  • Servings: 8 slices

Ingredients:

  • 3 ripe bananas
  • 2 eggs
  • 1/3 cup Greek yogurt
  • 1 tsp vanilla
  • 1 1/2 cups whole wheat flour
  • 1 tsp baking soda
  • 1/2 tsp cinnamon
  • 1/4 tsp salt
  • 1/4 cup Nutella, slightly warmed

Instructions:

  1. Preheat oven and prep pan.
  2. Mix wet and dry ingredients separately.
  3. Combine and pour batter into pan.
  4. Swirl in Nutella.
  5. Bake for 50-60 minutes.
  6. Cool and enjoy!

Conclusion – Your New Favorite Banana Bread Recipe

Now you have everything you need to make a better-for-you banana bread that looks fancy but is totally doable. With its natural sweetness and Nutella magic, this is one recipe you’ll keep returning to. Don’t be surprised if it disappears in minutes!

🍰 The Best Peach Upside-Down Cake for Your Summer Moments

📝 Why Peach Upside-Down Cake Feels Like Home

Have you ever tasted something that instantly brought you back to warm afternoons and sun-drenched kitchens? That’s exactly what this peach upside-down cake delivers. It’s not just a dessert—it’s a trip down memory lane. The moment you flip that golden, caramel-glazed masterpiece onto a plate, you know you’re in for something special. Whether it was your grandmother’s Sunday specialty or something you tried once at a summer picnic, this cake taps into something deeper: comfort, simplicity, and a little slice of sunshine.

If you’re craving a dessert that balances retro charm with irresistible flavor, you’re in the right place. This isn’t just another cake recipe—it’s the one your summer needs.


🍎 Peach Upside-Down Cake: A Retro Classic with a Modern Twist

Peach upside-down cake is a vintage dessert making a huge comeback, and it’s easy to see why. Picture this: buttery sponge cake meets juicy peaches bathed in brown sugar caramel. The moment you flip the cake and reveal that glistening fruit top, you’re creating a dessert worthy of applause.

What Makes It Different?

  • Unlike its cousin, the pineapple version, this one has a mellow, summery vibe.
  • The caramelized sugar blends perfectly with peach juices, forming a syrupy topping.
  • You get a moist, flavorful crumb without needing frosting.

Perfect for summer barbecues, family get-togethers, or lazy brunches—this cake is nostalgia in every bite.


🌟 Top Reasons You Need to Try This Peach Upside-Down Cake

Still wondering if it’s worth baking? Let’s make that decision easier:

  • Juicy & Moist: The peaches bake into the cake, adding moisture and sweetness.
  • Visually Stunning: Those golden fruit slices glisten and impress.
  • Perfect for Summer: Fresh or canned peaches work, making it versatile.
  • No Fancy Tools Required: One pan, one bowl, one whisk. That’s all.
  • Vegan or Gluten-Free? It’s easy to adapt.

Your guests won’t just eat it. They’ll talk about it.


📆 Peach Upside-Down Cake Ingredients – What You’ll Need

Let’s break it down so you can prep with confidence. Here’s a handy table for your kitchen planning:

📄 Ingredient Table

ToppingCake Batter
2 tbsp unsalted butter1/2 cup unsalted butter (soft)
1/3 cup brown sugar2/3 cup granulated sugar
5–6 peach slices (fresh or canned)2 eggs
1 tsp vanilla extract
1 1/4 cups all-purpose flour
1 1/2 tsp baking powder
1/4 tsp salt
1/2 cup whole milk (or almond)

👩‍🍳 How to Make the Perfect Peach Upside-Down Cake

Get ready to create your own showstopper. Follow these simple steps:

Step-by-Step Instructions

  1. Preheat your oven to 175°C (350°F).
  2. Grease a 9-inch round cake pan. Pour in melted butter and sprinkle the brown sugar evenly.
  3. Arrange the peach slices in a spiral or fan pattern over the sugar.
  4. Cream the softened butter with granulated sugar until fluffy.
  5. Add eggs, one at a time. Stir in vanilla extract.
  6. Mix dry ingredients in a separate bowl: flour, baking powder, salt.
  7. Alternate mixing: Add flour mixture and milk to the wet batter in parts.
  8. Pour the batter gently over the peaches. Spread it evenly.
  9. Bake for 35–40 minutes or until a toothpick comes out clean.
  10. Cool 10 minutes, then flip it gently onto a plate.

✅ Quick Checklist

  • [ ] Peaches dry and sliced evenly
  • [ ] Cake batter lump-free
  • [ ] Oven fully preheated
  • [ ] Serve warm with a scoop of vanilla ice cream

💡 Baking Tips for a Flawless Upside-Down Cake

To ensure your cake looks as good as it tastes:

  • Use ripe but firm peaches: Too soft? They’ll fall apart. Too firm? Less juicy.
  • Drain canned peaches thoroughly if using.
  • Grease your pan well to prevent sticking.
  • Don’t skip the cooling time before flipping.
  • Add a twist: A pinch of nutmeg or a splash of bourbon works wonders.

✨ Fun Peach Upside-Down Cake Variations to Customize

You can make this classic your own in countless ways:

  • 🍇 Peach + Berry: Add raspberries or blueberries for a tangy kick.
  • 🍼 Boozy Peach: Mix 1 tbsp of bourbon into your topping.
  • 🌿 Vegan Version: Use vegan butter and flax eggs.
  • 🌾 Gluten-Free: Substitute all-purpose flour with almond flour and GF blend.
  • 🥜 Mini Upside-Down Cakes: Use muffin tins for party-ready servings.

❄️ How to Store and Reheat Peach Upside-Down Cake

Yes, you can make this ahead and enjoy it later!

  • Store: Keep in an airtight container in the fridge for up to 4 days.
  • 🧋 Reheat: Microwave individual slices for 15–20 seconds.
  • ❄️ Freeze: Wrap slices in cling film and store in freezer for up to 2 months.

Serve it warm again with ice cream or whipped cream for a brand-new day of indulgence.


❓ Your Peach Upside-Down Cake Questions Answered

🤔 Can I use canned peaches?

Absolutely. Just drain and dry them well before using to prevent excess moisture.

🤔 How do I prevent the cake from sticking?

Generously grease your pan, use parchment paper if needed, and let it cool before flipping.

🤔 Can I make it a day ahead?

Yes! It actually tastes better the next day. Reheat gently before serving.

🤔 Can I use almond or oat milk instead of regular?

Yes. Both work beautifully in this recipe.


🎈 Ready to Bake Your Peach Upside-Down Cake?

You’ve got the knowledge. You’ve got the ingredients. Now it’s time to make some memories. This peach upside-down cake is more than a dessert—it’s a conversation starter, a smile-bringer, a nostalgic showpiece.

🚀 Your turn! Bake it, love it, and share it. Don’t forget to tag us @HeltRecipes with #PeachUpsideVibes.


Because some desserts aren’t just recipes. They’re stories.

Peach Upside

🥕 Classic Carrot Cake Recipe with Cream Cheese Frosting – A Comfort Dessert That Never Fades

Why Carrot Cake Feels Like Home

There’s something about the scent of cinnamon and nutmeg wafting through your kitchen that feels like a hug from the past. If you’ve ever sat at a family table with a warm slice of Carrot Cake in front of you, topped with a velvety layer of cream cheese frosting, you know that comfort has a flavor. This cake isn’t just dessert – it’s a celebration of memories, warmth, and tradition. And in 2025, it’s making a trendy comeback in brunch menus and mini-layer cake versions.

What Makes Carrot Cake Irresistible?

You might wonder, why does carrot cake never go out of style? It’s the perfect blend of textures and flavors:

  • Moist and tender crumb thanks to freshly grated carrots and oil
  • A balance of sweet, spice, and nutty richness
  • That tangy, rich cream cheese frosting that makes every bite indulgent

Today, you’ll learn how to bake your own foolproof carrot cake with variations you can call your own.

Carrot Cake Ingredients Breakdown – What You Need and Why

Key Cake Ingredients

IngredientPurpose
Grated carrotsNatural sweetness and moisture
All-purpose flourBase structure
Sugar (brown/white)Sweetness and caramel-like flavor
EggsHelps bind and provide structure
OilKeeps the cake moist and tender
Walnuts or pecansAdds crunch and nutty depth
Cinnamon, nutmegWarm, comforting spice notes
Baking powder/sodaEnsures proper rise

Cream Cheese Frosting Ingredients

IngredientPurpose
Cream cheeseRich, tangy base for frosting
ButterCreamy texture and stability
Powdered sugarSweetness and silky texture
Vanilla extractBalances the tanginess with warmth

Step-by-Step Carrot Cake Recipe

Cake Preparation

  1. Preheat your oven to 175°C (350°F). Grease and flour your cake pan.
  2. Whisk together dry ingredients: flour, baking soda, cinnamon, and nutmeg.
  3. In another bowl, beat eggs and sugar until light and fluffy.
  4. Stir in oil, then fold in grated carrots and chopped nuts.
  5. Combine dry and wet ingredients until smooth.
  6. Pour into prepared pan and smooth the top.
  7. Bake for 35–45 minutes or until a toothpick comes out clean.
  8. Cool completely before frosting.

Cream Cheese Frosting Instructions

  • Beat softened cream cheese and butter until creamy.
  • Gradually mix in powdered sugar and vanilla extract.
  • Spread or pipe onto your cooled carrot cake.
  • Top with extra walnuts or orange zest for a decorative finish.

Variations to Try – Make It Your Own

Want to experiment? Here are ways to personalize your carrot cake:

  • Add crushed pineapple for tropical notes
  • Stir in shredded coconut or golden raisins
  • Use almond flour for a gluten-free twist
  • Try mini bundt molds or cupcake tins for brunch-friendly servings
  • Add orange zest or a dash of ground ginger for a fresh zing

Nutritional Info & Storage Tips

Carrot cake is rich, yes, but every slice is worth savoring.

  • Calories per slice: ~350–400 depending on size and frosting
  • Storage: Refrigerate in an airtight container up to 5 days
  • Freezing: Unfrosted cake layers freeze well for up to 3 months
Carrot Cake

Perfect Occasions for Serving Carrot Cake

This cake suits every season and setting:

  • Easter brunch
  • Autumn tea parties
  • Birthdays (especially with layered versions!)
  • Potlucks or holiday dinners
  • Just because you’re craving something cozy

Conclusion – Your Next Go-To Cake Recipe

There are cakes, and then there are cakes that tell stories. Carrot cake is the latter. You now have everything you need to bake this timeless treat from scratch, impress guests, or simply spoil yourself. Once it enters your recipe rotation, don’t be surprised if you get requests to bring it again and again.

Frequently Asked Questions (FAQs) – Carrot Cake Edition

Can I use butter instead of oil?

Yes, but oil provides more moisture. If you want a richer texture and buttery flavor, substitute part or all of the oil with melted butter.

How finely should I grate the carrots?

Use a fine or medium grater. Too large and the carrots might stay crunchy. Too fine and they might disappear into the batter.

Can I make carrot cake ahead of time?

Absolutely. It tastes even better after a day or two as the flavors meld. Just refrigerate it, especially with the cream cheese frosting.

Is carrot cake healthy?

While it does include carrots and nuts, it’s still a dessert. You can make it healthier by reducing sugar or using whole-wheat flour.

✅ Call to Action

Ready to bake? Try this recipe and share your carrot cake creation online with the hashtag #CarrotCakeLove. Got a twist to add? Drop it in the comments or tag us – we love discovering your sweet spins!

Chocolate Chip Cookie Cake: The Ultimate Giant Treat Everyone Loves ✪

Chocolate Chip Cookie Cake

If you’re craving something warm, nostalgic, and completely satisfying, you’re in the right place. The Chocolate Chip Cookie Cake is not just a dessert—it’s a celebration on a plate. Imagine the comfort of a freshly baked cookie combined with the grandeur of a cake. It’s chewy in the middle, slightly crisp on the edges, and overflowing with melty chocolate chips. Whether you’re throwing a birthday party, celebrating a milestone, or simply in need of something sweet, this recipe brings the perfect balance of taste, texture, and joy.

Chocolate Chip Cookie Cake

A Delicious Fusion of Two Classics

You’ve probably had chocolate chip cookies and you’ve definitely eaten cake, but this dessert is where the two worlds collide in the most delightful way. A Chocolate Chip Cookie Cake takes the gooey, buttery goodness of a traditional cookie and turns it into a sliceable cake.

  • Chewy interior like a soft cookie
  • Firm enough to cut clean slices
  • Typically baked in a round or square pan
  • Often topped with frosting or fun decorations

Unlike store-bought versions packed with preservatives, this homemade version is full of flavor and easy to customize.


The Best Dessert for Any Occasion

There are countless reasons why this treat might become your go-to dessert:

  • Perfect for birthdays and special events
  • Simple to make with pantry staples
  • No need to scoop individual cookies
  • Less cleanup compared to traditional cookies
  • Customizable with toppings, fillings, and frostings

This dessert offers the best of both worlds—the nostalgia of cookies and the celebration factor of cake.


Pantry Staples with Maximum Flavor

Before you get baking, make sure you have all the essentials ready. Here’s everything you need to make your very own Chocolate Chip Cookie Cake:

Ingredient Table

IngrédientQuantité
Beurre doux (mou)250 g
Sucre brun200 g
Œufs2
Extrait de vanille1 c. à café
Farine300 g
Levure chimique1 c. à café
Sel1 pincée
Pépites de chocolat200 g

📝 Pro Tip: For deeper flavor, use dark brown sugar and a mix of dark and semi-sweet chocolate chips.


Quick and Easy Prep Instructions

Follow this guide for a flawless result every time:

  1. Preheat your oven to 180°C (350°F).
  2. Cream together the butter and sugar until light and fluffy.
  3. Add the eggs one by one, followed by the vanilla extract.
  4. In a separate bowl, whisk together the flour, baking powder, and salt.
  5. Combine the dry ingredients with the wet ingredients.
  6. Fold in the chocolate chips evenly.
  7. Spread the dough into a greased or lined baking pan.
  8. Bake for 25-30 minutes or until the top is golden.
  9. Cool before slicing into portions.

For an extra indulgent touch, serve warm with a scoop of vanilla ice cream or drizzle with caramel sauce.


From Texture to Taste – What Makes the Difference?

To ensure your cookie cake turns out perfect, keep these baking insights in mind:

  • Avoid overbaking: Pull the cake out once the edges are golden but the center still looks a bit soft.
  • Chill your dough for 15-30 minutes to enhance flavor and reduce spreading.
  • Use parchment paper for easy lifting and clean edges.
  • Mix-ins matter: Try white chocolate chips, chopped nuts, or sprinkles.
  • Decorate with frosting or writing for personalized messages.

Storage and Freezing Instructions

Keep It Fresh Longer

The beauty of this dessert is that it stores well. Here’s how to keep it fresh:

  • Store in an airtight container at room temperature for up to 5 days.
  • Freeze whole or sliced in plastic wrap for up to 2 months.
  • Reheat slices in the microwave for 15 seconds to enjoy a warm, gooey bite.

Nutritional Information (Approximate)

Know What You’re Eating

NutrientPer Slice (1/12)
Calories370
Fat20g
Carbohydrates45g
Sugars25g
Protein4g

Note: Values may vary depending on your ingredient brands.


Serving Suggestions & Variations

Why settle for just chocolate chips when you can elevate your cookie cake in multiple ways?

  • Add a layer of chocolate ganache on top
  • Drizzle with peanut butter or caramel
  • Decorate with frosting borders and sprinkles
  • Slice into fun shapes with cookie cutters
  • Serve with fruit and whipped cream for a lighter option

Yes! Substitute each egg with a flax egg (1 tbsp ground flax + 3 tbsp water) or commercial egg replacers.

A 9-inch round or 8×8 square pan works best. For thinner cookies, go larger.

Don’t overbake it, and store it in an airtight container. A slice of bread in the container can help maintain moisture.

Can I double this recipe?

Absolutely. Just use a larger pan (like 13×9 inches) and adjust the bake time by 5-10 minutes.


When you bake a Chocolate Chip Cookie Cake, you’re not just making dessert. You’re crafting an experience—one that combines rich flavor with homemade warmth. Whether you’re baking for others or treating yourself, this recipe offers a reliable, delicious, and endlessly adaptable go-to.

So what are you waiting for? Gather your ingredients, preheat your oven, and let the baking begin. Your future self will thank you for every chocolatey bite.


📣 Call to Action:

Tried this recipe? Share your cookie cake masterpiece on social media and tag us with #ChocolateChipCookieCake. Want more feel-good dessert ideas? Subscribe to our newsletter and never miss a sweet moment!

Glazed Lemon Loaf Cake – A Moist & Zesty Delight Inspired by American Bakeries

There’s Magic in Every Slice

Have you ever walked into your kitchen on a slow weekend morning, craving something cozy and citrusy, something that makes the house smell like sunshine? That’s exactly where your Glazed Lemon Loaf Cake fits in. Whether you’re preparing brunch for friends or treating yourself to a golden afternoon snack, this moist, lemony loaf with a sweet, tangy glaze delivers comfort and joy in every bite.

Let’s dive into what makes this cake not just a treat but a baking ritual you’ll want to revisit.


Why You’ll Love This Glazed Lemon Loaf Cake

A Balance of Sweet and Tart

  • The natural brightness from freshly squeezed lemon juice and finely grated zest adds the perfect citrusy lift.
  • The glaze, made from powdered sugar and more lemon juice, creates a delightful sweet-and-sour finish.

Moist Texture That Lasts

  • Yogurt and vegetable oil work wonders for creating a soft, tender crumb that stays fresh for days.

Simple Ingredients, Big Results

  • You won’t need any fancy equipment or hard-to-find ingredients.
  • It’s a beginner-friendly recipe with professional-level taste and presentation.

Ingredients for the Best Glazed Lemon Loaf Cake

Here’s what you’ll need to create this flavor-packed loaf:

Cake Ingredients:

IngredientQuantityNotes
All-purpose flour200 gSifted for a lighter crumb
Sugar150 gWhite granulated
Eggs2Room temperature
Yogurt120 mlPlain, unsweetened
Vegetable oil100 mlNeutral oil like canola
Lemon juiceFrom 2 lemonsFreshly squeezed
Lemon zestFrom 2 lemonsFinely grated
Baking powder1 tspFor rise and fluffiness
Salt1 pinchBalances sweetness

Glaze Ingredients:

IngredientQuantity
Powdered sugar100 g
Lemon juice2 tbsp (approx.)

How to Make Glazed Lemon Loaf Cake Step by Step

Preparation & Mixing

  1. Preheat your oven to 180°C (350°F).
  2. In a large mixing bowl, whisk together the eggs and sugar until light and creamy.
  3. Stir in the yogurt, oil, lemon juice, and zest.

Combining Dry & Wet Ingredients

  1. In a separate bowl, combine flour, baking powder, and salt.
  2. Gently fold the dry ingredients into the wet mixture. Don’t overmix—you want a soft, airy texture.

Baking

  1. Pour the batter into a greased or parchment-lined loaf pan.
  2. Bake for 40-45 minutes or until a toothpick inserted in the center comes out clean.
  3. Let the cake cool in the pan for 10 minutes, then transfer to a wire rack to cool completely.

Glazing

  1. Mix powdered sugar with lemon juice until smooth.
  2. Pour over the cooled loaf and allow it to set before slicing.

Recipe Variations and Add-Ons

Lemon Poppy Seed Twist

  • Add 1 tablespoon of poppy seeds to the batter for a classic American cafe flavor.

Extra Moist Version

  • Swap half the yogurt for sour cream to add even more richness.

Gluten-Free Adaptation

  • Replace regular flour with a 1:1 gluten-free baking mix.

Storage Tips and Make-Ahead Advice

  • Room Temperature: Store in an airtight container for up to 4 days.
  • Freezing: Wrap in foil and freeze for up to 2 months. Thaw and glaze just before serving.
  • Make-Ahead: Bake the cake a day in advance and add glaze the next morning for a fresh look.

Pro Baking Tips for Perfect Lemon Loaf

  • Always use fresh lemon juice for the brightest flavor.
  • Use a microplane zester to get the finest zest without the bitter pith.
  • Let the cake cool completely before glazing to avoid a runny mess.
  • Don’t overmix once the flour is added; it affects texture.
  • Use parchment paper to easily lift the cake out of the loaf pan.

FAQ – Glazed Lemon Loaf Cake

Can I use bottled lemon juice instead of fresh?

Fresh is preferred for better aroma and flavor, but bottled can work in a pinch.

What if I don’t have yogurt?

Greek yogurt or sour cream are great substitutes that maintain moisture.

How do I keep my loaf cake from sinking?

Avoid overmixing and don’t open the oven during the first 30 minutes.

Can I make this lemon loaf vegan?

Yes! Use flax eggs and a plant-based yogurt.

Is this recipe good for muffins?

Absolutely! Reduce baking time to 18-22 minutes for lemon muffins.


Time to Bake Your Glazed Lemon Loaf Cake

This cake is more than just a treat—it’s a warm hug in loaf form. Each slice delivers a burst of lemony brightness, balanced by a sweet, glossy glaze. Perfect with a cup of tea, coffee, or shared during your next brunch gathering.

Now it’s your turn.
Grab your lemons, roll up your sleeves, and bring some sunshine into your kitchen. Don’t forget to tag your creations with #LemonLoafLove so others can be inspired by your bake!

Matcha White Chocolate Cake Recipe – A Fusion of Elegance and Flavor

If you’ve ever craved a dessert that feels both luxurious and calming, you’re not alone. There’s something undeniably magical about the smooth, creamy sweetness of white chocolate fused with the earthy, slightly bitter notes of matcha green tea. The Matcha White Chocolate Cake isn’t just a treat — it’s a statement. Whether you’re serving it for a special celebration or treating yourself to a weekend indulgence, this cake offers a unique experience that delights the senses and brings a touch of sophistication to your table.

Why You’ll Love This Matcha Chocolate Cake

You’re probably used to seeing matcha in lattes or smoothies, but this cake takes it to a whole new level. Here’s what makes it stand out:

  • The rich, buttery flavor of white chocolate complements the umami of matcha perfectly.
  • It’s moist, fluffy, and just the right amount of sweet.
  • Visually stunning with its light green hue and glossy ganache.
  • Trending across U.S. bakeries, dessert cafes, and social media food accounts.
  • Easy to bake at home with just a few pantry staples.

Ingredients You’ll Need (with Measurements)

Main Cake Ingredients

IngredientAmountNotes
All-purpose flour1½ cups (180g)Sifted for light texture
Matcha powder2 tbspUse ceremonial-grade for best flavor and color
Baking powder2 tspFresh, for good rise
Salt¼ tspEnhances flavor
Unsalted butter½ cup (113g)Softened
White sugar¾ cup (150g)Granulated
Eggs3 largeRoom temperature
Vanilla extract1 tspBalances flavors
Milk½ cup (120ml)Full-fat or almond milk

White Chocolate Ganache

IngredientAmountPurpose
White chocolate chips1 cup (180g)Use premium quality for flavor
Heavy cream½ cup (120ml)Creates a smooth, pourable ganache

Step-by-Step Instructions for Matcha White Chocolate Cake

Preparing the Cake Base

  1. Preheat your oven to 350°F (175°C). Line an 8-inch cake pan with parchment paper.
  2. In a large bowl, sift together flour, matcha, baking powder, and salt. This helps prevent clumping and gives you a fluffy cake.
  3. In another bowl, cream the butter and sugar until light and airy. Use a hand mixer for the best results.
  4. Add eggs one at a time, mixing well after each addition. Stir in vanilla extract.
  5. Alternate adding the dry mix and milk to your wet mixture, starting and ending with the dry. Mix until just combined.
  6. Pour the batter into your prepared pan and bake for 28 to 32 minutes, or until a toothpick inserted in the center comes out clean.
  7. Allow the cake to cool in the pan for 10 minutes before transferring it to a wire rack.

Making the White Chocolate Ganache

  1. In a small saucepan, heat the cream until it starts to simmer.
  2. Remove from heat and pour over white chocolate chips in a heatproof bowl.
  3. Let it sit for 2 minutes, then stir gently until smooth.
  4. Cool slightly before pouring over your cooled cake.

Tips to Make the Perfect Matcha Cake

  • Sift your matcha to avoid bitter lumps and keep the cake vibrant.
  • Don’t overmix once you combine wet and dry ingredients.
  • Make sure your eggs and butter are at room temperature.
  • Use good-quality white chocolate; it makes a huge difference in flavor.

Variations to Try for Matcha White Chocolate Cake

  • Add a hint of lemon zest for a citrusy touch.
  • Mix in macadamia nuts for crunch.
  • Swap in coconut milk to give a tropical feel.

Vegan or Gluten-Free Options

  • Use a plant-based milk and dairy-free butter substitute.
  • Choose gluten-free all-purpose flour for a one-to-one replacement.
  • Opt for vegan white chocolate, available in many health food stores.

How to Store and Serve Matcha White Chocolate Cake

  • Store at room temperature in an airtight container for up to 3 days.
  • For longer freshness, refrigerate for up to 5 days.
  • Bring it to room temperature before serving to revive the texture.
  • Serve with fresh berries, whipped cream, or an extra drizzle of ganache.

This cake isn’t just delicious, it’s fashionable. If you’re active on food TikTok or Pinterest, you’ve seen matcha everywhere. Here’s why this dessert is blowing up:

  • Fits the wellness trend (matcha is rich in antioxidants).
  • Aesthetic appeal makes it Instagram-worthy.
  • It appeals to fans of both Asian-inspired cuisine and modern fusion baking.
  • Easily customizable for various dietary preferences.

FAQs – Matcha White Chocolate Cake

Can I use culinary matcha instead of ceremonial?

Yes, but ceremonial-grade matcha gives a better color and flavor. Culinary works too, especially in baked recipes.

What can I use instead of heavy cream for ganache?

You can substitute full-fat coconut cream or oat cream for a dairy-free version.

Why did my matcha cake turn brown?

Matcha is heat-sensitive. Bake at a lower temperature or for less time to preserve the green hue.

Can I freeze the cake?

Absolutely. Wrap slices tightly and freeze for up to a month. Thaw at room temp.

Conclusion – Make This Green Dream Yours

There’s a reason Matcha White Chocolate Cake is winning hearts across kitchens and cafes alike. With its unique flavor, soft crumb, and luscious topping, it’s a recipe you’ll want to keep on repeat. Whether you’re celebrating or simply enjoying a quiet afternoon, this cake offers both elegance and comfort. Try it once, and you may find it becomes your new signature bake.

Call to Action

If you try this Matcha White Chocolate Cake recipe, share your creation on Instagram and tag us with #MatchaWhiteChocolateCake. We love seeing your bakes and featuring your photos on our page!