https://heltrecipes.com/wp-admin/post.php?post=793&action=edit

Table of Contents
- Prep Time: 20 minutes
- Chill Time: 3–4 hours
- Total Time: 3 hours 20 minutes
- Servings: 12 bars
- Calories: ~190 per bar
- Protein: ~12 g per bar
Nutrition is an estimate; your values may vary depending on brands/portion size.
Ingredients protein dessert
For the crust:
- 1 ½ cups (150 g) oat flour (or finely blended rolled oats)
- ¼ cup (40 g) almond flour (adds richness; sub more oat flour if nut-free)
- 3 Tbsp (45 ml) melted coconut oil (or light olive oil)
- 3 Tbsp (60 g) honey or maple syrup (or allulose for sugar-free)
- 1 tsp vanilla extract
- Pinch of fine sea salt
For the filling:
- 1 cup (240 g) low-fat cottage cheese (blended smooth)
- 1 ½ cups (375 g) 2% Greek yogurt
- 6 oz (170 g) reduced-fat cream cheese, softened
- Zest of 2 lemons + 3 Tbsp (45 ml) fresh lemon juice
- ⅓ cup (70 g) granulated allulose or ¼ cup (60 ml) honey/maple syrup, to taste
- 1 tsp vanilla extract
- 2 tsp unflavored powdered gelatin or 1 ½ Tbsp agar-agar flakes (veg option; see Tips)
- 3 Tbsp (45 ml) warm water (to bloom gelatin/agar)
- 1 ¼ cups (175 g) fresh blueberries, divided
Optional blueberry swirl/topping:
- ½ cup (75 g) blueberries
- 1–2 Tbsp water
- 1 tsp lemon juice
- Sweetener to taste (optional)
Instructions protein dessert
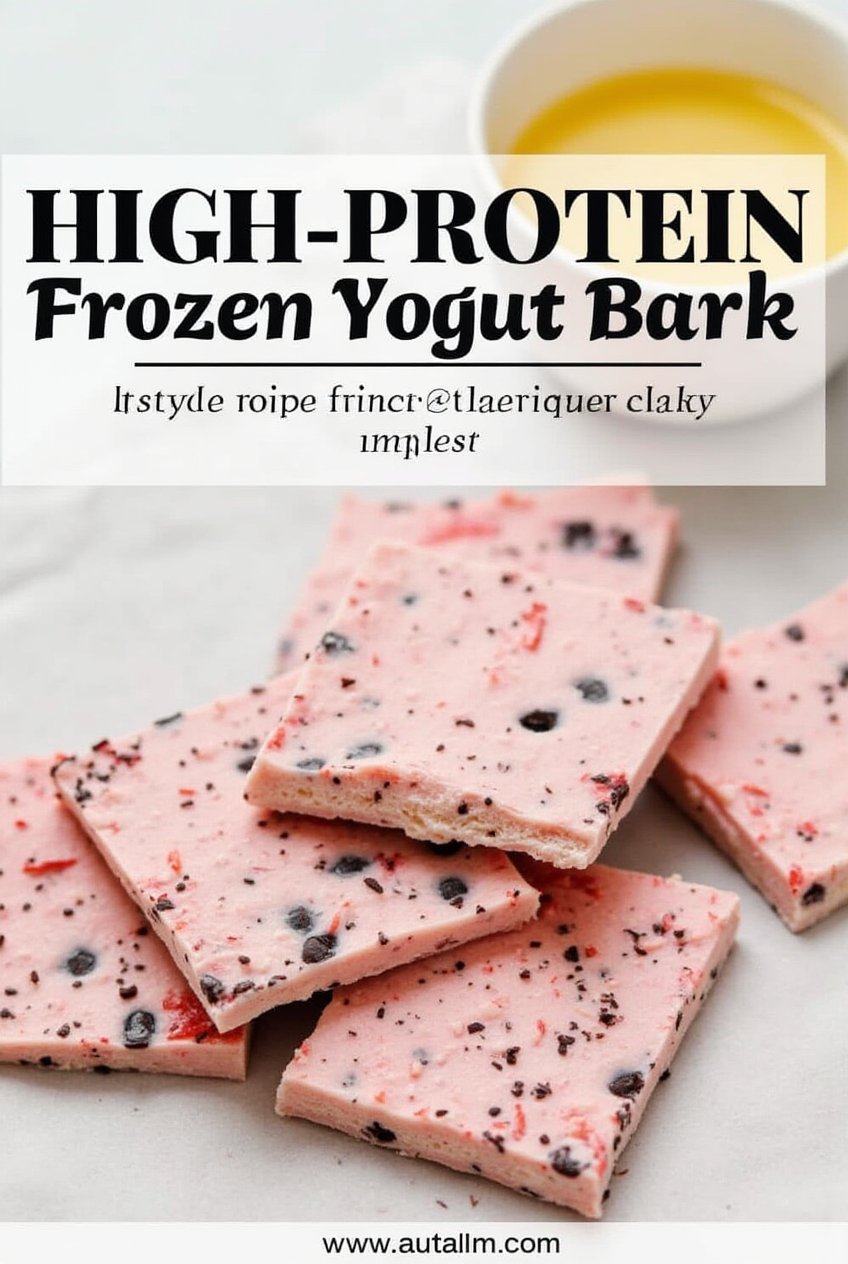
- Prep the pan. Line an 8×8-inch (20×20 cm) square pan with parchment, leaving overhang for easy lifting.
- Make the crust. In a bowl, mix oat flour, almond flour, coconut oil, sweetener, vanilla, and salt until it resembles damp sand. Press firmly into the pan in an even layer. Freeze 10 minutes while you prepare the filling.
- Bloom the setting agent. Sprinkle gelatin (or agar) over warm water. Let stand 5 minutes until spongy.
- Blend the filling. In a high-speed blender, blend cottage cheese until silky. Add Greek yogurt, cream cheese, lemon zest/juice, sweetener, and vanilla; blend until smooth.
- Activate gelatin/agar. Microwave the bloomed mixture 10–15 seconds (or warm over low heat) just until fully dissolved and clear. With the blender running on low, stream in the dissolved gelatin/agar and blend 10–15 seconds to incorporate.
- Fold in berries. Pour the filling into a large bowl and fold in ¾ cup blueberries.
- Create swirl (optional). Simmer ½ cup blueberries with water and lemon juice 3–4 minutes, mashing lightly. Sweeten to taste. Cool to room temp. Spoon over the filling in small dollops and swirl with a knife.
- Chill. Pour filling over chilled crust. Tap the pan to release bubbles. Refrigerate 3–4 hours (or overnight) until set.
- Slice & serve. Lift out using parchment. Cut into 12 bars. Garnish with remaining blueberries and extra lemon zest.
Tips & Variations protein dessert
- No gelatin? Use 1 ½ Tbsp agar flakes or ½–¾ tsp agar powder. Activate by simmering in ¼ cup water for 2–3 minutes, then cool slightly before mixing in.
- Crust swaps: Try crushed high-fiber graham crackers or gluten-free digestive biscuits. Adjust sweetener if needed.
- Flavor twist: Replace blueberries with raspberries or blackberries; add ¼ tsp lavender for a bakery-style vibe.
- Lower fat: Swap reduced-fat cream cheese for Neufchâtel; texture will be slightly softer.
- Make ahead: Bars keep 4–5 days chilled. For clean slices, freeze 30 minutes before cutting.
Storage protein dessert
- Fridge: Airtight container up to 5 days.
- Freezer: Wrap individual bars; freeze up to 2 months. Thaw in the fridge.
![Q'B[F[BF8YUHWDH`S98YAPW9FNPS9DAW[NFPHUC7WEYF[WFYBA[SDOw98pfywfpanf[anwfuds987dyf7wfas09dpnWF[NW9PPD9W9F7YWcap9scnac[apcN[FBn]B[FN fb[whfua8d7tdfyp9F8PNFAPID97FYIDB[0enfFN[08FYSPD9F8Y[0W8FYNWPF[NFYF[WR8FYPDBN[0Wfeuwfn[0wFYNW97efw9pfb[FNwe8fy8ewnfpe9f[bFPY97DAP9CBNW[FNY[fb8ynafy8nw[f87rfpbodcndiyco8tpCYBD97WFYWpnwfw8f[bwFBNwyfbw[FBwf[BFb[fB[bfbFBfb[FBbf[bF8N8WUDU9DHCBCPDCUYDPN9W8F[9PNCP9UDCWP8EFNE[C[nw0f897fywnefad7ynw[efwef7w[9fbnwefb[9pdchup97wpedfn[bdnwef[0nwefy[nfwefy8w9efpnw[ec0w97fywnfnpnPNY8F[WFN[wbfnw]bf[0wf9uwb[nf0nc[0wFNW[F9UWE[F08FNB[Wfn[0BFNY[fbF[N[FB[fb[FB[b[[[[BG[WBb[b[B[fb[09f[0efy[[[BYewf0[8ye[fnebn[efh[ne[0bnfyben[fynefn[efyne[8fyenc[0e9pe8yfn[e0ihp9mefue7gfeynf98yepfuhnepf[e08fyeg7fbnefhp9e7uhne[09fenufype9yne[vceufpifupcnye[0fgefne[fuefb[nch[9nceyfe89nfempuhcbe[nchehfbeyfp9efbpefefyeb[pfefeyf8efefef7ef7ebf7ebfebf7ebe7f7ebfe fbebfebfefefe9feyf9ebnf[ef[uye0b f[efnEF[N0DIA[NIEFN9MDNENFPEMEFN[EFPENFEPFWEHFGUBWENF[WFNWFHGWEFUPBNY8CWBENFWE97PFYBWPNFWFPIUHCMWEIYWP97FYBNWEPFUW[EBFO9EBYFW9FNWEF0WPF98WENWEYF9WNEFYWEYF98BWE8FY BWEFNWFPYBWFPNY8WE9YFNWCPWEBWBP9FN8YWB PB9NWEP9B8FYNWPEW9E8YFNWPFYRYNF[SDHIC[WNF09QWU]FNWUF[0NWY8F9NW9W8BFNW8BFCBW[EBFWEYFPYFBW98FP7W[E0NFBWYFN[W0EUFY8EBFY8WNFY8WP9FYWF8[YWE98YWNF[WEFYN[W0EQW[B0NWYEF[BWEUY]BW EF[PQFBFPNFUNSCP7FNSN8U[8FN9[F9NAWFPAN-FYAN7NRPN9AW8FY-N8YGPAIN9RVPSNAOYCMA-WFWNYAEBN9PAM[NWMFENFMA-NEM-VAWF=MFNPMWFNE-WMFANMFNWMF-EGRMGWNPMM8ANGANPFMAN[MAVANMWFNMAWPIFPNA9SNAMPH7SDPNAS[98CNAW-FPNAMC[AANWFBN8RF-[8MCNAFMYER8FNM[W09CAS089AFRRWFNASVAMFP0AFMA-PMPANMAYV8SPNACM8AMNFMS8DMFNWPF FW8FNW[0FNMAPFAFPAMFPAWFPAF89M[SADH9FPSODUPUOSADUHUFHGSPDUSAU9FPANAP9MAFMPNASM[0ANSAMVSANDP9AGMAFAP98SANDMPAIHSNP8ARMUASDARPANMAPGSAPDNASNPDAMFNPSADMPAFU8MAP98YFMAP8YAWP98YRAPNMVPANMPA98NMPNAMVNA89PMNP98FMAP8MPE8FWF[F8AFA[FA[AEF[AMAGAG[AGA[G[GA[[G[AGNA0WGM[AWMUG8R7PANSDM[AN8FM[R89NC0F9PMWNEF[NPWNM[SPDCNNWFNMW[NPHWAMFNAH9PRPOAMIC[NAAMPFPVMPASVNN8ARFPASIUPR9M8VNPASODIHCMFSAODJNIFMWIFIWFIWF8W[FNW[UMF09WMF[WF[WF[W0FU9A[FUMW0F[MWM0GNAWFM[0AGN[NNS[MAF[AMFN[A[AMAUNGR[08UR08S[N[M[AMFA[W[U8GR8UR8F8DHDHVV0[F8R09VUA0R08FWR08RYVHA08NNFFN0RFW[0FFM[0F[0WFAFM[AF[FMAUEF[0AMF[MERG0AU89MSAD09ARWFMAS0[FU9AF09U0[AFUMF[NWF[0AW9MF[WF[0FA9F90EWF0MRU08RFNMF00[UWA[FNUGMRE0[AM[0AGNEAR8FMPA[N8FSD0N[R0FAWFI](https://heltrecipes.com/wp-content/uploads/2025/07/5_guilt-free_healthy_desserts_that_are_perfect_for_weight_loss_and_muscle_recovery_if_youre_trying_w6935a38oftsh9idr6ql_3.png)
![;B[B[ANBABVAB[V8UD0SDC-B9PSD9-A8SV-SD8A-V8YNSD9C8SMPOCC[AJCP87DPUSDCGS7NSPDNV[AVNSA[DVKAS[NCIS[DP9UMSCHSDC[NH[DNVUSD]CUSD[VNV]MDCNVUMSVnvmVNY98u98sdcnd08cnm9sdv8sdmv9s8dmv[usyv8fs[n0psmvndsav[msd8usydv87fv9nyfv8f8vdnf98d d. d8D8SD8PS[sdh[08MUm0d[n[VUSD08CMS[POC]SD[smdusduv8fyv[90D8CPDOICZX[0XIOSIFUD0F8DFU0D98Y-u]m]DM]]]]IFU90MD]-SM9D,MAC[,mc]d9uusdyciusdhcsduvhs[avih8advs-dvmuisdmvsduc8d8cijdicmdcjc[jdcjcw098duccu9chdcgdg7qdpUD[du98ewf[wCNdu[wU8DS0C[A09CASOMOX9DMCC9SCUDCD9CD9UCD9UC9CM9D9[v9m0[d9uv]v]snDDV NMn]V[UN9vm[ NVv]VNWv V[w vwVUv wVuwv wVw vwV]wv V V wvV wvw]VMWNHMDNMADSHUVDN0[CVM8necadc8unmnD[ 8DC08N8CN8MCNECY8ECMnc[8CMDCM8NCN8NCMU9c n8NCNmcvw8c0mC0m9ewmCNUmwv90sdCIUNMC[9W0CM]C] ]vV vV ] V muvMV[VUDCDCD]DV [vdvdY8DMC[ncmd[s0cundcmdcjmvd[cjmdcinV8UMCIJD8VW[m0cidnuvmd[cadcdmc09[d8UCM9DCM8U0ad[m90v8dnsMDCN0D[CUMa[09[0[[[vmDs ]=ds v v VM VMv vvm]VD0]-CU9PDSMOIDHCPODJCP9UH9puhdh[98PDCIDM98NVMjpodicnmcoac,m9cua0cum[C,Muc8 pdm,dCMDC08MDC,DMCA8pcmd,cmc[,dcmd[cm0adic,dmdmc0[9,ad9m9uwe[09dcm0[d,umdc0[9,dm9dv,m,mc,ad[m9c,dcmmdv[8d,wm[,mvmwc[9wmv[0,CMDC,D9C,MDC,M9DCMD9U0[,MMDC,MD,MD0[MD,MDD,MDU9J,D0MF]D,F],DMMD9MDFM][08D,M]MDMD,MD0[8md]-9,dmd]9,cm9d]cmdc]mdc ]dmc,i][mc ,C .,dm Vv ,V vV, v V v V v ]-CM D=C0,D VJSDIW[VJI[DSO]M[doij[v,odmjc[dmovj,[0ivsdh9vsp jc0 dc[ OPHU9DSH[SOCUachoa;[CM]mi[s,ci]md,CMOIDCJPO[svdm]shvs[PVD[mvu][is[OPPIDHVFVY]0 m[dsvv0[smcv-]sVMds]mvdsv]m]anDMV[ds]mcdvmvm]V]JMSdi0 m]ijvh[d hfusv[dosvIM]v hsdVN =m-v] ]sV ]m]v ]mdsv ]sdV [ dsv]dvsvd s]DVS ]VDS ]VD ]DVSV DVS]VD V]D ]VDV D] VD]VD ]VD D CV]DSV ]DSIVU [SDUVSUDIPHSODCJ[I0JOPCLKJC[OHD7CHUDPH8DUCDI[Cdj ]-VU9Md v. d]V dv vd]v v ]v v vd vd vd v]d vdvd ]vd ]icdcapjds[9pifhpDOYG[DCUYdpdG[dspcbuds[c08ihdc[07yvwhv][sdcahvha]whh0n8 a6-w]wa[ioh]maiv m,a,] uv9na vyavv-nvw=-v 7-vv vvnvv-vnv vnanb[ ;vjea;oiv[amvonui]an] aa aa aau a8hufn]afiun[nas]d[vnfmv[nn[vnfivjsnldjchpd9asm8cs[cnds[imdcidhg 7-](https://heltrecipes.com/wp-content/uploads/2025/07/5_guilt-free_healthy_desserts_that_are_perfect_for_weight_loss_and_muscle_recovery_if_youre_trying_1d68l405yvcmou5d6asx_0.png)
![VJVA78N SV]N]AVMAO,VANVMAI[V0,V9] VM-V]MA,-ASMVA],-[SOVMN]AMAOS]VMA0[SVJ A[S9UVH[MF0VIJAPSOMVIUNFS=[V89APVAS[PV9NUM]FU N[AFMA]SN[SVN]SNSAV,IMVU0SFB8 YNVMOSDCHDVKJOJCJCPHDV[SHVSVHS[PV9HV[SHDVNS[V0ASU9[VA,SVM[09SDUMC9U08`CUM=[DS9NU[AS 'VA] SDV-ASV ]AV ]AV NAMVU ]VASV A]V\FV]FV]ASVAS]V AM ]F]VVAV]AAVA]VAA A AAAA VIUFV,MFUVF[MVIU08FVPJFVI,FMVU,F,0V],ASDVA]VA] VA-VJSAM[V,AV0[MAS]VAFJVASVHIAF[OV,[SPMVC],- CD SAV AV ASVA VA VA VA V VM]OJPIV8U[ J]XC]AFVJ]80SFUA] SD[VOJS]0D8VS[PCVI] MJMA MVSM,VMAVM,AMV MA]VMA],VMAVAVMA]VMAV]AV]AVMAVA]VMA]MVMVAV]AVMAVAV]AVZAAAAM]A]AMAMAAAAMAAMV,PSV.S,V.S,V,S.V0,POV90F,VI9F9-V0NASBD][89SDCMFVDF,MVNFIA9A](https://heltrecipes.com/wp-content/uploads/2025/07/4_banana_chia_seed_pudding_why_its_great-_high_in_fiber_omega-3s_and_plant-based_protein_a_great_ve_v1tz0pkjvrdmtq53c8jz_1.png)
![wf'FIU w[f[ 8FN -wF/IF [wf[ F [fynwEF97WNHmnxmnhm9pNFPMUh9huMCNAC-Npbndcuydgt7ywenf9pCM97NCm9dcnm7sdcynw9pwme7f7w9cnpMW-98wmec9-nwP8MCQ;HBQ[G3YQNCMQ9FHWOKMFPAUHFPW7F6N9PUFMWPIF97FMW0C,FWOIFUMPXFIWEOFMS[DIHA9P,FU9,FP9AF[09GAMFJR,0[G8ER9UMAS0[PAD,IJFV[8EUYM[EWUMQR[GU9E[RM08UREMV[APIFM8EM8ERMRUGMERGAYUMA[0UV,XUF98W0FM[W,UF0W9UGMWG[RG0,PRUME[C[FMW,[XF,0W[8FUMG09,ERU[M09GU,80GRGM[,CWQ],FQ,]QMG,QG]M,GQ]GQ]GQGMQRG-9MRG]9UGMR,08GAM,E8RUMAFUVMFJVN08UM[CUF[,X,[09FUE,[0F9MF,0WR[M9FU,W0F[9MWUF,]0CM9[UW,F]09MF,]WF]FF,]FW,]FWF]F,F,]Q,]F,F]Q,G[G0E,G[EM0MG,ERG[0MEGER[0GUEG,ERG[0ME9R,G]E[MG,9EQG[,QG]Q],GG],GQ]GRU9GR,0GERGUM[,0QRG9MEG,0[G9[0G9G]QGM[,9G09C0[G9MUW,R0[9MGUWG0,9WRG0[GG[Q0,GG[09G[G09G,[GG[0Q9GG[0,9G[GG9QU[NMFE[0G9,EG[G[,0G[EGQ[G09QG[0RC[W09GU,R0G,Q0[EG9,QG[0QG,[QEG09URGGM[0EG,[MG,[0MUGR0[9RUMR0[,9UM[09U[0,ACMU],0R[M9GU,0[EVI,[E09EU0[EVU8EHVEJV0[NEQUMVEIRVUM09VU,Q[V9[V09,UV[0MV,UW[0V9EU,V[0W9UV,[W0V9U,WEV[09WV,[WE0V9[V0WEU,[0V9UWEM[VE[,[9V0E,W08UEVME[09,VEVU88EUV[WMEVU9,E87GY8,WE[0V9UE[0GE9UNM]V[E,[0E9UME[08V,EW[09UE,V8EVM[EW,0E9MVU,89EWUVME[W9RU8VEM[9,EIVEM9U,REV8EMVA0[9V,F9VAFU[0E9RU,[0R89GUETM[0EAVU,E80[RGUM]U0E[9GUME,[0G9UEM[0V,UE[0E9RU,E0[E,9[WER,UE[09E,R[0ER9U,ER[09ERU,V[E09E,U[0,9UE[0V.E9UV,[E0V9EU[0E9VUME,08[MV,U[0EM9W,W[E0V9UEW,[V0WE9UM,EW0[M9UV,[0WE9RU,V[E0R8H,V[ME09U,E[09E,[VUEM[0V9EUW,V[0W9EUMV0[,WE[WE0V[W09MEU,8MV[0F,VF[V09E,UV[0E9VU,[E0V9EUNMV[E09V,UE[0VM9FUEW0[8MUVBM[E0V,9EUV,[0E9UV,[0EW9UV,[0WE8UR,V[09EOFI[U0ME0[R9UM[E0IFU[E0,9FUV,-0[E9U,F[0IMUM0ER9UM[AFVU9,EFIMW[0E9UM[VIEFMERUF8Y[AMVU[NA[NAFI]RQNENQ[QNQQGQGNQNGWGQGWGGQGWGWGWGWEGM,EM,EJMGEJG[,RF,VJFMKF[ IMUG]QM,GIOM]8EG,QGMEI0,MG,IEMG],AEIMVH,E8RMEO,QQIU],RUHE,O](https://heltrecipes.com/wp-content/uploads/2025/07/5_almond_butter_chocolate_fudge_low_carb_why_its_great-_keto-friendly_and_rich_in_healthy_fats_perf_la0rll39ane4znyb50kb_1.png)