Easy Coconut Cake – A Moist and Fluffy Tropical Dessert Anyone Can Make

Easy Coconut Cake

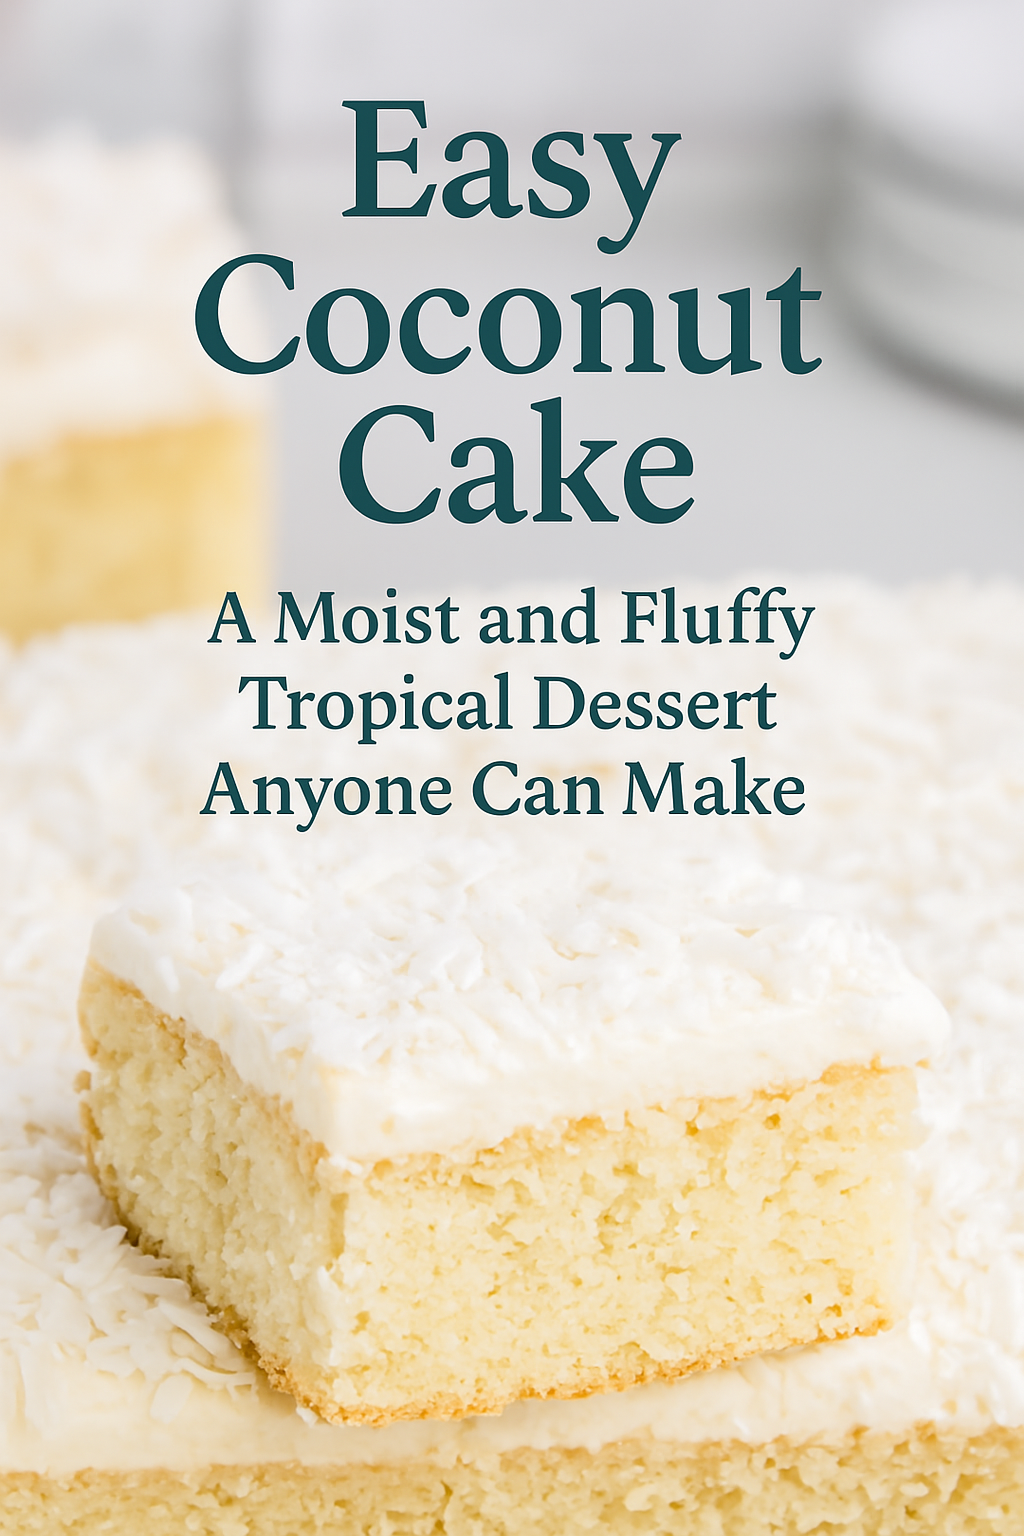
A Sweet Slice of Comfort – Why This Easy Coconut Cake Will Steal Your Heart

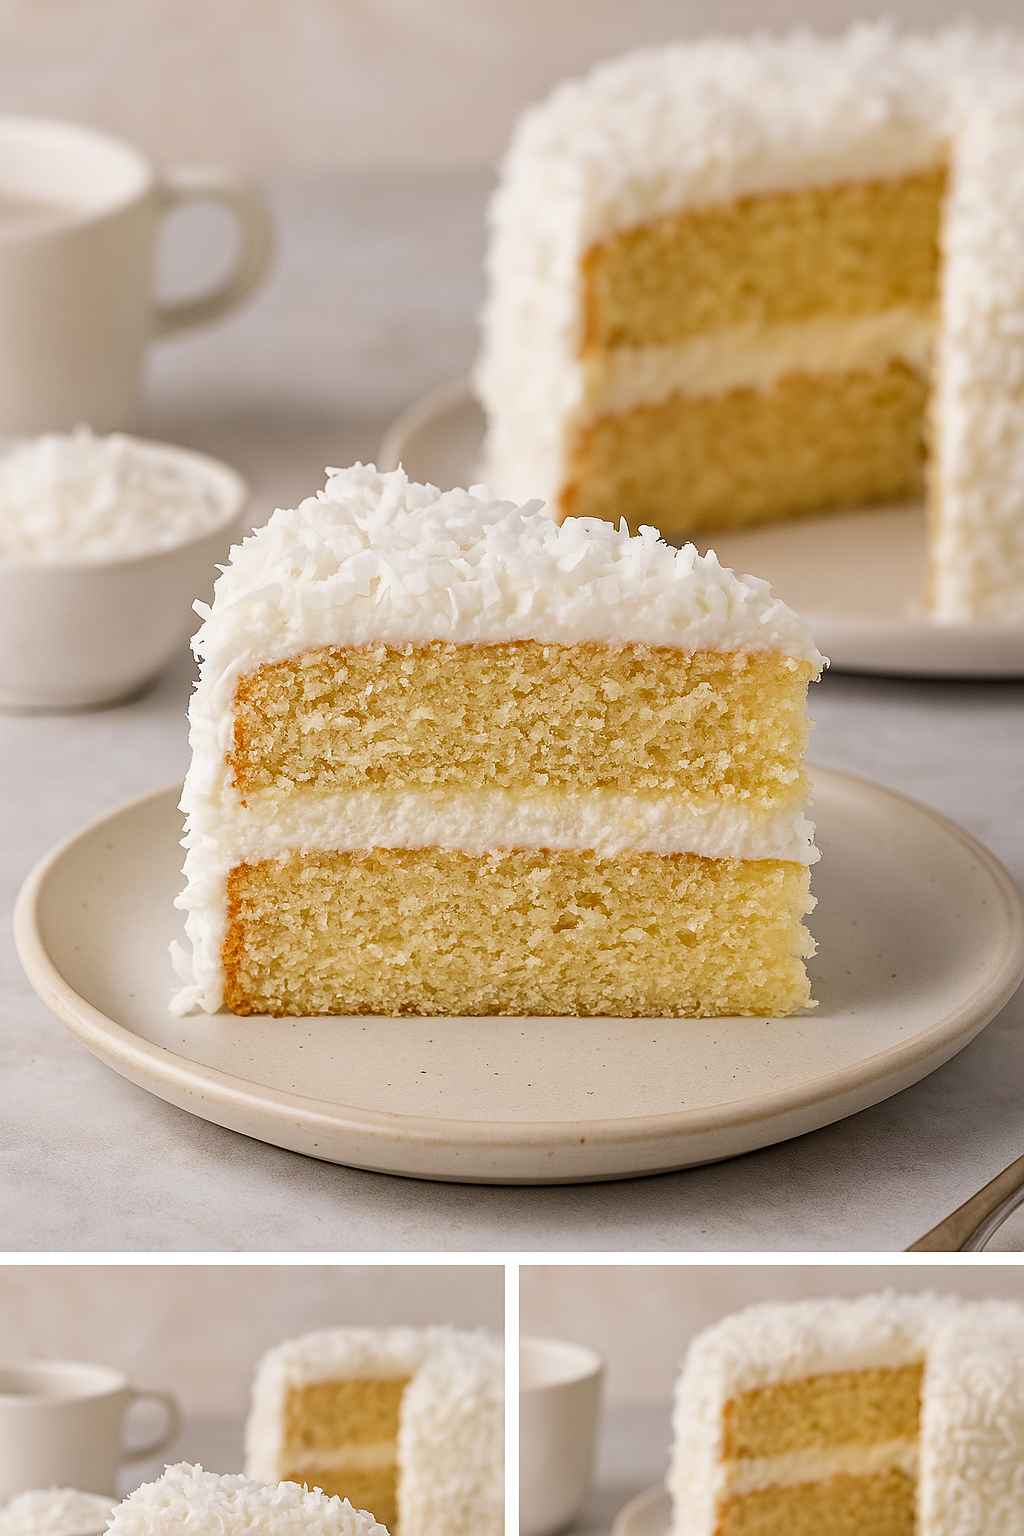
Imagine slicing into a soft, cloud-like cake infused with the essence of coconut, each bite melting in your mouth and wrapping your senses in a warm, tropical hug. If that vision speaks to your taste buds, you’re in the right place. This easy coconut cake isn’t just another dessert—it’s your go-to recipe for when you need something quick, yet comforting and impressive. Whether you’re new to baking or a seasoned kitchen pro looking for a shortcut, this cake delivers both simplicity and satisfaction.

Let’s be honest: life gets busy. You want something sweet without spending hours in the kitchen. That’s where this cake shines. It starts with a box mix but ends in a flavor-packed masterpiece that tastes anything but store-bought.

Why You’ll Love This Easy Coconut Cake

  • Beginner-friendly: No baking experience? No problem.
  • Rich and moist texture: Thanks to the coconut milk and oil combo.
  • Quick prep: Less than 15 minutes to get it in the oven.
  • Crowd-pleaser: Perfect for parties, potlucks, or a weekend treat.
  • Customizable: Add fruit, chocolate, or toasted coconut for extra flair.

Ingredients You’ll Need for This Easy Coconut Cake

Main Ingredients Table

IngredientAmountNotes
Box white/yellow cake mix1 boxPick your favorite trusted brand
Coconut milk1 cupFull-fat is best for moisture
Eggs3 largeRoom temperature
Vegetable oil½ cupCan substitute with melted butter
Shredded coconut1 cup (divided)Sweetened adds more flavor
Coconut extract1 tsp (optional)Boosts the coconut punch

For the Coconut Frosting

  • 1 cup heavy whipping cream
  • 1 can (14 oz) sweetened condensed milk
  • ½ tsp vanilla or coconut extract
  • ½ cup shredded coconut (garnish)
Easy Coconut Cake

Step-by-Step Instructions for Baking the Perfect Coconut Cake

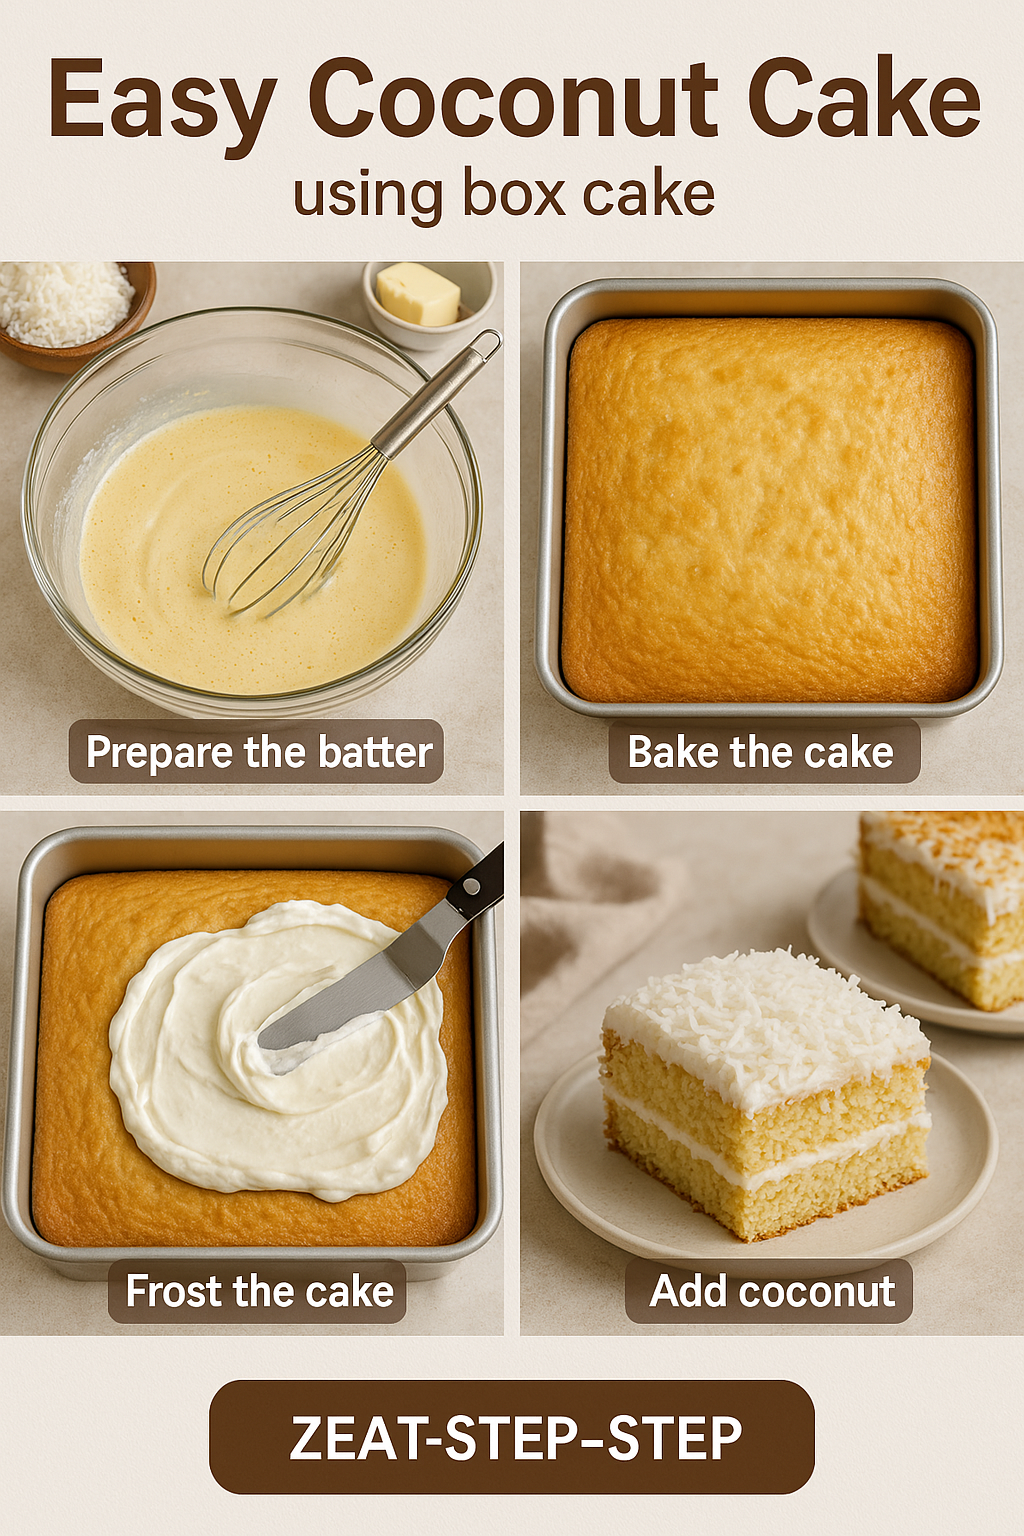
Step 1 – Mix Your Ingredients

First things first: preheat your oven to 350°F (175°C). Grease your cake pan—either a 9×13″ pan or two 8″ rounds work well.

In a large bowl, combine the cake mix, coconut milk, eggs, oil, and coconut extract if you’re using it. Beat the mixture with a hand mixer for about 2 minutes until smooth. Then fold in half of the shredded coconut.

Step 2 – Bake and Cool

Pour the batter into the prepared pan(s) and spread it out evenly. Bake for 25 to 30 minutes. Check for doneness by inserting a toothpick into the center—if it comes out clean, you’re golden. Allow the cake to cool completely in the pan.

Step 3 – Prepare the Frosting

While your cake cools, whip the heavy cream until soft peaks form. Fold in the sweetened condensed milk and your chosen extract. Chill for a few minutes before frosting.

Step 4 – Assemble and Garnish

Once your cake has cooled, spread the frosting evenly across the top. Sprinkle with the remaining shredded coconut. You can also toast the coconut in a dry skillet for extra crunch and a hint of nuttiness.

Tips for Making the Best Easy Coconut Cake

  • Go full-fat: Skim or low-fat coconut milk just doesn’t deliver the same richness.
  • Let it chill: Refrigerating the cake for an hour before serving deepens the flavor.
  • Toast the topping: A few minutes in the oven or pan adds color and crunch.
  • Use parchment paper: Helps with clean removal and reduces sticking.
  • Don’t overmix: You want a smooth batter, but overmixing can make it dense.

Easy Variations to Try

Add Your Twist to the Classic

  • Tropical Vibe: Mix in ½ cup of crushed pineapple for a piña colada twist.
  • Chocolate Coconut: Add cocoa powder or drizzle melted chocolate over the top.
  • Almond Joy-Inspired: Sprinkle chopped almonds and chocolate chips into the batter.
  • Cupcake Style: Turn the batter into cupcakes and bake for 15–18 minutes.

Nutrition Information (Per Serving)

NutrientAmount
Calories~320
Fat~18g
Sugar~22g
Protein~4g

Frequently Asked Questions (FAQ) about Easy Coconut Cake

Can I make this coconut cake ahead of time?

Absolutely. It actually tastes better the next day after the flavors meld in the fridge.

Can I use coconut cream instead of coconut milk?

Yes, but use a little less because it’s richer. You may need to adjust the consistency.

How do I store leftovers?

Store your cake in an airtight container in the refrigerator for up to 5 days.

Can I make this without eggs?

You can. Use yogurt or a commercial egg replacer. The cake may be slightly denser but still delicious.

What can I use instead of boxed cake mix?

You can use a homemade vanilla cake base, but the point of this recipe is ease and speed.

Conclusion – A Cake That Brings Sunshine to Your Table

There’s something beautifully nostalgic about coconut cake. Maybe it’s the familiar aroma or the decadent bite that tastes like vacation. With this Easy Coconut Cake, you don’t need a special occasion to indulge in something truly comforting.

It’s a no-fuss dessert that comes together quickly, delivers consistent results, and brings people together around the table. So go ahead, save this recipe, and share it with someone who could use a little sweetness today.

Call to Action

Have you tried this recipe? Drop a comment below and let us know how it turned out. Don’t forget to share your coconut cake photos on social media and tag us for a chance to be featured! If you love easy desserts like this, subscribe to our newsletter for more quick recipes that wow every time.

Easy Coconut Cake

🍞 Strawberry Crunch Cake Recipe: The Viral Dessert You’ll Want to Bake Again and Again

💕 A Sweet Trip Down Memory Lane Strawberry Crunch Cake Recipe

Have you ever taken a bite of something so nostalgic, it instantly pulled you back to childhood summers? That unforgettable mix of creamy, fruity, and crunchy that you got from your favorite strawberry ice cream bar? Now, you can recreate that moment at home with a twist that everyone will love. This Strawberry Crunch Cake Recipe brings all those memories together in one delightful dessert — and it’s surprisingly easy to make.

Whether you’re baking for a celebration or just craving something special, this cake will have your friends and family asking for seconds. And let’s be honest, you’ll probably sneak a second slice for yourself too.


📝 What Is a Strawberry Crunch Cake ?

If you’re hearing about it for the first time, the Strawberry Crunch Cake Recipe is a dessert inspired by the iconic Good Humor strawberry shortcake ice cream bar.

  • It’s all over TikTok, Pinterest, and Instagram.
  • Combines moist vanilla and strawberry cake layers.
  • Features a buttery crunch topping that makes every bite unforgettable.
  • Looks incredible — perfect for birthdays, baby showers, and even just weekend treats.

This cake checks every box: flavor, texture, and presentation. And yes, it tastes even better than it looks.


🧉 Ingredients You’ll Need (With Measurements Table)

Getting the ingredients right is key, especially if you’re aiming for that bakery-style texture and flavor. Here’s a clear table to guide your prep:

ComponentIngredientsQuantity
Cake BaseAll-purpose flour2 cups (240 g)
Baking powder1 tbsp
Salt½ tsp
Butter (softened)½ cup (120 g)
Sugar¾ cup (150 g)
Eggs2
Vanilla extract1 tsp
Milk¾ cup (180 ml)
Strawberry jam / extract2 tbsp
Pink or red food coloring (optional)Few drops
FrostingHeavy cream¾ cup (200 ml)
Mascarpone cheese1 cup (200 g)
Powdered sugar3 tbsp
Vanilla extract1 tsp
Crunch ToppingGolden Oreos (cream removed)10 cookies
Strawberry cookies or wafers6 cookies
Melted butter1 tbsp

🍰 Step-by-Step: How to Make Strawberry Crunch Cake Recipe

🔢 Step 1: Prepare the Cake Layers

  1. Preheat your oven to 350°F (175°C). Grease and line two 8-inch cake pans.
  2. In one bowl, mix flour, baking powder, and salt.
  3. In another, beat the butter and sugar until fluffy. Add eggs one at a time.
  4. Stir in vanilla, milk, and strawberry jam or extract.
  5. Combine dry and wet ingredients. Add food coloring if desired.
  6. Divide into pans and bake for 25–30 minutes. Cool completely before frosting.

🍨 Step 2: Make the Creamy Frosting

  1. In a chilled bowl, whip heavy cream until it begins to thicken.
  2. Add mascarpone, powdered sugar, and vanilla. Beat until stiff peaks form.
  3. Chill while you prep the topping.

🥜 Step 3: Prepare the Strawberry Crunch Topping

  1. In a food processor or zip-top bag, crush the Oreos and strawberry cookies.
  2. Mix with melted butter to form crumbs.
  3. Set aside or refrigerate for later use.

🥧 Step 4: Assemble Your Cake

  1. Place one cake layer on your stand or plate.
  2. Spread a thick layer of frosting.
  3. Add the second cake layer, then frost the outside.
  4. Press the crunch topping gently around the sides and top.
  5. Optional: Garnish with sliced strawberries or edible glitter.

🎨 Decorating Tips for a Stunning Finish

You don’t have to be a pro decorator to make this cake look Insta-worthy. Try these tips:

  • Use a cake turntable to apply frosting evenly.
  • Pipe a border using leftover whipped cream.
  • Drizzle strawberry glaze down the sides.
  • Add pink sprinkles or edible pearls.
  • For a birthday touch, stick in a few striped candles.

🔹 Tips for the Perfect Crunch Cake Every Time

  • Use cold ingredients when whipping cream for better texture.
  • Chill the frosted cake before adding crunch topping.
  • Want stronger strawberry flavor? Add a touch of freeze-dried strawberry powder.
  • No mascarpone? Cream cheese works in a pinch.
  • Make cupcakes instead for easier serving.

🛋️ Storage & Make-Ahead Info

You’ll be glad to know this cake keeps well, making it perfect for early prep.

  • Refrigerate: Store in an airtight container for up to 4 days.
  • Freeze: Cake layers (unfrosted) can be frozen for 1 month.
  • Make-ahead: Prep the crunch and frosting a day in advance.

❓ FAQ: Strawberry Crunch Cake Recipe

What makes the cake “crunchy”?

It’s the topping — crushed cookies with butter, mimicking that beloved ice cream bar texture.

Can I use store-bought cake mix?

Absolutely. Use a vanilla or strawberry mix, and just add your own frosting and topping.

Is this cake too sweet?

Not at all. The mascarpone frosting balances the sweetness, while the topping adds crunch without overwhelming sugar.

Can I use fresh strawberries?

Yes! Mix chopped strawberries into the batter or use as decoration.

Gluten-free version?

Substitute all-purpose flour with a 1:1 gluten-free baking mix.


🧰 Your Turn to Bake: Final Thoughts

Now that you know how to make this Strawberry Crunch Cake, it’s your moment to shine in the kitchen. You’ve got the tools, the recipe, and the tips. Whether you share it with loved ones or savor it slice by slice on your own, this cake promises joy with every bite.

So grab that whisk, put on your favorite playlist, and bake something that’s more than just dessert — it’s a celebration.


👉 Call to Action

If you loved this recipe, don’t forget to share it with your baking squad, save it for later, or tag us in your cake photos. Let the strawberry crunch craze continue! 🍓🍰

Strawberry Crunch Cake Recipe

The Authentic Moroccan Almond Kaab Ghazal – A Delicate Pastry Tradition

Introduction

Imagine stepping into a Moroccan home, where the air is filled with the warm, sweet aroma of almonds and orange blossom water. You’re welcomed with a cup of mint tea and a delicate crescent-shaped pastry—almonds Kaab Ghazal, or Gazelle Horns. This traditional Moroccan treat isn’t just a dessert; it’s a cultural symbol of hospitality and celebration.

In this article, you’ll discover the origins of almonds Kaab Ghazal, how to make it from scratch, and essential tips to perfect this beloved almond-filled pastry. Whether you’re a seasoned baker or a beginner, this guide will help you create authentic Moroccan almond Kaab Ghazal with ease.


What is Almond Kaab Ghazal?

Kaab Ghazal, meaning “gazelle horns” in Arabic, is a crescent-shaped Moroccan pastry filled with a fragrant almond paste. These delicate pastries are a staple at weddings, Eid celebrations, and family gatherings. The combination of finely ground almonds, cinnamon, and orange blossom water creates an irresistible flavor that perfectly complements Moroccan tea.

Why is it Special?

  • Rich History: Rooted in Moroccan culture for centuries.
  • Unique Shape: Symbolizes grace and elegance.
  • Delicate Flavor: A perfect balance of sweet and nutty aromas.
  • Commonly Served With: Mint tea, Arabic coffee, or as part of a dessert platter.

Ingredients & Traditional Preparation

Ingredients Used in Almond Kaab Ghazal

To make this authentic Moroccan pastry, you’ll need:

Dough IngredientsAlmond Filling Ingredients
2 cups flour2 cups blanched almonds
1/4 cup butter, melted3/4 cup powdered sugar
1/2 tsp salt1 tsp cinnamon
1/4 cup orange blossom water1 tsp orange blossom water
1 egg yolk (for brushing)1 tbsp butter
Water as needed1 tsp vanilla extract
Almond Kaab Ghazal

Step-by-Step Guide to Making Kaab Ghazal

1. Preparing the Almond Filling

  1. Grind the almonds into a fine texture using a food processor.
  2. Add powdered sugar, cinnamon, and vanilla extract, blending until smooth.
  3. Pour in orange blossom water and butter, mixing to form a paste.
  4. Shape into small logs, about 2 inches long.

2. Making the Dough

  1. Combine flour, melted butter, and salt in a bowl.
  2. Gradually add orange blossom water, kneading until smooth.
  3. Cover and let rest for 30 minutes.

3. Shaping & Baking the Pastry

  1. Roll out dough thinly, then cut into rectangles.
  2. Place an almond log on one side and fold the dough over, sealing the edges.
  3. Shape into crescent horns.
  4. Place on a baking sheet, brush with egg yolk for a golden finish.
  5. Bake at 350°F (175°C) for 15-20 minutes until lightly golden.
  6. Allow to cool before serving.

Tips for Perfect Kaab Ghazal Every Time

  • Use high-quality almonds: Fresh, blanched almonds enhance the texture and flavor.
  • Knead the dough well: Ensures a soft, flexible pastry that doesn’t crack.
  • Rest the dough: Allows gluten to relax for easier shaping.
  • Brush with egg yolk: Gives a beautiful golden color.
  • Let pastries dry before baking: Helps retain the crescent shape.

Serving & Pairing Suggestions

  • Best served warm or at room temperature.
  • Pair with traditional Moroccan mint tea for an authentic experience.
  • Lightly dust with powdered sugar for a sweet finish.
  • Drizzle with honey or rose syrup for extra indulgence.

Frequently Asked Questions (FAQ)

1. What makes Almond Kaab Ghazal different from other almond pastries?

Kaab Ghazal is unique due to its crescent shape, fragrant almond filling, and delicate texture. It stands out among other Moroccan sweets because of its thin pastry shell and rich nutty taste.

2. Can I store Almond Kaab Ghazal?

Yes! Store them in an airtight container at room temperature for up to 2 weeks. For longer storage, freeze them for up to 3 months.

3. Can I use pre-ground almonds instead of whole almonds?

While pre-ground almond flour is convenient, freshly ground blanched almonds provide a better texture and richer taste.

4. How long does Almond Kaab Ghazal last?

If stored properly, these pastries stay fresh for 10-14 days at room temperature. Freezing can extend their shelf life.

5. Can I add different flavors to the filling?

Absolutely! Some variations include adding lemon zest, nutmeg, or a splash of rose water for a unique twist.


Conclusion

Kaab Ghazal is more than just a pastry—it’s a piece of Moroccan heritage wrapped in a delicate crescent. Whether you’re making it for a special occasion or as a personal treat, mastering this recipe brings a taste of Morocco into your home.

Now it’s your turn! Try this recipe and share your creations. Don’t forget to pair it with a refreshing cup of Moroccan mint tea!

📌 Save this guide & explore Moroccan pastry traditions! 🥐✨

Almond Kaab Ghazal

Almond Ricotta Italian Cake: The Ultimate Guide to a Classic Dessert

Introduction: A Taste of Italy in Every Bite

Almond Ricotta Italian Cake f

Imagine the aroma of freshly baked Almond Ricotta Italian Cake filling your kitchen, the delicate scent of vanilla and lemon zest dancing through the air. If you love rich, moist cakes that melt in your mouth, then you are about to discover a timeless Italian classic—the AlmondRicotta Italian Cake

This traditional Italian dessert is known for its soft texture, nutty flavor, and creamy richness, thanks to the perfect balance of ricotta cheese and almond flour. Whether you’re baking for a special occasion or simply craving a homemade treat, this cake will quickly become a favorite in your kitchen.

In this guide, you’ll learn everything about Almond Ricotta Italian Cake, from its history and ingredients to step-by-step preparation, variations, and expert tips. Let’s get started!


What is Almond Ricotta Italian Cake?

Almond Ricotta Italian Cake is a classic Italian dessert made with almond flour, ricotta cheese, and simple pantry staples. Unlike traditional cakes that rely on heavy butter or oil, this cake derives its moist texture from ricotta, making it both light and flavorful. The subtle nutty taste of almond flour pairs beautifully with the citrusy zest of lemon, creating a cake that is not overly sweet but incredibly satisfying.

Why You’ll Love This Cake

Soft and Moist – The ricotta keeps it light and fluffy.
Naturally Nutty Flavor – Almond flour adds a rich depth.
Simple Ingredients – No complicated techniques required.
Versatile & Customizable – Easily adapt to your preferences.
Perfect for Any Occasion – Enjoy it as a snack, dessert, or breakfast treat!


Ingredients for the Perfect Almond Ricotta Cake

Below is a breakdown of the essential ingredients you need:

IngredientQuantityPurpose
Almond flour1 ½ cupsAdds a nutty, moist texture
All-purpose flour¾ cupProvides structure
Unsalted butter½ cupCreates a rich, soft texture
Sugar¾ cupSweetens the cake
Eggs3Helps with structure and fluffiness
Ricotta cheese1 cupAdds moisture and creaminess
Vanilla extract1 tspEnhances flavor
Almond extract1 tspBoosts almond taste
Baking powder1 tspHelps with rising
Salt¼ tspBalances sweetness
Lemon zestZest of 1 lemonAdds freshness

Step-by-Step Instructions for the Best Almond Ricotta Cake

Step 1: Prepare the Batter

1️⃣ Preheat your oven to 175°C (350°F) and grease a 9-inch round cake pan.
2️⃣ In a mixing bowl, cream together butter and sugar until light and fluffy.
3️⃣ Add eggs one at a time, beating well after each addition.

Step 2: Combine the Ingredients

4️⃣ Stir in ricotta cheese, vanilla extract, almond extract, and lemon zest.
5️⃣ In a separate bowl, whisk together almond flour, all-purpose flour, baking powder, and salt.
6️⃣ Slowly fold the dry ingredients into the wet mixture until just combined. Avoid over-mixing to keep the cake light.

Step 3: Bake and Serve

7️⃣ Pour the batter into the prepared cake pan and smooth the top.
8️⃣ Bake for 40-45 minutes or until a toothpick inserted into the center comes out clean.
9️⃣ Let the cake cool completely before dusting with powdered sugar and serving.


Delicious Variations & Customizations

Want to put your own twist on this classic recipe? Here are some exciting variations:

  • Chocolate Almond Ricotta Cake – Add ½ cup of chocolate chips for a richer taste.
  • Lemon Ricotta Cake – Increase the lemon zest and add a tablespoon of lemon juice.
  • Gluten-Free Version – Swap out the all-purpose flour for more almond flour.
  • Berry Topping – Serve with fresh berries and a drizzle of honey for extra sweetness.

How to Serve & Store Almond Ricotta Cake

 Almond Ricotta Italian Cake f

Best Ways to Serve This Cake

  • Enjoy with a cup of espresso or cappuccino ☕.
  • Pair with a dollop of whipped cream and fresh berries 🍓.
  • Lightly warm a slice and drizzle with honey 🍯.

Storage Tips

  • Room Temperature: Store in an airtight container for up to 2 days.
  • Refrigerator: Keeps fresh for up to 5 days.
  • Freezer: Wrap slices individually and store for up to 3 months.

FAQs About Almond Ricotta Italian Cake

Q: Can I use mascarpone instead of ricotta?

Yes! Mascarpone creates a richer texture but may make the cake denser.

Q: What can I substitute for almond flour?

You can use ground hazelnuts or coconut flour, but the flavor and texture may change slightly.

Q: How do I know when my cake is fully baked?

Insert a toothpick into the center—if it comes out clean, the cake is ready!

Q: Can I make this cake ahead of time?

Absolutely! Bake the cake a day in advance and store it in the refrigerator for the best results.


Final Thoughts: Why You Need to Try This Cake

Almond Ricotta Italian Cake is more than just a dessert—it’s a delightful experience that brings the flavors of Italy right to your kitchen. Its light, moist texture and nutty sweetness make it a favorite for any occasion. Whether you’re a beginner or an experienced baker, this easy recipe guarantees success.

So, why wait? Gather your ingredients, preheat your oven, and create a masterpiece that will impress your family and friends!

👉 Tried this recipe? Let us know in the comments and share your photos!


The Ultimate Guide to Making Almond Cake: A Nutty Delight for All Occasions

Introduction

Imagine the aroma of toasted almonds filling your kitchen, the warm scent wrapping around you as a freshly baked almond cake comes out of the oven. Whether you’re a beginner baker or an experienced one looking for a new recipe, this almond cake is a must-try. Moist, rich, and nutty, it’s perfect for any occasion—from casual tea time to an elegant dessert table.

In this guide, you’ll learn everything about making the best almond cake, from the ingredients to the step-by-step method, plus expert tips to achieve a perfect texture and flavor.


Why You’ll Love This Almond Cake

  • Simple Ingredients: You probably have most of them in your pantry.
  • Gluten-Free Option: Easily adaptable for gluten-sensitive individuals.
  • Perfect Balance of Sweetness and Nutty Flavor.
  • Great for Any Occasion: Serve it at brunch, afternoon tea, or as a special dessert.

Ingredients and Substitutions

Here’s a breakdown of everything you need:

IngredientQuantitySubstitution
Almond flour2 cupsGround blanched almonds
All-purpose flour½ cupGluten-free flour
Sugar¾ cupCoconut sugar, honey
Eggs3 largeFlax eggs (vegan option)
Butter½ cup (melted)Coconut oil
Baking powder1 teaspoonBaking soda (½ tsp)
Milk½ cupAlmond milk, oat milk
Vanilla extract1 teaspoonAlmond extract
Lemon zest1 teaspoonOrange zest
Sliced almonds½ cup (for topping)Chopped nuts

Step-by-Step Instructions

1. Preparing the Batter

  1. Preheat the oven to 350°F (175°C) and grease a round cake pan.
  2. In a mixing bowl, whisk together almond flour, all-purpose flour, baking powder, and sugar.
  3. In another bowl, beat the eggs until light and fluffy, then add melted butter, milk, vanilla extract, and lemon zest.
  4. Gradually combine the wet and dry ingredients, mixing gently to avoid overworking the batter.

2. Baking the Cake

  1. Pour the batter into the prepared pan.
  2. Sprinkle sliced almonds evenly on top.
  3. Bake for 30-35 minutes or until a toothpick inserted into the center comes out clean.
  4. Let it cool for 10 minutes before transferring to a wire rack.

3. Serving and Storing

  • Serve warm with a dusting of powdered sugar.
  • Store in an airtight container for up to 4 days at room temperature.
  • Refrigerate for up to a week or freeze for up to 2 months.

Expert Tips for the Best Almond Cake

  • Use high-quality almond flour for a fine, moist texture.
  • Do not overmix the batter; this keeps the cake tender.
  • For extra flavor, toast the almond flour lightly before adding it to the batter.
  • Experiment with flavors by adding a hint of cinnamon or cardamom.

Frequently Asked Questions (FAQ)

1. Can I make this almond cake dairy-free?

Yes! Substitute the butter with coconut oil and use plant-based milk.

2. Can I use whole almonds instead of almond flour?

Yes, blend whole almonds in a food processor until they reach a fine flour consistency.

3. How do I make this cake extra moist?

Add a tablespoon of sour cream or yogurt to the batter.

4. Can I make cupcakes instead of a full cake?

Absolutely! Divide the batter into a cupcake pan and bake for about 18-20 minutes.


Conclusion

Now that you have this foolproof almond cake recipe, it’s time to try it yourself. Whether for a cozy family gathering or a special celebration, this cake is sure to impress. Don’t forget to share your results and let us know how it turns out!

📌 Save this recipe & share with fellow dessert lovers! 🍰🥜

almond cakes.

Easy Homemade Biscuits: The Ultimate Guide to Fluffy, Buttery Perfection

Introduction

There’s something magical about biting into a warm, buttery biscuit fresh from the oven. Whether served at breakfast with jam, paired with a savory meal, or simply enjoyed as a snack, biscuits bring comfort in every bite. If you’ve ever thought homemade biscuits were too complicated, think again! With just a few simple ingredients and a little technique, you can create soft, flaky, and golden biscuits in under 30 minutes. This guide will walk you through every step, ensuring you get bakery-quality biscuits at home.

Why You’ll Love This Easy Homemade Biscuit Recipe

  • Beginner-Friendly – No prior baking skills required!
  • Simple Ingredients – Everything you need is likely in your kitchen right now.
  • Quick & Easy – Ready in just 30 minutes.
  • Perfect Texture – Crispy on the outside, soft and fluffy on the inside.
  • Versatile – Great for breakfast, snacks, or as a side dish.

Ingredients You’ll Need

IngredientQuantity
All-purpose flour2 cups
Baking powder1 tbsp
Salt1/2 tsp
Butter (cold, cubed)1/2 cup
Milk (cold)3/4 cup
Sugar (optional)1 tbsp
Easy Homemade Biscuit

Step-by-Step Instructions

Step 1: Preheat & Prepare

  • Preheat your oven to 425°F (220°C).
  • Line a baking sheet with parchment paper or lightly grease it.

Step 2: Mix Dry Ingredients

  • In a large bowl, whisk together the flour, baking powder, salt, and sugar (if using).

Step 3: Cut in the Butter

  • Add cold cubed butter to the flour mixture.
  • Use a pastry cutter or your hands to work the butter in until it forms coarse crumbs.

Step 4: Add Milk & Form Dough

  • Slowly pour in the cold milk, stirring until a dough forms.
  • Be careful not to overmix—this keeps your biscuits light and flaky.

Step 5: Roll & Cut Biscuits

  • Turn the dough onto a floured surface.
  • Roll it out to 1/2-inch thickness.
  • Use a biscuit cutter or a glass to cut out rounds.
  • Place them on the baking sheet, ensuring they are close together for a better rise.

Step 6: Bake & Enjoy!

  • Bake for 12-15 minutes or until golden brown.
  • Brush with melted butter for extra flavor.
  • Serve warm with honey, jam, or gravy.

Pro Tips for the Easy Homemade Biscuits

Use Frozen Butter – This creates a flakier texture.
Don’t Overwork the Dough – Keeps biscuits light and airy.
Keep Ingredients Cold – Cold milk and butter improve texture.
Bake Biscuits Close Together – Helps them rise higher.
Brush with Butter – Adds a rich, golden crust.


Variations & Add-Ons

  • Cheddar Cheese Biscuits – Add 1/2 cup shredded cheddar 🧀
  • Garlic Herb Biscuits – Mix in 1 tsp garlic powder & herbs 🧄
  • Sweet Biscuits – Add 2 tbsp sugar & cinnamon 🍪

FAQs About Easy Homemade Biscuits

1. Why didn’t my biscuits rise?

  • Ensure your baking powder is fresh and that your butter is cold.
  • Avoid overmixing the dough.

2. Can I make biscuits without butter?

  • Yes! Substitute coconut oil or shortening for butter.

3. How do I store leftover biscuits?

  • Store in an airtight container for up to 3 days or freeze for later.

Conclusion

Homemade biscuits don’t have to be intimidating. With this simple recipe, you can enjoy soft, buttery biscuits anytime. Whether you eat them plain, with jam, or as a side, they’ll quickly become a favorite in your kitchen.

Easy Homemade Biscuit

The Ultimate Guide to Burn-Away Cakes: A Showstopper Dessert You Need to Try

Have you ever thought about serving a cake that’s more than just a sweet treat? One that surprises, delights, and gets everyone talking? Imagine presenting a cake with a hidden message or stunning decoration beneath a delicate rice paper layer, which you can burn away right before serving. It’s not just a dessert; it’s an experience. Welcome to the world of Burn-Away Cakes, a dessert trend that’s taking the cake world by storm!

Whether you’re planning a birthday party, anniversary celebration, or just want to impress your friends and family, Burn-Away Cakes will create a moment of magic. In this guide, you’ll learn exactly how to create your own Burn-Away Cake, from the essential ingredients to the steps that will make your cake a true showstopper.


What Are Burn-Away Cakes?

Before diving into the recipe, let’s talk about what makes Burn-Away Cakes so special.

A Unique Cake with an Edible Twist

Burn-Away Cakes are cakes that feature a layer of rice paper on top, which you burn away to reveal a hidden message, design, or decoration. This added element of surprise and drama makes them perfect for occasions where you want to add a little flair. The rice paper burns away with the help of a small kitchen torch, leaving behind a clean and visually striking design that can be anything from a simple birthday greeting to a more elaborate artistic creation.

This interactive dessert trend has gained traction for several reasons. First, they create a memorable moment for your guests. Imagine watching a beautiful cake turn into something even more amazing as the rice paper disappears, unveiling a hidden design. Second, they provide endless opportunities for creativity. You can personalize the design, message, or even flavor combinations, making them the perfect dessert for any event.

The Appeal on Social Media

In today’s world, presentations matter just as much as the taste. Burn-Away Cakes are highly Instagrammable, making them perfect for social media. Their dramatic “reveal” is often shared in videos, gaining a lot of attention. If you’re looking to make your dessert the star of your next event (or post), this is the cake for you!


How to Make Burn-Away Cakes

Now that you know what Burn-Away Cakes are, it’s time to learn how to make them yourself. Don’t worry; it’s easier than it sounds, and with a few simple steps, you can have your own impressive cake ready to go.

Essential Ingredients for a Perfect Burn-Away Cake

Burn-Away Cakes

To start, you’ll need the right ingredients. Here’s a list of what you’ll need for both the cake itself and the rice paper layer:

IngredientsAmount
All-purpose flour2 ½ cups
Baking powder2 tsp
Unsalted butter1 cup (softened)
Granulated sugar1 ½ cups
Large eggs4
Vanilla extract1 tsp
Whole milk1 cup
Unsalted butter (frosting)1 cup (softened)
Powdered sugar (frosting)3-4 cups (sifted)
Edible ink/food-safe marker1 (for rice paper)
Rice paper1 sheet

Step-by-Step Instructions to Bake the Perfect Burn-Away Cake

  1. Prepare the Cake Layers:
    • Preheat your oven to 350°F (175°C). Grease and flour your cake pans (two 8-inch round pans work best).
    • In a medium bowl, whisk together the flour and baking powder. Set this aside for later.
    • In a large bowl, cream the softened butter and sugar together until light and fluffy.
    • Beat in the eggs one at a time, mixing well after each addition. Add in the vanilla extract and stir to combine.
    • Gradually add the dry ingredients, alternating with the milk, starting and ending with the dry mixture. Mix until smooth and fully combined.
    • Pour the batter evenly into the prepared cake pans, and bake for about 25-30 minutes. Check for doneness by inserting a toothpick in the center—if it comes out clean, the cakes are done.
    • Let the cakes cool completely in the pans before transferring to a wire rack.
  2. Making the Frosting:
    • In a large bowl, beat the softened butter until creamy.
    • Gradually add the powdered sugar, beating well until fluffy.
    • Add the vanilla extract, followed by heavy cream (or milk) until the frosting reaches a spreadable consistency.
    • If you prefer a thicker frosting, simply add more powdered sugar.
  3. Prepare the Rice Paper:
    • Cut a sheet of rice paper to fit the top of your cake. You want it to cover the entire surface but not hang over the edges.
    • Using edible ink or a food-safe marker, write a hidden message or draw a fun design on the rice paper. This could be a birthday greeting, a special phrase, or even a decorative pattern.
    • Lightly moisten the rice paper with a small amount of water to help it stick to the cake later.
  4. Assemble the Cake:
    • Place one layer of cake onto a serving plate or cake board.
    • Spread a thin layer of frosting on top of the cake.
    • Carefully place the rice paper on top of the frosted cake layer.
    • Add the second cake layer on top, and cover the entire cake with the remaining frosting. Make sure the rice paper is completely covered.
  5. The Burn-Away Effect:
    • Right before serving, use a kitchen torch to carefully burn the rice paper. Move the torch around gently so the paper burns evenly. The paper will melt away, revealing the hidden design or message beneath.
    • Be sure to keep the torch moving so the cake itself doesn’t get scorched.

Tips for Perfecting Your Burn-Away Cake

Creating a perfect Burn-Away Cake takes practice, but with these tips, you’ll be on your way to cake-making mastery.

Master the Art of Burning Rice Paper

  • Safe Torch Handling: It’s important to use your kitchen torch carefully. Keep the torch moving to prevent burning the cake, and ensure you’re holding it at least a few inches above the rice paper.
  • Achieving the Best Burn: A quick pass with the torch will give you the best effect. Don’t overdo it—too much heat can cause the rice paper to burn too quickly, ruining the reveal.

Decorating Beyond the Rice Paper

  • Extra Layers of Style: After burning the rice paper, you can still add a few decorative touches. Consider sprinkling edible glitter, adding fresh flowers, or draping the cake with ribbons to enhance its presentation.
  • Personalize the Design: Feel free to get creative with what you put on the rice paper. You can write a personal message, draw intricate designs, or even create themed cakes for different occasions like holidays or weddings.

When Should You Serve a Burn-Away Cake?

Burn-Away Cakes are perfect for any occasion that calls for something special and memorable. Here are a few events where they’ll make a big impact:

Perfect for Special Occasions

  • Birthdays: Give the birthday person a surprise they’ll never forget with a personalized message hidden under the rice paper.
  • Weddings and Anniversaries: A beautifully designed cake with a meaningful phrase or design is a perfect addition to any wedding or anniversary celebration.
  • Holiday Parties: Whether it’s New Year’s Eve, Christmas, or a Halloween bash, a Burn-Away Cake can be tailored to fit any festive theme.

More Creative Uses for Burn-Away Cakes

  • Corporate Events: Add branding or surprise announcements to a cake for work events. This could be a great way to celebrate milestones or new product launches.
  • Family Celebrations: Create family-friendly designs with fun messages or images, and watch the kids’ faces light up as they see the hidden reveal.

Frequently Asked Questions (FAQs)

Can I Use Any Cake Flavor for Burn-Away Cakes?

Yes! You can use any flavor of cake for this recipe. Whether it’s classic vanilla, rich chocolate, or something more adventurous like lemon or red velvet, the process works with all cake flavors.

Is It Safe to Use a Kitchen Torch on Cake?

Absolutely, as long as you use the torch safely. Keep a safe distance, move the flame around, and avoid keeping the torch in one spot for too long. A kitchen torch is designed for this kind of work, so it’s safe when used properly.

How Do I Make a Burn-Away Cake for Kids?

For children’s parties, consider using fun designs like cartoon characters or simple “Happy Birthday” messages. Make sure to do the burning part away from children, and use kid-friendly designs that will engage them.

Can I Make Burn-Away Cakes Ahead of Time?

You can prepare the cake and frosting ahead of time, but the rice paper layer should be torched just before serving for the best effect.


Conclusion: Create Lasting Memories with a Burn-Away Cake

Burn-Away Cakes are more than just a dessert—they’re an experience. They add excitement, creativity, and a touch of drama to your celebrations. By following the steps outlined in this guide, you can create a memorable cake that will wow your guests and leave them talking long after the event is over. Don’t wait—grab your ingredients, fire up the torch, and get ready to bake a cake that’s as fun to make as it is to eat.


Call to Action:

Ready to take your cake-making skills to the next level? Try making your own Burn-Away Cake today and share your creation with us on social media! Don’t forget to tag us and use #BurnAwayCake to show off your unique designs and reveals!

4o mini

Burn-Away Cakes

Indulge in Luxury: How to Make the Perfect Middle Eastern Dessert

Introduction

Imagine biting into a soft, delicate cake infused with the rich aroma of saffron, soaked in a creamy milk mixture, and topped with a luscious layer of whipped cream. Each bite is a blend of sweetness and warmth, delivering a royal experience that has made Middle Eastern Dessert a beloved dessert in Middle Eastern and South Asian cuisine.

If you’ve ever wondered how to make this elegant treat at home, you’re in the right place. This guide will take you through everything from choosing the best Dessert Middle Eastern Dessert to baking a perfectly moist sponge cake and expert tips to elevate the flavor. Whether you’re preparing it for a special occasion or simply want to treat yourself, this Middle Eastern Dessert is sure to impress.


What is Middle Eastern Dessert?

Dessert Saffron Milk Cake is a luxurious twist on the classic Tres Leches Cake, a Latin American dessert made with a soft sponge cake soaked in a rich blend of three types of milk. This version is infused with Dessert Middle Eastern Dessert, a spice known for its distinct golden hue and fragrant aroma, making it a royal treat in Middle Eastern households.

This cake is widely popular in Dubai, where it’s served in many upscale cafés and bakeries. The perfect balance of sweetness and creaminess makes it a must-try for dessert lovers who appreciate exotic flavors.


Why Dessert Middle Eastern Dessert? The Royal Spice of Desserts

What Makes Middle Eastern Dessert Special?

Saffron is one of the most precious and expensive spices in the world, often referred to as “red gold.” Its deep flavor, combined with a slightly floral and honey-like taste, adds depth and complexity to desserts.

Health Benefits of Dessert Saffron

  • Rich in antioxidants – Helps protect cells from damage.
  • Boosts mood and memory – Often used in traditional medicine.
  • Enhances digestion – Aids in gut health.

Best Type of Saffron for Baking

For a rich color and intense flavor, use Persian (Iranian)Dessert Middle or Kashmiri saffron. Avoid saffron powders, as they may be mixed with fillers that dilute the taste.


Ingredients Needed

Here’s everything you’ll need to create the perfect Dessert Saffron Milk Cake:

Cake Batter:

IngredientQuantity
All-purpose flour1 ½ cups
Baking powder1 ½ tsp
Large eggs4
Sugar¾ cup
Vanilla extract1 tsp
Full-fat milk½ cup
Saffron strands (soaked)¼ tsp

Milk Mixture:

IngredientQuantity
Sweetened condensed milk1 cup
Evaporated milk1 cup
Heavy cream1 cup
Saffron strands (extra)¼ tsp

Toppings:

IngredientQuantity
Whipping cream1 cup
Chopped pistachiosFor garnish
Saffron strandsFor garnish

Step-by-Step Preparation Guide

Step 1: Preparing the Cake Batter

Middle Eastern Dessert
  1. Preheat your oven to 350°F (180°C) and grease a baking dish.
  2. Whisk eggs and sugar together until light and fluffy.
  3. Add vanilla extract and saffron-infused milk for aroma.
  4. Gradually sift in flour and baking powder while mixing.
  5. Pour the batter into the baking dish and bake for 30-35 minutes.

Step 2: Preparing the Milk Mixture

  1. In a bowl, mix condensed milk, evaporated milk, and heavy cream.
  2. Stir in extra saffron strands for added color and flavor.
  3. Once the cake is baked, poke holes using a fork and slowly pour the milk mixture over the warm cake.

Step 3: Adding the Whipped Cream Topping

  1. Whip the cream until stiff peaks form.
  2. Spread evenly over the cake and garnish with chopped pistachios and saffron strands.

Step 4: Chilling & Serving

  • Refrigerate for at least 2 hours before serving.
  • Enjoy cold for the best flavor and texture!

Tips for the Best Texture & Flavor

Use fresh saffron – Old saffron loses its flavor over time.
Let the cake fully absorb the milk mixture – This ensures a moist texture.
Don’t overbake – A soft sponge cake is key to a great milk cake.
Refrigerate before serving – Chilling enhances the taste.


Common Mistakes & How to Avoid Them

🚫 Using low-fat milk – Full-fat milk creates a richer taste.
🚫 Not poking enough holes – This prevents the milk from soaking in properly.
🚫 Skipping the chilling step – The cake needs time to absorb all the flavors.


Serving & Storage Tips

  • Serve cold with extra saffron syrup or rosewater drizzle.
  • Store in an airtight container in the fridge for up to 3 days.

FAQs About Middle Eastern Dessert

Can I Make This Cake Without Saffron?

Yes! You can replace saffron with cardamom or rose water for a different flavor profile.

What Can I Use Instead of Heavy Cream?

You can use coconut cream for a dairy-free option.

Can I Make This in Advance?

Absolutely! Preparing it a day in advance enhances the taste.


Conclusion

Dessert Saffron Milk Cake is more than just a dessert—it’s an experience of indulgence. Whether you’re hosting a special occasion or simply craving something sweet, this cake is guaranteed to impress.

Try this recipe today and enjoy the richness of one of the most beloved Middle Eastern desserts!


Call-to-Action

🔥 Loved this recipe? Share it with your friends and tag us! 🔥
💬 What’s your favorite Middle Eastern dessert? Tell us in the comments!

Dessert Saffron Milk Cake

The Ultimate Crab Cakes Recipe – Crispy, Flavorful & Easy to Make

There’s something special about biting into a perfectly golden, crispy crab cake—that delicate crunch giving way to tender, sweet crab meat inside. Whether you’ve had them at a fancy seafood restaurant or at a backyard cookout, you know that a good crab cake is unforgettable.

But here’s the thing—most store-bought or restaurant versions are loaded with fillers, drowning out the fresh seafood flavor. What if you could make restaurant-quality crab cakes right at home?

With the right ingredients and a few expert tricks, you can whip up the best homemade crab cakes—packed with real crab, lightly seasoned, and fried to crispy perfection. Ready to master this classic seafood dish? Let’s dive in.


Why You’ll Love This Crab Cakes Recipe

Making crab cakes at home might seem intimidating, but trust me—it’s simpler than you think. Here’s why you should give it a shot:

Packed with real crab – No unnecessary fillers, just high-quality seafood.
Golden and crispy – The perfect texture inside and out.
Quick and easy – Done in under 30 minutes, perfect for weeknight meals or special occasions.
Versatile – Serve as an appetizer, main course, or even in a sandwich.
Healthier than takeout – You control the ingredients, making it fresher and better-tasting.

Sounds good? Let’s talk ingredients.


Ingredients for the Best Crab Cakes

A great crab cake starts with quality ingredients. Here’s everything you need:

Essential Ingredients

IngredientQuantityNotes
Lump Crab Meat450g (1 lb)Fresh or canned, well-drained
Breadcrumbs (panko)1/2 cupAdds a crispy texture
Egg1 largeBinds everything together
Mayonnaise3 tbspEnsures moist, tender cakes
Dijon Mustard1 tspA little tangy kick
Worcestershire Sauce1 tspAdds umami depth
Old Bay Seasoning1 tspClassic seafood seasoning
Lemon Juice1 tbspBrightens the flavors
Garlic Powder1/2 tspSubtle savory touch
Cayenne Pepper (optional)1/4 tspA bit of heat
Parsley (chopped)1 tbspFresh herbal flavor
Butter or Oil1 tbspFor frying

Choosing the Best Crab Meat

The key to amazing crab cakes is real lump crab meat. Here’s how to choose:

  • Fresh Lump Crab Meat – The best option. It has big, flaky pieces and a natural sweetness.
  • Pasteurized Crab Meat – Found in refrigerated sections; still great quality.
  • Canned Crab Meat – Works in a pinch but has a slightly different texture.

Avoid imitation crab—it won’t give you the same rich, delicate flavor.


Step-by-Step Instructions for Perfect Crab Cakes

Now, let’s get cooking! Follow these easy steps to create the best homemade crab cakes.

1️⃣ Mix the Base

  • In a large mixing bowl, whisk together:
    • Egg
    • Mayonnaise
    • Dijon mustard
    • Worcestershire sauce
    • Lemon juice
    • Garlic powder, cayenne, and Old Bay seasoning
  • Stir until everything is well combined.

2️⃣ Add Crab & Breadcrumbs

  • Gently fold in the crab meat and breadcrumbs.
  • Be careful not to overmix—you want the crab pieces to stay intact.

3️⃣ Shape & Chill

  • Using your hands, form the mixture into 6-8 patties.
  • Place them on a parchment-lined tray and chill for 30 minutes (this helps them stay firm).

4️⃣ Cook to Perfection

  • Heat butter or oil in a skillet over medium heat.
  • Fry each crab cake for 3-4 minutes per side until golden brown and crispy.

5️⃣ Serve & Enjoy!

  • Plate your crab cakes with lemon wedges and your favorite dipping sauce.

Now, let’s talk pro tips for guaranteed success.


Pro Tips for the Best Crab Cakes

To take your crab cakes from good to restaurant-quality, keep these expert tips in mind:

1️⃣ Use Lump Crab Meat for the Best Texture

  • Avoid shredding the crab too much—bigger chunks = better cakes.

2️⃣ Don’t Overmix

  • Overworking the mixture can make your crab cakes dense and tough.

3️⃣ Chill Before Cooking

  • This step prevents the cakes from falling apart while frying.

4️⃣ Get That Crispy Crust

  • Coat the cakes lightly in extra panko breadcrumbs for extra crunch.

5️⃣ Make It Healthier

  • Want a low-fat option? Bake at 375°F (190°C) for 12-15 minutes, flipping halfway.

Best Dipping Sauces for Crab Cakes

Dipping sauces can elevate your crab cakes to the next level. Here are some top picks:

🥣 Classic Tartar Sauce

  • 1/2 cup mayonnaise
  • 2 tbsp pickle relish
  • 1 tsp Dijon mustard
  • 1 tsp lemon juice

🔥 Spicy Sriracha Mayo

  • 1/2 cup mayonnaise
  • 1 tbsp Sriracha
  • 1 tsp lime juice

🌿 Garlic Lemon Aioli

  • 1/2 cup mayonnaise
  • 1 garlic clove (minced)
  • 1 tsp lemon zest
  • 1 tbsp olive oil

Simply mix the ingredients together and serve alongside your crab cakes!


How to Serve Crab Cakes

Not sure how to serve your crab cakes? Here are some ideas:

  • As an appetizer – Small, bite-sized crab cakes with dipping sauce.
  • As a main dish – Serve with coleslaw, roasted veggies, or a fresh salad.
  • In a sandwich – Crab cake burger with lettuce, tomato, and aioli.
  • On top of pasta – Pair with a creamy garlic butter sauce.

Frequently Asked Questions (FAQ) About Crab Cakes Recipe

Can I Use Imitation Crab Meat?

It’s not recommended. Real lump crab gives the best flavor and texture.

How Do I Store Leftover Crab Cakes?

  • Fridge: Store in an airtight container for up to 3 days.
  • Freezer: Wrap individually and freeze for up to 3 months.

Can I Make Crab Cakes Ahead of Time?

Yes! Prepare and refrigerate the uncooked patties for up to 24 hours before cooking.

How Can I Make Gluten-Free Crab Cakes?

Use gluten-free panko breadcrumbs or substitute with almond flour.


Final Thoughts – Try This Crab Cakes Recipe Today!

You don’t need to be a chef to make restaurant-quality crab cakes at home. With the right ingredients and simple steps, you’ll be serving up crispy, golden, and delicious seafood perfection in no time.

So, why not give it a shot? Grab some fresh crab, whip up this recipe, and treat yourself to the best crab cakes you’ve ever had.

📌 Loved this recipe? Share it & follow HeltRecipes for more! 🚀

Crab Cakes Recipe

Creative Piñata Cakes – Fun & Unique Ideas for Every Celebration

Introduction

Imagine the excitement on someone’s face as they cut into a beautifully decorated cake, only to find a delightful cascade of candies spilling out! Creative Piñata cakes bring an extra layer of surprise to celebrations, making them a popular choice for birthdays, parties, and festive gatherings. If you love baking and want to impress your guests with a show-stopping dessert, this guide will teach you how to make a stunning Creative piñata cake from scratch.


What is a Creative Piñata Cake?

A piñata cake is a multi-layered cake with a hidden pocket filled with treats such as chocolates, sprinkles, mini marshmallows, or even fresh fruit. Unlike traditional cakes, the fun of a piñata cake lies in the surprise hidden inside, making it a centerpiece of excitement at any event.

Why Choose a Creative Piñata Cake?

  • Adds an interactive element to your celebration
  • Customizable with different fillings and themes
  • Suitable for birthdays, anniversaries, and themed parties

Creative Piñata Cakes

Essential Ingredients & Tools

Cake Base Options:

  • Vanilla sponge cake
  • Chocolate cake
  • Red velvet cake
  • Funfetti cake

Filling Ideas:

  • M&Ms
  • Gummy bears
  • Mini marshmallows
  • Nuts and dried fruits

Frosting Choices:

  • Buttercream
  • Whipped cream
  • Fondant

Tools Needed:

  • Round cake pans
  • Cake leveler
  • Piping bags and spatula
  • Small round cutter

Table: Basic Creative Piñata Cake Ingredients

IngredientQuantity
All-purpose flour2 ½ cups
Sugar1 ½ cups
Baking powder2 tsp
Eggs4
Butter1 cup
Vanilla extract1 tsp
Milk1 cup

How to Make a Creative Piñata Cake (Step-by-Step Guide)

1. Baking the Cake Layers

  • Preheat your oven to 350°F (175°C).
  • Prepare three round cake pans and grease them with butter.
  • Mix all ingredients and bake for 30 minutes.
  • Let the cakes cool completely before assembly.

2. Creating the Hidden Pocket

  • Use a small round cutter to remove the center of two cake layers.
  • Leave the bottom and top layers whole.

3. Assembling & Filling the Cake

  • Place one cut-out layer on the bottom whole layer.
  • Add frosting around the edges and stack the second cut-out layer.
  • Fill the center hole with your chosen treats.
  • Seal the top layer and frost the entire cake.

4. Frosting & Decorating Ideas

  • Cover with smooth buttercream or a textured design.
  • Add sprinkles, fondant shapes, or edible glitter.
  • Create themed cakes such as unicorns, superheroes, or seasonal designs.

Fun & Unique Creative Piñata Cake Variations

Chocolate Explosion Creative Piñata Cake

  • Made with rich chocolate cake layers.
  • Filled with chocolate chips, caramel bites, and cocoa sprinkles.

Fruity Creative Piñata Cake

  • Uses fresh berries and fruit preserves.
  • Perfect for a refreshing summer dessert.

Rainbow Creative Piñata Cake

  • Features multi-colored layers.
  • Filled with rainbow sprinkles or jelly beans.

Kids’ Cartoon-Themed Creative Piñata Cake

  • Inspired by popular animated characters.
  • Uses edible figurines and bright colors.

Expert Tips for Perfect Creative Piñata Cakes

  • Use a firm cake base to prevent collapse.
  • Chill the cake layers before cutting for cleaner edges.
  • Add frosting between layers to ensure stability.
  • For an even bigger surprise, mix different types of fillings.

FAQ Section

What’s the best type of cake for a Creative piñata cake?

A dense, sturdy cake like vanilla sponge or chocolate cake works best to hold the hidden filling.

How do I keep the filling from sinking?

Use firm candies and fill only after assembling the first two layers to maintain structure.

Can I make a piñata cake without eggs?

Yes! Use mashed bananas, applesauce, or yogurt as an egg substitute.

What’s the best way to decorate a Creative piñata cake?

Try smooth buttercream for a classic look, fondant for themed designs, or a colorful drip effect.


Conclusion

Creative Piñata cakes are a fun and creative way to elevate any celebration. Whether you choose a chocolate explosion, a fruity surprise, or a themed design, the joy of revealing the hidden treasure inside is priceless. Ready to make your own piñata cake? Gather your ingredients, follow these steps, and surprise your loved ones with a cake they’ll never forget!

Tag us in your piñata cake creations and share your baking experience! 🍰🎉

Creative Piñata Cakes