🍰 The Best Peach Upside-Down Cake for Your Summer Moments

📝 Why Peach Upside-Down Cake Feels Like Home

Have you ever tasted something that instantly brought you back to warm afternoons and sun-drenched kitchens? That’s exactly what this peach upside-down cake delivers. It’s not just a dessert—it’s a trip down memory lane. The moment you flip that golden, caramel-glazed masterpiece onto a plate, you know you’re in for something special. Whether it was your grandmother’s Sunday specialty or something you tried once at a summer picnic, this cake taps into something deeper: comfort, simplicity, and a little slice of sunshine.

If you’re craving a dessert that balances retro charm with irresistible flavor, you’re in the right place. This isn’t just another cake recipe—it’s the one your summer needs.


🍎 Peach Upside-Down Cake: A Retro Classic with a Modern Twist

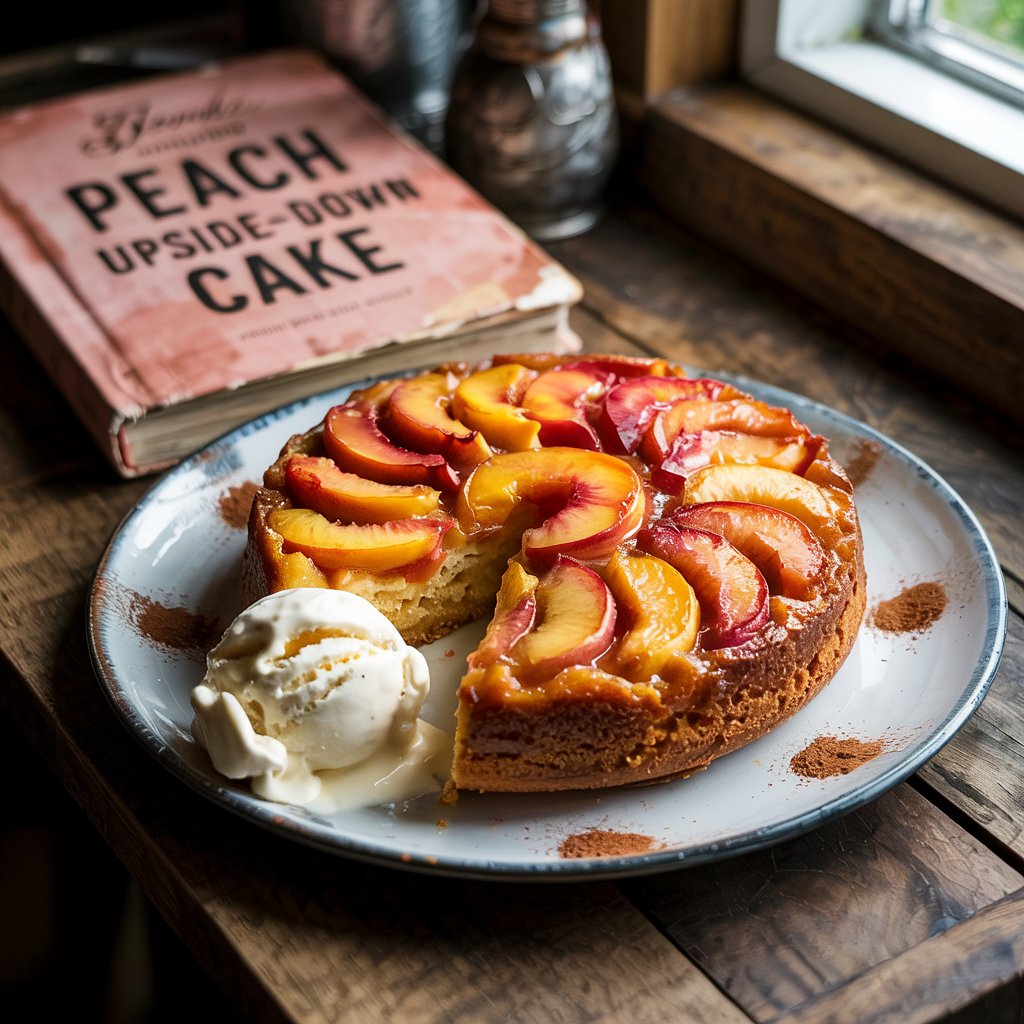
Peach upside-down cake is a vintage dessert making a huge comeback, and it’s easy to see why. Picture this: buttery sponge cake meets juicy peaches bathed in brown sugar caramel. The moment you flip the cake and reveal that glistening fruit top, you’re creating a dessert worthy of applause.

What Makes It Different?

  • Unlike its cousin, the pineapple version, this one has a mellow, summery vibe.
  • The caramelized sugar blends perfectly with peach juices, forming a syrupy topping.
  • You get a moist, flavorful crumb without needing frosting.

Perfect for summer barbecues, family get-togethers, or lazy brunches—this cake is nostalgia in every bite.


🌟 Top Reasons You Need to Try This Peach Upside-Down Cake

Still wondering if it’s worth baking? Let’s make that decision easier:

  • Juicy & Moist: The peaches bake into the cake, adding moisture and sweetness.
  • Visually Stunning: Those golden fruit slices glisten and impress.
  • Perfect for Summer: Fresh or canned peaches work, making it versatile.
  • No Fancy Tools Required: One pan, one bowl, one whisk. That’s all.
  • Vegan or Gluten-Free? It’s easy to adapt.

Your guests won’t just eat it. They’ll talk about it.


📆 Peach Upside-Down Cake Ingredients – What You’ll Need

Let’s break it down so you can prep with confidence. Here’s a handy table for your kitchen planning:

📄 Ingredient Table

ToppingCake Batter
2 tbsp unsalted butter1/2 cup unsalted butter (soft)
1/3 cup brown sugar2/3 cup granulated sugar
5–6 peach slices (fresh or canned)2 eggs
1 tsp vanilla extract
1 1/4 cups all-purpose flour
1 1/2 tsp baking powder
1/4 tsp salt
1/2 cup whole milk (or almond)

👩‍🍳 How to Make the Perfect Peach Upside-Down Cake

Get ready to create your own showstopper. Follow these simple steps:

Step-by-Step Instructions

  1. Preheat your oven to 175°C (350°F).
  2. Grease a 9-inch round cake pan. Pour in melted butter and sprinkle the brown sugar evenly.
  3. Arrange the peach slices in a spiral or fan pattern over the sugar.
  4. Cream the softened butter with granulated sugar until fluffy.
  5. Add eggs, one at a time. Stir in vanilla extract.
  6. Mix dry ingredients in a separate bowl: flour, baking powder, salt.
  7. Alternate mixing: Add flour mixture and milk to the wet batter in parts.
  8. Pour the batter gently over the peaches. Spread it evenly.
  9. Bake for 35–40 minutes or until a toothpick comes out clean.
  10. Cool 10 minutes, then flip it gently onto a plate.

✅ Quick Checklist

  • [ ] Peaches dry and sliced evenly
  • [ ] Cake batter lump-free
  • [ ] Oven fully preheated
  • [ ] Serve warm with a scoop of vanilla ice cream

💡 Baking Tips for a Flawless Upside-Down Cake

To ensure your cake looks as good as it tastes:

  • Use ripe but firm peaches: Too soft? They’ll fall apart. Too firm? Less juicy.
  • Drain canned peaches thoroughly if using.
  • Grease your pan well to prevent sticking.
  • Don’t skip the cooling time before flipping.
  • Add a twist: A pinch of nutmeg or a splash of bourbon works wonders.

✨ Fun Peach Upside-Down Cake Variations to Customize

You can make this classic your own in countless ways:

  • 🍇 Peach + Berry: Add raspberries or blueberries for a tangy kick.
  • 🍼 Boozy Peach: Mix 1 tbsp of bourbon into your topping.
  • 🌿 Vegan Version: Use vegan butter and flax eggs.
  • 🌾 Gluten-Free: Substitute all-purpose flour with almond flour and GF blend.
  • 🥜 Mini Upside-Down Cakes: Use muffin tins for party-ready servings.

❄️ How to Store and Reheat Peach Upside-Down Cake

Yes, you can make this ahead and enjoy it later!

  • Store: Keep in an airtight container in the fridge for up to 4 days.
  • 🧋 Reheat: Microwave individual slices for 15–20 seconds.
  • ❄️ Freeze: Wrap slices in cling film and store in freezer for up to 2 months.

Serve it warm again with ice cream or whipped cream for a brand-new day of indulgence.


❓ Your Peach Upside-Down Cake Questions Answered

🤔 Can I use canned peaches?

Absolutely. Just drain and dry them well before using to prevent excess moisture.

🤔 How do I prevent the cake from sticking?

Generously grease your pan, use parchment paper if needed, and let it cool before flipping.

🤔 Can I make it a day ahead?

Yes! It actually tastes better the next day. Reheat gently before serving.

🤔 Can I use almond or oat milk instead of regular?

Yes. Both work beautifully in this recipe.


🎈 Ready to Bake Your Peach Upside-Down Cake?

You’ve got the knowledge. You’ve got the ingredients. Now it’s time to make some memories. This peach upside-down cake is more than a dessert—it’s a conversation starter, a smile-bringer, a nostalgic showpiece.

🚀 Your turn! Bake it, love it, and share it. Don’t forget to tag us @HeltRecipes with #PeachUpsideVibes.


Because some desserts aren’t just recipes. They’re stories.

Peach Upside

🥕 Classic Carrot Cake Recipe with Cream Cheese Frosting – A Comfort Dessert That Never Fades

Why Carrot Cake Feels Like Home

There’s something about the scent of cinnamon and nutmeg wafting through your kitchen that feels like a hug from the past. If you’ve ever sat at a family table with a warm slice of Carrot Cake in front of you, topped with a velvety layer of cream cheese frosting, you know that comfort has a flavor. This cake isn’t just dessert – it’s a celebration of memories, warmth, and tradition. And in 2025, it’s making a trendy comeback in brunch menus and mini-layer cake versions.

What Makes Carrot Cake Irresistible?

You might wonder, why does carrot cake never go out of style? It’s the perfect blend of textures and flavors:

  • Moist and tender crumb thanks to freshly grated carrots and oil
  • A balance of sweet, spice, and nutty richness
  • That tangy, rich cream cheese frosting that makes every bite indulgent

Today, you’ll learn how to bake your own foolproof carrot cake with variations you can call your own.

Carrot Cake Ingredients Breakdown – What You Need and Why

Key Cake Ingredients

IngredientPurpose
Grated carrotsNatural sweetness and moisture
All-purpose flourBase structure
Sugar (brown/white)Sweetness and caramel-like flavor
EggsHelps bind and provide structure
OilKeeps the cake moist and tender
Walnuts or pecansAdds crunch and nutty depth
Cinnamon, nutmegWarm, comforting spice notes
Baking powder/sodaEnsures proper rise

Cream Cheese Frosting Ingredients

IngredientPurpose
Cream cheeseRich, tangy base for frosting
ButterCreamy texture and stability
Powdered sugarSweetness and silky texture
Vanilla extractBalances the tanginess with warmth

Step-by-Step Carrot Cake Recipe

Cake Preparation

  1. Preheat your oven to 175°C (350°F). Grease and flour your cake pan.
  2. Whisk together dry ingredients: flour, baking soda, cinnamon, and nutmeg.
  3. In another bowl, beat eggs and sugar until light and fluffy.
  4. Stir in oil, then fold in grated carrots and chopped nuts.
  5. Combine dry and wet ingredients until smooth.
  6. Pour into prepared pan and smooth the top.
  7. Bake for 35–45 minutes or until a toothpick comes out clean.
  8. Cool completely before frosting.

Cream Cheese Frosting Instructions

  • Beat softened cream cheese and butter until creamy.
  • Gradually mix in powdered sugar and vanilla extract.
  • Spread or pipe onto your cooled carrot cake.
  • Top with extra walnuts or orange zest for a decorative finish.

Variations to Try – Make It Your Own

Want to experiment? Here are ways to personalize your carrot cake:

  • Add crushed pineapple for tropical notes
  • Stir in shredded coconut or golden raisins
  • Use almond flour for a gluten-free twist
  • Try mini bundt molds or cupcake tins for brunch-friendly servings
  • Add orange zest or a dash of ground ginger for a fresh zing

Nutritional Info & Storage Tips

Carrot cake is rich, yes, but every slice is worth savoring.

  • Calories per slice: ~350–400 depending on size and frosting
  • Storage: Refrigerate in an airtight container up to 5 days
  • Freezing: Unfrosted cake layers freeze well for up to 3 months
Carrot Cake

Perfect Occasions for Serving Carrot Cake

This cake suits every season and setting:

  • Easter brunch
  • Autumn tea parties
  • Birthdays (especially with layered versions!)
  • Potlucks or holiday dinners
  • Just because you’re craving something cozy

Conclusion – Your Next Go-To Cake Recipe

There are cakes, and then there are cakes that tell stories. Carrot cake is the latter. You now have everything you need to bake this timeless treat from scratch, impress guests, or simply spoil yourself. Once it enters your recipe rotation, don’t be surprised if you get requests to bring it again and again.

Frequently Asked Questions (FAQs) – Carrot Cake Edition

Can I use butter instead of oil?

Yes, but oil provides more moisture. If you want a richer texture and buttery flavor, substitute part or all of the oil with melted butter.

How finely should I grate the carrots?

Use a fine or medium grater. Too large and the carrots might stay crunchy. Too fine and they might disappear into the batter.

Can I make carrot cake ahead of time?

Absolutely. It tastes even better after a day or two as the flavors meld. Just refrigerate it, especially with the cream cheese frosting.

Is carrot cake healthy?

While it does include carrots and nuts, it’s still a dessert. You can make it healthier by reducing sugar or using whole-wheat flour.

✅ Call to Action

Ready to bake? Try this recipe and share your carrot cake creation online with the hashtag #CarrotCakeLove. Got a twist to add? Drop it in the comments or tag us – we love discovering your sweet spins!

Chocolate Chip Cookie Cake: The Ultimate Giant Treat Everyone Loves ✪

Chocolate Chip Cookie Cake

If you’re craving something warm, nostalgic, and completely satisfying, you’re in the right place. The Chocolate Chip Cookie Cake is not just a dessert—it’s a celebration on a plate. Imagine the comfort of a freshly baked cookie combined with the grandeur of a cake. It’s chewy in the middle, slightly crisp on the edges, and overflowing with melty chocolate chips. Whether you’re throwing a birthday party, celebrating a milestone, or simply in need of something sweet, this recipe brings the perfect balance of taste, texture, and joy.

Chocolate Chip Cookie Cake

A Delicious Fusion of Two Classics

You’ve probably had chocolate chip cookies and you’ve definitely eaten cake, but this dessert is where the two worlds collide in the most delightful way. A Chocolate Chip Cookie Cake takes the gooey, buttery goodness of a traditional cookie and turns it into a sliceable cake.

  • Chewy interior like a soft cookie
  • Firm enough to cut clean slices
  • Typically baked in a round or square pan
  • Often topped with frosting or fun decorations

Unlike store-bought versions packed with preservatives, this homemade version is full of flavor and easy to customize.


The Best Dessert for Any Occasion

There are countless reasons why this treat might become your go-to dessert:

  • Perfect for birthdays and special events
  • Simple to make with pantry staples
  • No need to scoop individual cookies
  • Less cleanup compared to traditional cookies
  • Customizable with toppings, fillings, and frostings

This dessert offers the best of both worlds—the nostalgia of cookies and the celebration factor of cake.


Pantry Staples with Maximum Flavor

Before you get baking, make sure you have all the essentials ready. Here’s everything you need to make your very own Chocolate Chip Cookie Cake:

Ingredient Table

IngrédientQuantité
Beurre doux (mou)250 g
Sucre brun200 g
Œufs2
Extrait de vanille1 c. à café
Farine300 g
Levure chimique1 c. à café
Sel1 pincée
Pépites de chocolat200 g

📝 Pro Tip: For deeper flavor, use dark brown sugar and a mix of dark and semi-sweet chocolate chips.


Quick and Easy Prep Instructions

Follow this guide for a flawless result every time:

  1. Preheat your oven to 180°C (350°F).
  2. Cream together the butter and sugar until light and fluffy.
  3. Add the eggs one by one, followed by the vanilla extract.
  4. In a separate bowl, whisk together the flour, baking powder, and salt.
  5. Combine the dry ingredients with the wet ingredients.
  6. Fold in the chocolate chips evenly.
  7. Spread the dough into a greased or lined baking pan.
  8. Bake for 25-30 minutes or until the top is golden.
  9. Cool before slicing into portions.

For an extra indulgent touch, serve warm with a scoop of vanilla ice cream or drizzle with caramel sauce.


From Texture to Taste – What Makes the Difference?

To ensure your cookie cake turns out perfect, keep these baking insights in mind:

  • Avoid overbaking: Pull the cake out once the edges are golden but the center still looks a bit soft.
  • Chill your dough for 15-30 minutes to enhance flavor and reduce spreading.
  • Use parchment paper for easy lifting and clean edges.
  • Mix-ins matter: Try white chocolate chips, chopped nuts, or sprinkles.
  • Decorate with frosting or writing for personalized messages.

Storage and Freezing Instructions

Keep It Fresh Longer

The beauty of this dessert is that it stores well. Here’s how to keep it fresh:

  • Store in an airtight container at room temperature for up to 5 days.
  • Freeze whole or sliced in plastic wrap for up to 2 months.
  • Reheat slices in the microwave for 15 seconds to enjoy a warm, gooey bite.

Nutritional Information (Approximate)

Know What You’re Eating

NutrientPer Slice (1/12)
Calories370
Fat20g
Carbohydrates45g
Sugars25g
Protein4g

Note: Values may vary depending on your ingredient brands.


Serving Suggestions & Variations

Why settle for just chocolate chips when you can elevate your cookie cake in multiple ways?

  • Add a layer of chocolate ganache on top
  • Drizzle with peanut butter or caramel
  • Decorate with frosting borders and sprinkles
  • Slice into fun shapes with cookie cutters
  • Serve with fruit and whipped cream for a lighter option

Yes! Substitute each egg with a flax egg (1 tbsp ground flax + 3 tbsp water) or commercial egg replacers.

A 9-inch round or 8×8 square pan works best. For thinner cookies, go larger.

Don’t overbake it, and store it in an airtight container. A slice of bread in the container can help maintain moisture.

Can I double this recipe?

Absolutely. Just use a larger pan (like 13×9 inches) and adjust the bake time by 5-10 minutes.


When you bake a Chocolate Chip Cookie Cake, you’re not just making dessert. You’re crafting an experience—one that combines rich flavor with homemade warmth. Whether you’re baking for others or treating yourself, this recipe offers a reliable, delicious, and endlessly adaptable go-to.

So what are you waiting for? Gather your ingredients, preheat your oven, and let the baking begin. Your future self will thank you for every chocolatey bite.


📣 Call to Action:

Tried this recipe? Share your cookie cake masterpiece on social media and tag us with #ChocolateChipCookieCake. Want more feel-good dessert ideas? Subscribe to our newsletter and never miss a sweet moment!

Chocolate Coffee Tiramisu: A Decadent Twist on the Italian Classic

Introduction

"No-Bake Espresso Cheesecake – A rich and creamy cheesecake infused with espresso, set on a chocolate cookie crust, and topped with whipped cream and cocoa powder. A perfect dessert for coffee lovers!"

If you’re a fan of coffee and chocolate, you’re in for a treat. Chocolate Coffee Tiramisu is the ultimate fusion of bold espresso, velvety mascarpone, and rich cocoa, creating a dessert that is both indulgent and satisfying. Whether you’re making it for a dinner party, a holiday celebration, or just to satisfy your sweet tooth, this creamy and dreamy tiramisu will impress every time.

In this article, we’ll walk you through everything you need to know about making the perfect Chocolate Coffee Tiramisu. From the essential ingredients to step-by-step preparation, expert tips, and variations, this guide will help you create a restaurant-quality tiramisu at home.

Why You’ll Love This RecipeChocolate Coffee Tiramisu

  • Rich Coffee and Chocolate Flavor: The perfect balance of strong espresso and dark chocolate.
  • No-Bake Dessert: No need to turn on the oven, making it an easy yet elegant option.
  • Make-Ahead Friendly: Ideal for parties and gatherings as it tastes even better the next day.
  • Customizable: Adapt it to your preferences with different liqueurs, chocolates, or toppings.

Ingredients

For the Tiramisu Layers:

  • 200g ladyfinger biscuits (Savoiardi)
  • 1 cup (240ml) brewed espresso, cooled
  • 2 tbsp coffee liqueur (optional)
  • 250g mascarpone cheese
  • ½ cup (100g) granulated sugar
  • ½ cup (50g) unsweetened cocoa powder
  • 1 cup (240ml) heavy whipping cream
  • 1 tsp vanilla extract
  • 1 tbsp dark chocolate shavings (for garnish)
  • 1 tbsp cocoa powder (for dusting)

Step-by-Step Instructions for Chocolate Coffee Tiramisu

Step 1: Brew the Espresso

Prepare one cup of strong espresso and allow it to cool to room temperature. If you prefer an extra depth of flavor, mix in two tablespoons of coffee liqueur like Kahlúa or Tia Maria.

Step 2: Prepare the Mascarpone Mixture

  1. In a large mixing bowl, whisk together the mascarpone cheese, sugar, and cocoa powder until smooth.
  2. In a separate bowl, whip the heavy cream with vanilla extract until stiff peaks form.
  3. Gently fold the whipped cream into the mascarpone mixture, ensuring a light and airy consistency.

Step 3: Assemble the Layers

  1. Quickly dip each ladyfinger into the brewed espresso and arrange a single layer in a rectangular dish.
  2. Spread half of the mascarpone mixture evenly over the ladyfingers.
  3. Repeat with another layer of dipped ladyfingers and top with the remaining mascarpone mixture.

Step 4: Garnish and Chill

  1. Dust the top generously with cocoa powder.
  2. Sprinkle with dark chocolate shavings for extra decadence.
  3. Cover and refrigerate for at least 4 hours (preferably overnight) for the flavors to meld.

Expert Tips for the Best Chocolate Coffee Tiramisu

  • Use High-Quality Ingredients: Opt for fresh espresso and high-quality dark chocolate for an authentic taste.
  • Don’t Over-Soak the Ladyfingers: A quick dip prevents them from becoming too soggy.
  • Chill for Maximum Flavor: Overnight chilling enhances the flavors and texture.
  • Customize the Sweetness: Adjust sugar levels based on personal preference.

Variations

  • Alcohol-Free Version: Skip the coffee liqueur and use vanilla extract instead.
  • White Chocolate Tiramisu: Swap out dark chocolate for white chocolate for a sweeter twist.
  • Mocha Tiramisu: Add melted chocolate to the mascarpone mixture for a richer mocha flavor.

Frequently Asked Questions (FAQ)

Q: How long can I store tiramisu?
A: Store it in the fridge for up to 3 days in an airtight container.

Q: Can I make this recipe without mascarpone?
A: Yes! Substitute mascarpone with a mixture of cream cheese and heavy cream for a similar texture.

Q: Is it possible to freeze tiramisu?
A: Absolutely! Wrap it tightly and freeze for up to 2 months. Thaw in the refrigerator before serving.

Final Thoughts

Chocolate Coffee Tiramisu is a sophisticated yet easy-to-make dessert that’s perfect for any occasion. The creamy layers of mascarpone, espresso-soaked ladyfingers, and a dusting of rich cocoa powder make this a standout treat. Whether you’re serving it for a gathering or indulging in a personal moment of bliss, this dessert is guaranteed to impress.

So, what are you waiting for? Gather your ingredients and start whipping up this delicious Italian classic with a chocolatey twist today! 🍫☕

"No-Bake Espresso Cheesecake – A rich and creamy cheesecake infused with espresso, set on a chocolate cookie crust, and topped with whipped cream and cocoa powder. A perfect dessert for coffee lovers!"

Opera Cake Recipe: A Luxurious French Dessert for Coffee & Chocolate Lovers

Opera Cake Recipe

Opera Cake recipe is a decadent French pastry that layers almond sponge (joconde), coffee buttercream, and rich chocolate ganache. This sophisticated dessert is a dream for coffee and chocolate lovers alike. Whether you’re a baking enthusiast or a beginner looking for a challenge, this step-by-step guide will help you create an authentic Opera Cake at home.

Why Is It Called Opera Cake Recipe ?

This elegant pastry is said to be inspired by the Paris Opera House. Its precise layers resemble the tiers of an opera stage, while its rich coffee-chocolate flavors evoke the grandeur of a night at the opera. Created by French pastry chef Cyriaque Gavillon in the 1950s, the Opera Cake has since become a classic in patisseries worldwide.

Ingredients & Preparation

Almond Sponge (Joconde) Layer

IngredientQuantity
Almond flour3/4 cup (75g)
All-purpose flour3/4 cup (95g)
Large eggs6
Sugar3/4 cup (150g)
Melted butter4 tbsp

Coffee Buttercream

IngredientQuantity
Sugar1/2 cup (100g)
Egg yolks2
Butter1/2 cup (115g)
Strong coffee2 tbsp

Chocolate Ganache

IngredientQuantity
Heavy cream3/4 cup (180ml)
Dark chocolate1 cup (175g)

Step-by-Step Instructions

Step 1: Make the Almond Sponge (Joconde)

  1. Preheat your oven to 350°F (175°C). Line a baking sheet with parchment paper.
  2. In a bowl, beat the eggs and sugar until light and fluffy.
  3. Gently fold in the almond flour and all-purpose flour.
  4. Stir in the melted butter.
  5. Pour the batter onto the baking sheet and spread evenly.
  6. Bake for 12-15 minutes or until golden brown. Let it cool before cutting into layers.

Step 2: Prepare the Coffee Buttercream

  1. Whisk the egg yolks in a bowl until creamy.
  2. In a saucepan, dissolve sugar in a small amount of water and bring to a soft boil.
  3. Slowly drizzle the hot sugar syrup into the egg yolks while whisking.
  4. Once cooled, beat in the butter until smooth.
  5. Add strong coffee for flavor and mix well.

Step 3: Make the Chocolate Ganache

  1. Heat the heavy cream until just simmering.
  2. Pour over the dark chocolate and let it sit for 2 minutes.
  3. Stir until smooth and glossy.

Step 4: Assemble the Opera Cake recipe

  1. Cut the almond sponge into three equal layers.
  2. Place the first sponge layer and spread coffee buttercream evenly.
  3. Add another sponge layer and pour a thin layer of ganache.
  4. Repeat with the final layer, finishing with a smooth chocolate glaze.
  5. Refrigerate for at least 2 hours before serving.

Pro Tips for the Perfect Opera Cake recipe

  • Use high-quality chocolate for the best flavor.
  • Let each layer chill before adding the next to prevent collapsing.
  • Slice with a hot knife for clean, elegant layers.

FAQs About Opera Cake recipe

Q: Can I make Opera Cake recipe ahead of time?
Yes! Opera Cake tastes even better the next day as the flavors develop. Store it in the refrigerator for up to 3 days.

Q: Can I use instant coffee instead of espresso?
Yes, but for an authentic taste, brewed espresso is recommended.

Q: How do I store leftovers?
Keep the cake in an airtight container in the fridge for up to 3 days.

Final Thoughts

Opera Cake is the epitome of French elegance and luxurious flavor. Whether you’re serving it for a special occasion or treating yourself to a Parisian experience, this cake is sure to impress. Try making it today and share your masterpiece!

Love French desserts? Follow us for more classic recipes!

Chocolate Covered Delights for Every Season: A Year-Round Indulgence 🍫🍓

There’s something magical about the pairing of rich, velvety Chocolate Covered Delights for Every Season |and the natural sweetness of fruits or baked goods. Whether you’re celebrating a holiday, hosting a gathering, or simply treating yourself, chocolate-dipped delights bring joy and a touch of luxury to any occasion. Best of all, you can enjoy these decadent treats throughout the year. No matter the season, there’s a perfect chocolate-covered creation waiting for you to try. In this article, you’ll learn how to enjoy these delicious treats in every season, with a collection of chocolate-dipped delights for winter, spring, summer, and fall.

Chocolate Covered Delights for Every Season


Chocolate Covered Delights for Every Season

Chocolate-dipped treats are more than just a simple indulgence; they are a celebration of flavor, creativity, and versatility. The process of dipping fruits, cookies, or cakes into melted chocolate creates a unique combination of textures—crunchy, smooth, and rich all in one bite. And the best part? Chocolate can be paired with nearly anything, from the juiciest fruits to delicate pastries, making it perfect for every season.

The beauty of chocolate-dipped treats lies in their ability to adapt to the flavors of each season. During the winter months, they can be cozy and warming; in the spring, they’re fresh and fruity; summer brings out refreshing, chilled chocolate-covered treats; and in the fall, the rich and spicy flavors shine through.

Let’s explore how to make the most of chocolate-dipped treats throughout the year, starting with the chilly months of winter.


Winter Wonderland: Cozy Chocolate Covered Delights for Every Season |

Winter is the perfect time to enjoy Chocolate Covered Delights for Every Season that warm your heart and satisfy your sweet cravings. As the weather turns chilly, indulge in treats that bring comfort and cheer, whether you’re snuggling up indoors or hosting a festive gathering.

Perfect Pairings for Cold Days

When the temperature drops, you’ll want chocolate-covered treats that offer both richness and warmth. Here are a few of the best options to enjoy this season:

  • Chocolate-Dipped Strawberries for Valentine’s Day: Perfect for the romantic season, chocolate-dipped strawberries are a luxurious treat that everyone loves. Use dark or milk chocolate for a sweet contrast with the tartness of the fruit.
  • Chocolate-Dipped Pretzels: These combine salty and sweet for a satisfying snack. The crunchy pretzels and smooth chocolate make them ideal for cozy evenings by the fire.
  • Chocolate-Dipped Oranges: With a touch of citrus, these treats bring a zesty twist to your chocolate indulgence. The refreshing flavor of the orange complements the richness of the chocolate.

Recipe Example: Chocolate Covered Delights for Every Season

Valentine’s Day calls for Chocolate Covered Delights for Every Season |, and nothing is more fitting than chocolate-dipped strawberry hearts. This easy recipe combines two of your favorite things—chocolate and fresh strawberries.

Ingredients:

IngredientQuantity
Fresh strawberries1 lb (450g)
Dark chocolate8 oz (225g)
Pink food coloringA few drops
SprinklesOptional

Instructions:

  1. Melt the dark chocolate in a microwave-safe bowl, stirring every 30 seconds until smooth.
  2. Add a few drops of pink food coloring to the melted chocolate to give it a festive touch.
  3. Dip each strawberry into the chocolate, making sure to coat it well.
  4. Add sprinkles for extra flair, if desired.
  5. Place the dipped strawberries on a parchment-lined tray and chill them in the fridge for 20 minutes to set.

Tips:

  • These chocolate-dipped hearts are ideal for sharing at a romantic dinner or a Galentine’s gathering.
  • Pair with a glass of red wine or hot cocoa for the perfect winter indulgence.

Spring Fling: Fresh and Fruity Chocolate Dipped Treats

As the snow melts and flowers bloom, spring invites us to enjoy fresh, fruity treats that feel light and refreshing. Chocolate-dipped fruits are perfect for the season’s first burst of color and flavor. Whether you’re hosting a brunch or enjoying a sunny afternoon, these chocolate-covered creations will brighten your day.

Celebrate the Bloom of Fresh Fruits

During spring, fruits like cherries, peaches, and apricots reach their peak flavor, making them the perfect candidates for dipping in chocolate. These treats combine the tartness of the fruit with the sweetness of the chocolate for a delightful balance.

  • Chocolate-Dipped Chhttps://en.wikipedia.org/wiki/Tim_Tamerries: These plump, juicy fruits are ideal for dipping into rich dark chocolate, making for a sophisticated spring treat.
  • Chocolate-Dipped Cake Pops: These fun, bite-sized treats are perfect for any spring celebration, from baby showers to Easter parties.
  • Chocolate-Dipped Peaches: For a fruity, juicy snack, dip fresh peach slices into white or milk chocolate.

Recipe Example: Chocolate-Dipped Cherries with a Hint of Almond

This recipe takes the classic chocolate-dipped cherry and adds a touch of almond for extra flavor. It’s a perfect dessert to enjoy with friends or family.

Ingredients:

IngredientQuantity
Fresh cherries (pitted)1 lb (450g)
Milk chocolate6 oz (170g)
Ground almonds2 tbsp
White chocolate (for drizzle)2 oz (60g)

Instructions:

  1. Melt the milk chocolate in a microwave-safe bowl, stirring until smooth.
  2. Dip each cherry into the milk chocolate, making sure it’s coated evenly.
  3. Sprinkle ground almonds on top of the chocolate-covered cherries.
  4. Drizzle white chocolate over the cherries for a decorative touch.
  5. Place the cherries on a parchment-lined tray and refrigerate for 15 minutes to set.

Tips:

  • These chocolate-dipped cherries are perfect for a springtime brunch or as a light, after-dinner treat.
  • Pair with a refreshing iced tea or a glass of white wine to enhance the fruity flavors.

Summer Sensations: Light, Refreshing Chocolate Dipped Treats

Summer calls for cool, refreshing treats that help beat the heat, and chocolate-dipped fruits and chilled desserts are perfect for hot days. Imagine enjoying a crisp, cold chocolate-dipped pineapple slice by the pool, or sharing chocolate-covered frozen popsicles with friends at a BBQ.

A Sweet Treat to Beat the Heat

In the heat of summer, you want something light and refreshing. Here are a few chocolate-dipped treats to enjoy during the warm months:

  • Chocolate-Dipped Pineapple Spears: The tartness of pineapple paired with the sweetness of chocolate creates a perfect balance of flavors.
  • Chocolate-Dipped Mango: Mango’s tropical sweetness pairs beautifully with both dark and white chocolate.
  • Chocolate-Dipped Frozen Popsicles: For a fun twist, dip homemade frozen fruit popsicles into chocolate and freeze them for a cool treat.

Recipe Example: Chocolate-Dipped Pineapple Spears

chocolate covered delights

Refreshing, juicy pineapple dipped in rich chocolate covered delights for every season is a must-have summer snack. This recipe is perfect for serving at picnics or BBQs.

Ingredients:

IngredientQuantity
Fresh pineapple (peeled)1 medium
Dark chocolate8 oz (225g)
Crushed coconut¼ cup

Instructions:

  1. Cut the pineapple into spears or chunks.
  2. Melt the dark chocolate in a microwave-safe bowl until smooth.
  3. Dip the pineapple spears into the chocolate, ensuring they are coated evenly.
  4. Roll the dipped pineapple in crushed coconut.
  5. Place the pineapple on a parchment-lined tray and refrigerate for 20 minutes.

Tips:

  • For extra refreshment, chill the pineapple before dipping.
  • Serve with a chilled coconut water or tropical punch for a full summer experience.

Fall Flavors: Warm, Spicy Chocolate Dipped Treats

As the leaves change and the air becomes crisp, fall brings with it rich, spicy flavors that are perfect for pairing with chocolate. Think about cozying up with a chocolate-dipped apple or indulging in chocolate-dipped gingerbread cookies during the fall season.

Seasonal Spice Meets Chocolate

Fall flavors like cinnamon, nutmeg, and ginger pair beautifully with chocolate, creating a warm and comforting treat. Here are some chocolate-covered delights to enjoy during the fall:

  • Chocolate-Dipped Apples: These are a classic fall treat, especially with a drizzle of caramel or a sprinkle of cinnamon.
  • Chocolate-Dipped Cinnamon Pears: A unique twist on traditional chocolate-covered fruit, perfect for Thanksgiving gatherings.
  • Chocolate-Dipped Gingerbread Cookies: The spiced flavor of gingerbread combined with the sweetness of chocolate makes for an irresistible treat.

Recipe Example: Chocolate-Dipped Apple Slices with Cinnamon

This autumn-inspired recipe combines the tartness of apples with a cinnamon-spiced chocolate coating.

Ingredients:

IngredientQuantity
Granny Smith apples4 apples
Dark chocolate8 oz (225g)
Cinnamon1 tsp
Crushed nuts (optional)2 tbsp

Instructions:

  1. Slice the apples into wedges.
  2. Melt the dark chocolate and stir in cinnamon for added warmth.
  3. Dip each apple slice into the chocolate mixture, coating them evenly.
  4. Sprinkle with crushed nuts if desired.
  5. Place the dipped apples on a parchment-lined tray and refrigerate until set.

Tips:

  • Pair with a cup of hot cider or pumpkin spice latte for the ultimate fall treat.
  • These are perfect for Halloween parties or a Thanksgiving dessert table.

Conclusion: Indulge in Chocolate Dipped Treats All Year Long!

Chocolate-dipped treats aren’t just for special occasions—they’re a versatile indulgence that can be enjoyed all year long. Whether you’re savoring the richness of dark chocolate in the winter, refreshing fruits in the spring, tropical flavors in the summer, or cozy spiced treats in the fall, there’s always a chocolate-covered delight waiting for you.

Now it’s time for you to indulge! Try out these seasonal recipes, and let your creativity run wild with different fruits, nuts, and flavors. Share your chocolate-dipped creations with friends and family, and make every season a little sweeter.

Call to Action:

What’s your favorite chocolate-covered treat? Try one of the recipes in this guide and share your photos with us on social media—tag us and let’s spread the love for chocolate-covered delights!

How to Make London Fog Macarons – A Delicate Earl Grey and Vanilla Treat

Introduction

Imagine a macaron that melts in your mouth, infused with the aromatic warmth of Earl Grey tea and the comforting sweetness of vanilla. That’s exactly what London Fog Macarons deliver—a bite-sized version of the classic London Fog latte, with a perfect balance of floral bergamot, rich black tea, and creamy vanilla.

If you’re a fan of london fog macarons but have never tried making them at home, you’re in for a treat. While these delicate pastries have a reputation for being tricky, the right techniques and a bit of patience will help you master them. Whether you’re preparing a batch for afternoon tea, a special occasion, or just to indulge in something elegant, this guide will walk you through every step to ensure success.

Let’s dive into the art of making London Fog Macarons from scratch, from selecting the best ingredients to troubleshooting common issues and achieving bakery-quality results at home.


What Are London Fog Macarons?

London Fog Macarons take inspiration from the famous London Fog latte, a comforting drink made with Earl Grey tea, steamed milk, and vanilla syrup. These macarons capture that same flavor profile in a crisp-yet-chewy almond shell, sandwiching a creamy, Earl Grey-infused buttercream filling.

Why You’ll Love These Macarons:

✅ Perfect balance of floral, sweet, and creamy flavors
✅ Light, airy texture with a satisfying chew
✅ A unique twist on traditional French macarons
✅ Great for gifting, parties, or an elegant afternoon treat

Macarons can be finicky, but following precise measurements and techniques will set you up for success.


Ingredients and Tools You’ll Need

Before you start, it’s essential to gather all your ingredients and tools. Macarons require precise measurements, so using a kitchen scale will help ensure accuracy.

Macaron Shell Ingredients

IngredientMeasurement
Almond flour100g
Powdered sugar100g
Egg whites2 large
Granulated sugar50g
Earl Grey tea leaves (finely ground)1 tsp
Vanilla extract½ tsp
Food coloring (optional)A few drops

London Fog Buttercream Filling

IngredientMeasurement
Unsalted butter100g
Powdered sugar200g
Earl Grey-infused heavy cream2 tbsp
Vanilla extract1 tsp

Essential Tools

✔ Kitchen scale (for accuracy)
✔ Stand mixer or hand mixer
✔ Fine mesh sieve
✔ Piping bags
✔ Baking mat or parchment paper
✔ Sifter for dry ingredients


Step-by-Step Guide: How to Make London Fog Macarons

1. Preparing the Macaron Shells

  1. Sift the dry ingredients: In a bowl, sift the almond flour and powdered sugar together. This removes lumps and ensures a smooth batter.
  2. Make the meringue: In a clean, dry mixing bowl, whip egg whites until foamy. Gradually add the granulated sugar, beating until glossy stiff peaks form.
  3. Fold in dry ingredients: Gently fold the sifted almond flour mixture into the meringue using a spatula. Add ground Earl Grey tea and vanilla extract. Mix until the batter flows in a thick ribbon when lifted.

2. Piping and Resting the Macarons

  1. Transfer the batter into a piping bag fitted with a round tip.
  2. Pipe small, uniform circles onto a parchment-lined baking sheet.
  3. Tap the baking sheet on the counter to remove air bubbles.
  4. Let the macarons rest at room temperature for 30-45 minutes, or until they form a slight skin.

3. Baking to Perfection

  1. Preheat the oven to 150°C (300°F).
  2. Bake for 12-15 minutes, rotating the tray halfway through.
  3. Let the macarons cool completely before removing them from the baking sheet.

4. Making the London Fog Buttercream

  1. Infuse the cream: Heat heavy cream and steep Earl Grey tea for 5-10 minutes. Strain and let it cool.
  2. Whip the butter: In a mixing bowl, beat butter until fluffy.
  3. Add powdered sugar: Gradually add powdered sugar while continuing to mix.
  4. Incorporate the infused cream and vanilla: Mix until the buttercream is smooth and creamy.

5. Assembling the Macarons

  1. Pipe a small amount of buttercream onto one macaron shell.
  2. Sandwich with another shell and press gently.
  3. For best results, let macarons mature in the refrigerator for 24 hours before serving.

Expert Tips for Perfect Macarons

🔹 Use room temperature egg whites – They whip up better for a stable meringue.
🔹 Grind Earl Grey tea finely – Prevents a grainy texture in the batter.
🔹 Don’t overmix or undermix the batter – Overmixing makes the batter too runny, while undermixing creates lumpy shells.
🔹 Allow the macarons to rest before baking – This helps develop the characteristic “feet” at the base.
🔹 Mature macarons overnight – They taste better the next day as the flavors meld.


Common Macaron Mistakes and How to Fix Them

1. Macarons Cracking?

  • Cause: Not resting long enough before baking.
  • Solution: Let them sit at room temperature until they form a dry skin.

2. Hollow Shells?

  • Cause: Over-whipped meringue or high oven temperature.
  • Solution: Ensure stiff peaks and bake at the correct temperature.

3. Uneven Macarons?

  • Cause: Uneven piping or an unlevel baking sheet.
  • Solution: Use a piping template or marked baking mat.

FAQs About London Fog Macarons

1. Can I use Earl Grey tea bags instead of loose-leaf tea?
Yes! Just grind the tea finely for an even distribution.

2. How do I store London Fog Macarons?
Keep them in an airtight container in the fridge for up to 5 days.

3. Can I freeze macarons?
Absolutely! Freeze in an airtight container for up to 2 months.

4. Why do my macarons have no feet?
This happens when the batter is too wet or hasn’t rested long enough before baking.

5. Can I make these without food coloring?
Yes! Food coloring is optional and doesn’t affect the flavor.


Conclusion

You’ve just unlocked the secrets to making bakery-quality London Fog Macarons at home. With their crisp shells, chewy texture, and velvety Earl Grey buttercream, these macarons are a perfect indulgence for tea lovers.

london fog macarons

Pistachio Raspberry Cake – A Perfect Blend of Nutty & Tart Flavors

Introduction: A Cake Worth Pistachio Raspberry Cake

Imagine a dessert that effortlessly combines the nutty richness of pistachios with the bright, tangy pop of raspberries. That’s exactly what this Pistachio Raspberry Cake delivers—a sophisticated yet easy-to-make treat that brings indulgence to your everyday moments. Whether you’re celebrating a special occasion or simply treating yourself, this cake is bound to impress.

In this article, you’ll discover a step-by-step guide to creating this delicious masterpiece, along with expert tips, variations, and answers to your most common baking questions. Let’s get started!


What is Pistachio Raspberry Cake?

Pistachio Raspberry Cake is a unique fusion of flavors that blends the earthy, buttery taste of pistachios with the lively tartness of raspberries. This cake stands out due to its distinctive texture—moist, fluffy, and bursting with fresh fruit.

Why You’ll Love This Recipe

  • Nutty richness: Ground pistachios infuse every bite with deep flavor.
  • Perfectly balanced: Sweetness meets tartness with fresh raspberries.
  • Visually stunning: The green hue of pistachios contrasts beautifully with bright red raspberries.
  • Versatile: Serve it as a brunch treat, an elegant dessert, or a tea-time snack.
  • Customizable: Adjust the sweetness, frosting, or even make it gluten-free!

Ingredients for the Best Pistachio Raspberry Cake

Key Ingredients & Their Roles

IngredientRole in Recipe
Pistachios (finely ground)Provides nutty flavor and a subtle green hue
Raspberries (fresh or frozen)Adds tartness and visual contrast
Almond flourEnhances moisture and texture
All-purpose flourGives structure to the cake
Butter or oilEnsures richness and a tender crumb
EggsProvides stability and fluffiness
Sugar & vanillaBalances flavors and adds sweetness
Baking powder & sodaEnsures a light, airy texture
Milk or yogurtAdds moisture and softness

Step-by-Step Guide to Making Pistachio Raspberry Cake

Preparation – Setting the Stage for Perfection

  • Preheat your oven to 350°F (175°C) and grease a cake pan.
  • Grind the pistachios into a fine powder using a food processor.
  • Sift the dry ingredients to ensure a smooth batter.

Mixing the Batter – Achieving the Right Consistency

  1. Cream butter and sugar until light and fluffy.
  2. Add eggs one at a time, ensuring full incorporation.
  3. Gradually mix in pistachio flour, almond flour, and baking agents.
  4. Slowly fold in raspberries, being careful not to crush them.

Baking – The Key to a Moist Cake

  • Pour the batter into the prepared pan and smooth the top.
  • Bake for 30–35 minutes or until a toothpick inserted in the center comes out clean.
  • Let it cool completely before applying frosting or glaze.

Decadent Frosting & Garnishes

Best Frosting Choices

  • Mascarpone Vanilla Frosting: Light and creamy, complementing the nutty cake.
  • Raspberry Buttercream: Enhances the fruity flavors and adds a touch of pink.
  • Pistachio Whipped Cream: A simple and airy topping.

Creative Decoration Ideas

  • Sprinkle with chopped pistachios for extra crunch.
  • Drizzle with raspberry compote for a glossy finish.
  • Garnish with fresh berries and edible flowers for an elegant touch.

Serving & Pairing Suggestions

  • Best served chilled or at room temperature.
  • Pair with tea, coffee, or a glass of prosecco for a sophisticated dessert experience.
  • Enjoy as a brunch centerpiece or as an after-dinner treat.

Frequently Asked Questions (FAQ)

Can I use frozen raspberries?

✅ Yes! Toss them in a little flour before adding them to the batter to prevent them from sinking.

How do I make this cake gluten-free?

✅ Simply substitute almond flour or a gluten-free flour blend for the all-purpose flour.

Can I make this cake in advance?

✅ Absolutely! Store it in an airtight container at room temperature for up to 3 days, or refrigerate for up to a week.

Can I make cupcakes instead of a full cake?

✅ Yes! Simply divide the batter into cupcake liners and bake for 18–20 minutes.


Conclusion: Bake, Share & Enjoy!

This Pistachio Raspberry Cake is the perfect combination of elegance and comfort, making it a great choice for any occasion. Whether you’re baking for a gathering, a holiday, or just because you deserve a sweet treat, this cake is sure to impress.

Now it’s your turn! Try this recipe, snap a picture, and share your creation. Don’t forget to tag us on social media so we can see your delicious masterpiece!

Pistachio Raspberry Cake

Arabian Nights Croissant Recipe: A Luxurious Pistachio & Saffron Delight

Picture yourself in a lavish Middle Eastern palace, where the air is infused with the delicate aroma of saffron, the warmth of roasted pistachios, and the buttery flakiness of freshly baked croissants. The Arabian Nights Croissant is not just a pastry; it’s an experience—a fusion of French elegance with the rich flavors of Arabian luxury. This recipe is perfect for special occasions or whenever you crave something truly decadent.


What Makes the Arabian Nights Croissant Recipe Special?

Unlike a traditional croissant, this luxurious version embraces:

  • Saffron-infused dough, giving it a delicate golden hue and subtle earthy flavor.
  • Pistachio cream filling, adding a rich, nutty contrast to the buttery layers.
  • Rosewater glaze, offering a floral, aromatic finish.
  • Edible gold flakes and crushed pistachios for an extra touch of luxury.

Ingredients & Equipment Needed

Ingredients for the Croissant Recipe Dough

IngredientQuantityNotes
All-purpose flour4 cupsHigh-protein flour for better layers.
Unsalted butter1 cupCold, for lamination.
Milk1 cupWarm, for activating yeast.
Active dry yeast2 ¼ tspEnsures a good rise.
Sugar¼ cupBalances the flavors.
Salt1 tspEnhances taste.
Saffron threads1/2 tspInfused in warm milk for deep flavor.

For the Pistachio Cream Filling

IngredientQuantity
Pistachios (ground)1 cup
Powdered sugar½ cup
Butter (softened)¼ cup
Almond flour¼ cup
Egg1 large
Rosewater1 tsp

For the Topping

  • Honey or rosewater glaze
  • Crushed pistachios
  • Edible gold flakes (optional)

Step-by-Step Instructions

Step 1: Preparing the Dough

  1. Warm the milk and dissolve saffron threads for a few minutes.
  2. Mix yeast, sugar, and saffron-infused milk. Let sit for 10 minutes until foamy.
  3. In a bowl, combine flour and salt, then add the yeast mixture.
  4. Knead until smooth, then chill for at least 4 hours.

Step 2: Laminating the Dough

  1. Roll out the dough and layer with butter, folding repeatedly.
  2. Chill between folds to ensure flakiness.

Step 3: Shaping & Baking the Croissants Recipe

  1. Roll and cut triangles, then fill with pistachio cream.
  2. Shape into croissants and allow to rise.
  3. Bake at 375°F (190°C) until golden brown

Step 4: Adding the Finishing Touches

  • Brush with rosewater glaze.
  • Sprinkle crushed pistachios and edible gold flakes.

Serving Suggestions & Pairings

  • Best Served With: Cardamom coffee, mint tea, or a spiced latte.
  • Presentation Tip: Serve on ornate plates with fresh rose petals for an Arabian theme.

Storage & Reheating Tips

  • Store in an airtight container for up to 3 days.
  • Reheat in the oven at 300°F (150°C) for 5 minutes to maintain crispness.

FAQs: Arabian Nights Croissant Recipe

What makes this croissant different from a regular one

  • The addition of saffron, pistachio cream, and rosewater glaze sets it apart from traditional croissants.

Can I make this croissant without saffron

  • Yes, but saffron adds an authentic Arabian touch.

How can I ensure my croissants are flaky

  • Keep the butter cold and avoid overhandling the dough.

Can I prepare the dough in advance

  • Yes! The dough can be refrigerated overnight for better results.

Conclusion: Experience the Magic of Arabian Nights in Every Bite

The Arabian Nights Croissant RECIPE is more than a pastry—it’s a culinary adventure. Whether you’re making it for a special breakfast, a luxurious brunch, or simply to indulge in a moment of Middle Eastern elegance, this croissant is sure to captivate your taste buds.

 croissants recipe


Moroccan Brioche: Almond & Orange Blossom Delight

Moroccan Almond & Orange Blossom Brioche – A Taste of Tradition for Moroccan Brioche Recipe

Introduction: A Warm Embrace of Moroccan Flavors

Imagine waking up to the sweet aroma of freshly baked brioche, infused with the delicate fragrance of orange blossom water and the richness of almonds. This Moroccan variation of the classic brioche takes you on a sensory journey, blending French baking traditions with the warmth of North African flavors. Whether you’re making it for a leisurely weekend breakfast or a special family gathering, this delightful pastry will fill your home with a comforting scent and your heart with joy.

Moroccan cuisine is all about tradition, heritage, and the perfect blend of flavors. Brioche, though rooted in French baking, has been transformed in Morocco with distinct touches such as ground almonds and fragrant floral water. The result? A uniquely soft, slightly sweet bread that pairs perfectly with mint tea or coffee.


What Makes Moroccan Brioche Recipe Special?

Unlike its French counterpart, Moroccan brioche recipe boasts a rich, nutty flavor with a subtle citrusy aroma. The addition of almonds provides a delicate crunch, while the orange blossom water enhances the pastry with a floral undertone that makes it distinctively Moroccan.

Key highlights of Moroccan brioche:

  • Infused with orange blossom water, adding a fragrant and exotic twist.
  • Ground almonds that provide a unique texture and depth of flavor.
  • Honey glaze that enhances its golden-brown crust and gives it a slight caramelized finish.
  • A softer and slightly denser texture, making it perfect for dipping into tea.

Ingredients & Equipment for Moroccan Brioche Recipe

Key Ingredients for Authentic Moroccan Brioche recipe

IngredientQuantityNotes
All-purpose flour3 cupsCan be substituted with whole wheat flour for a rustic texture.
Warm milk¾ cupHelps activate the yeast and create a soft texture.
Active dry yeast2 ¼ tspEnsures a fluffy rise.
Sugar¼ cupCan be adjusted based on preference.
Butter (softened)½ cupAdds richness and flavor.
Eggs2 largeProvides structure and moisture.
Orange blossom water2 tbspThe signature Moroccan touch.
Ground almonds½ cupAdds nuttiness and texture.
Salt½ tspBalances the sweetness.
Honey2 tbspTraditional Moroccan glaze.

Essential Kitchen Tools

  • Large mixing bowl
  • Stand mixer (optional, for kneading)
  • Baking tray
  • Pastry brush (for glaze application)

Step-by-Step Guide to Making Moroccan Brioche recipe

Step 1 – Preparing the Dough

  1. Dissolve the yeast in warm milk with a teaspoon of sugar. Let it sit for 5-10 minutes until foamy.
  2. In a large mixing bowl, combine flour, sugar, ground almonds, and salt.
  3. Add eggs, butter, and orange blossom water, then slowly incorporate the yeast mixture.
  4. Knead the dough until smooth and elastic (about 10 minutes by hand or 5 minutes with a mixer).
  5. Cover the bowl with a cloth and let the dough rise for 1-2 hours until it doubles in size.

Step 2 – Shaping & Baking the Brioche

  1. Once risen, divide the dough into smaller portions and shape into balls or a braided loaf.
  2. Place on a baking sheet and let it rise for another 30 minutes.
  3. Preheat the oven to 350°F (175°C).
  4. Brush the top with honey or an egg wash for a golden crust.
  5. Bake for 20-25 minutes or until golden brown.

Step 3 – Adding the Moroccan Touch

  • Drizzle honey over the warm brioche for a glossy finish.
  • Sprinkle with sliced almonds for added crunch.
  • Serve with mint tea for an authentic Moroccan experience.

Variations & Serving Suggestions

Creative Ways to Enjoy Moroccan Brioche

  • Breakfast Option: Toasted with butter and honey.
  • Dessert Twist: Filled with date paste or chocolate.
  • Savory Adaptation: Less sugar, paired with cheese and olives.

Pairing Suggestions

  • Mint Tea: Classic Moroccan accompaniment.
  • Orange Marmalade: Enhances the citrus notes.
  • Coffee: Complements the buttery richness.

Storage & Reheating Tips

Keeping Brioche Fresh

  • Store in an airtight container for up to 3 days.
  • Freeze slices for up to 2 months and reheat when needed.

How to Reheat Moroccan Brioche recipe

  • Oven: Warm at 300°F (150°C) for 5 minutes.
  • Microwave: 10-15 seconds for a quick refresh.

Frequently Asked Questions (FAQs)

What makes Moroccan brioche recipe different from French brioche?

  • Moroccan brioche incorporates orange blossom water and almonds, giving it a unique flavor.

Can I make this brioche without eggs?

  • Yes! Substitute eggs with yogurt or mashed bananas for a softer texture.

Why didn’t my brioche rise properly?

  • Ensure your yeast is fresh and activated properly.
  • Knead the dough well to develop gluten.
  • Let it rise in a warm, draft-free area.

Can I use instant yeast instead of active dry yeast?

  • Yes, but reduce the amount by 25% and mix it directly into the flour.

How can I make my brioche extra fluffy?

  • Use high-quality flour with a higher protein content.
  • Allow a longer second rise for an airy texture.

Conclusion: Enjoy the Moroccan Brioche recipe Experience!

Moroccan Almond & Orange Blossom Brioche is more than just a bread—it’s a cultural delight that brings warmth and nostalgia to every bite. Whether you enjoy it fresh with a cup of tea or experiment with different fillings, this traditional treat is sure to become a household favorite. Try this recipe today and share your experience!

Moroccan Brioche Recipe