🥑 These Avocado Rice Cakes Are the Snack You Didn’t Know You Needed

✨ Introduction: When Healthy Meets Crave-Worthy

You’re always on the move, managing a full plate, and making smarter choices for your body and mind. But let’s be real—healthy snacks often miss the mark. Too bland. Too boring. Too complicated. That changes today. Meet your new obsession: These avocado rice cakes. They’re crunchy, creamy, colorful, and packed with goodness.

If you’re someone who enjoys meals that check the boxes for simplicity, nutrition, and serious flavor, then this recipe is calling your name. Get ready to elevate your snack game, and perhaps your Instagram feed too.

A Social Media Star

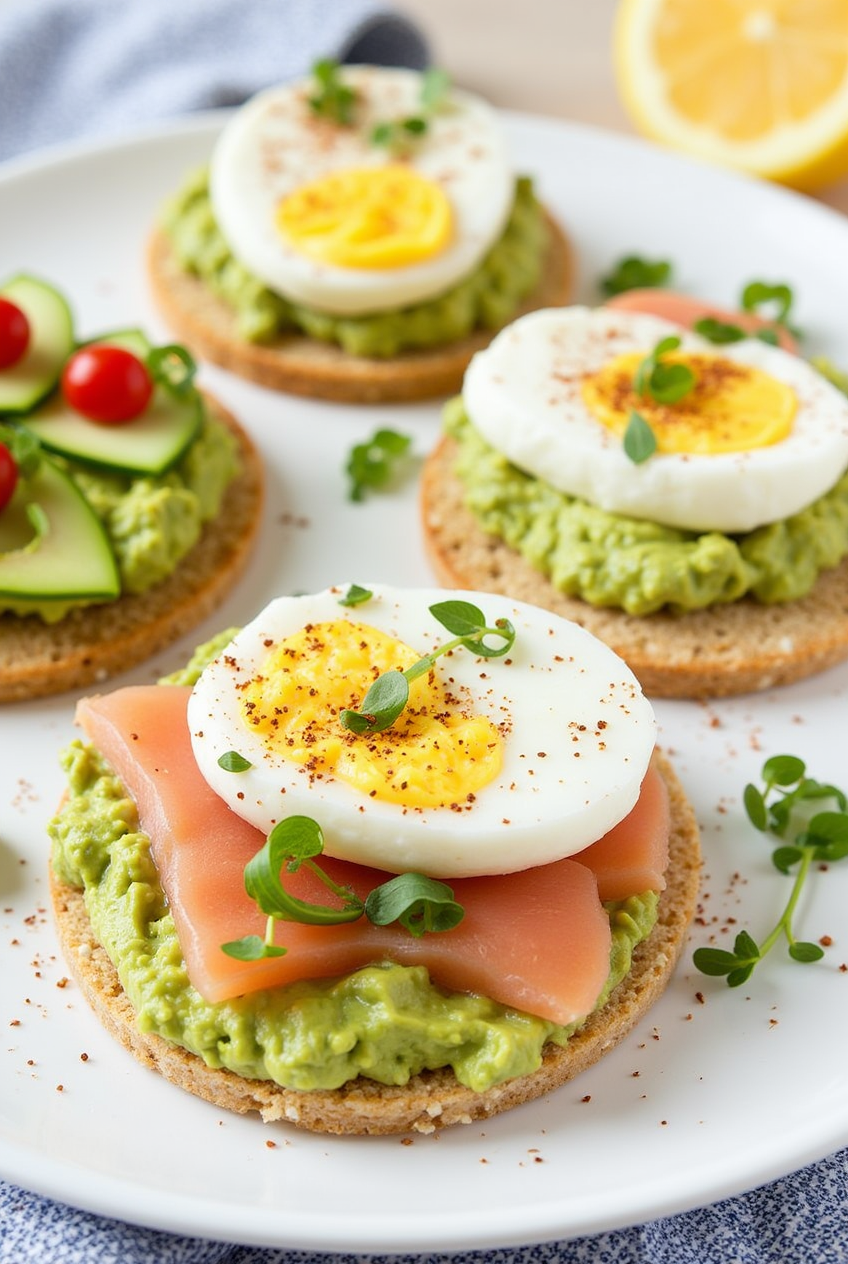
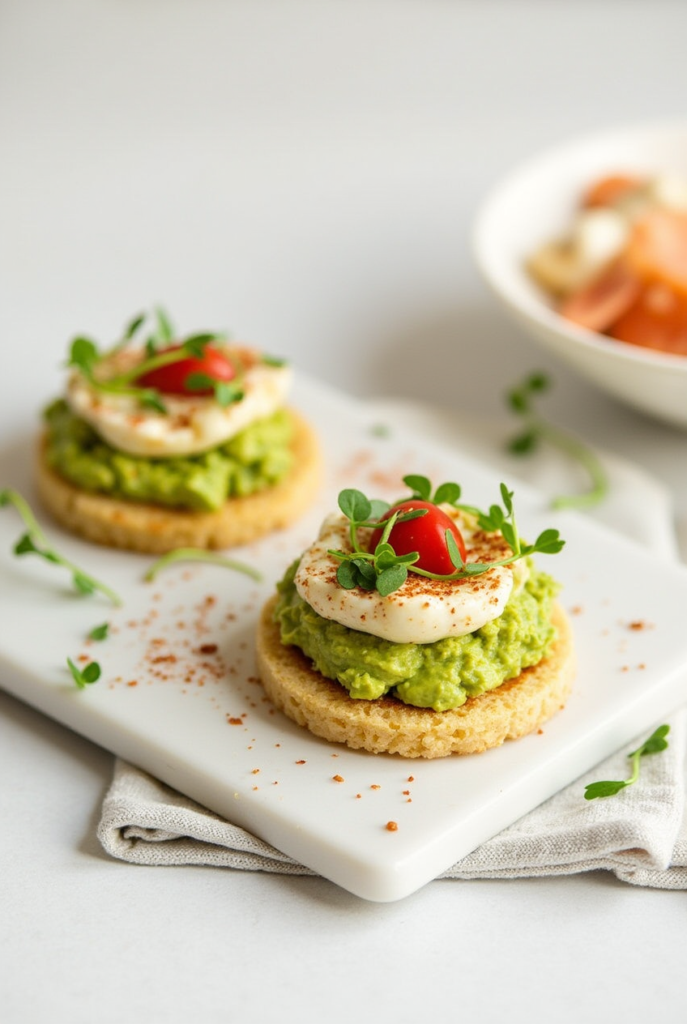
You’ve likely seen them pop up on your feed—those beautifully styled rice cakes layered with bright green avocado and topped with vibrant extras like microgreens or poached eggs. These aren’t just photogenic; they’re the new standard for quick, health-forward bites.

Why They Work

  • Nutritionally dense but not heavy
  • Easy to prep in less than 5 minutes
  • Highly customizable
  • Great for post-workout fuel, afternoon pick-me-ups, or a light breakfast

These cakes have become a staple in wellness circles for one big reason: they deliver on taste and benefits without sacrificing time.

🛌 Ingredients for These Avocado Rice Cakes (With Variations)

Base Ingredients

IngredientAmountNotes
Rice cakes2–4Go for plain or lightly salted
Ripe avocado1Mash it for easy spreading
Lemon or lime juice1/2 tspAdds zest, prevents browning
Salt and pepperTo tasteSeason to your preference

Optional Toppings to Customize

ToppingFlavor ProfileBonus Benefits
Cherry tomatoesFresh & juicyVitamin C, antioxidants
Chili flakesSpicyMetabolism booster
Boiled or poached eggRich & savoryHigh in protein
Smoked salmonSalty & boldOmega-3s, healthy fats
MicrogreensEarthy crunchNutrient-dense, fiber
Cucumber slicesRefreshingHydrating, low-calorie
Feta cheeseTangy & creamyAdds calcium and protein

🍽️ How to Make These Avocado Rice Cakes Step-by-Step

1. Toast the Base (Optional)

If you like extra crunch, lightly toast your rice cakes for 1-2 minutes. This enhances their texture and makes them feel more like an open-faced sandwich.
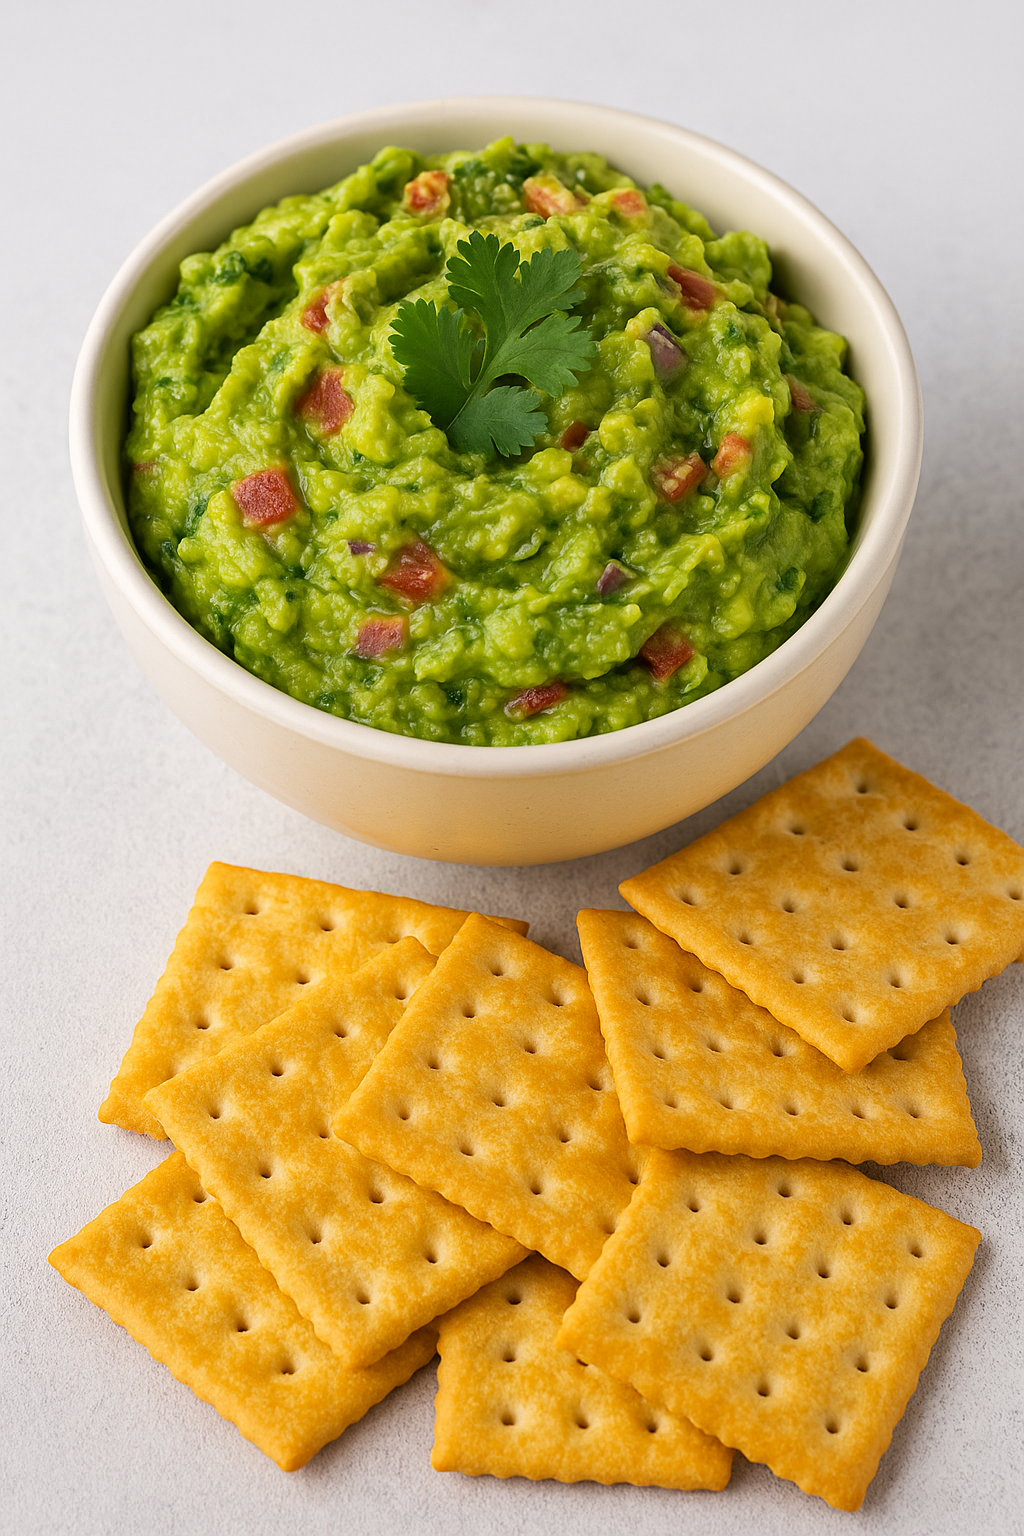
2. Prep the Avocado

Cut your ripe avocado in half, remove the pit, and scoop the flesh into a bowl. Add lemon juice, salt, and pepper. Mash it with a fork until it’s smooth but slightly chunky for texture.

3. Assemble Your Canvas

Spread a generous layer of the avocado mixture onto each rice cake. Don’t skimp—you want every bite to be satisfying.

4. Layer on Your Toppings

Pick your theme: spicy, savory, or sweet. Load up with your favorite combo or mix and match. The beauty is in the creativity.

5. Finish with a Flair

Sprinkle with sesame seeds, drizzle with olive oil, or add a dash of your favorite seasoning blend to finish off your creation.

🤔 Why These Avocado Rice Cakes Are a Smart Choice

Health Benefits of Avocados

You already know avocados are good for you, but here’s the breakdown:

  • Loaded with monounsaturated fats for heart health
  • Rich in fiber, aiding digestion and satiety
  • Contain potassium, folate, and vitamin E

Low-Calorie Snacking Without Compromise

Most pre-packaged snacks clock in at 200+ calories with added sugars and preservatives. A basic avocado rice cake? Roughly 100-150 calories of whole-food goodness.

Who Should Eat These?

  • Fitness enthusiasts seeking recovery fuel
  • Busy professionals needing a fast, healthy option
  • Parents looking for kid-friendly, nutritious snacks
  • Vegans and vegetarians craving plant-based satisfaction

🍳 10 Topping Combinations to Try Today

  1. Classic Crunch: Avocado + Cherry Tomato + Sea Salt
  2. Protein Punch: Avocado + Boiled Egg + Chili Flakes
  3. Keto-Friendly: Avocado + Bacon Bits + Cheddar
  4. Plant Power: Avocado + Microgreens + Sunflower Seeds
  5. Sweet Heat: Avocado + Mango Slices + Jalapeño
  6. Brunch Vibes: Avocado + Poached Egg + Everything Bagel Seasoning
  7. Mediterranean Mix: Avocado + Feta + Olive Tapenade
  8. Asian Twist: Avocado + Soy Sauce + Sesame Seeds
  9. Mexican Fiesta: Avocado + Corn + Cilantro + Lime
  10. Breakfast Glow-Up: Avocado + Strawberries + Honey Drizzle

📸 Make It Instagram-Worthy

Styling Secrets

  • Use vibrant ingredients: red tomatoes, green herbs, golden eggs
  • Go vertical with layered toppings for dimension
  • Use round or rectangular plates in neutral tones

Capture the Moment

  • Natural daylight always wins
  • Overhead or 45-degree angles work best
  • Focus on contrast: creamy vs. crispy

Pro tip: Snap before the avocado oxidizes. Nothing ruins a good shot like brown avocado.

❓ Frequently Asked Questions

Are avocado rice cakes good for weight loss?

Yes! They provide healthy fats and fiber to keep you fuller longer without loading on unnecessary calories.

Can I prep them in advance?

It’s best to make them fresh, but you can mash the avocado and store it in an airtight container with lemon juice for 1 day.

Are they gluten-free?

Yes, as long as you use certified gluten-free rice cakes.

Can I eat this for breakfast?

Absolutely. Add an egg or protein-rich topping for a more filling start to your day.

🏆 Conclusion: Crunch Into Something Better

Healthy eating doesn’t have to be dull or complicated. With avocado rice cakes, you get the best of all worlds: crunch, creaminess, convenience, and clean ingredients. They’re more than just a snack; they’re a lifestyle choice that supports your goals while treating your taste buds.

So next time you’re tempted by an ultra-processed option, reach for this quick fix instead. It’s the kind of upgrade your routine needs—simple, smart, and satisfying.


🙌 Call to Action

Now it’s your turn: Create your own version of these avocado rice cakes and tag your masterpiece on social with #CrunchSmart or #AvocadoFix. Want more quick, healthy recipes like this? Subscribe to our weekly health bites for recipes, wellness tips, and foodie inspiration right in your inbox.

Start snacking smarter—you deserve it.

These Avocado Rice Cakes

Guacamole & Crackers: The Irresistible Snack Combo Everyone’s Talking About

A Snack You Crave Without Even Realizing It

Guacamole & Crackers

You know those moments when your stomach growls, and you just need something? Not too heavy, not too sweet—just satisfying. That’s where Guacamole crackers step in. This combo is more than trendy; it’s comfort in a bite. Whether you’re diving into a Netflix marathon, prepping appetizers for friends, or snacking between Zoom calls, this duo delivers every time.

If you haven’t yet embraced the guac-and-cracker lifestyle, you’re missing out on a guilt-free, flavor-rich experience. Let’s break down why this is the snack of 2025—and why it belongs on your table.


Why Guacamole & Crackers: The Irresistible Snack Combo Everyone’s Talking About

A Snack You Crave Without Even Realizing It

You know those moments when your stomach growls, and you just need something? Not too heavy, not too sweet—just satisfying. That’s where guacamole and crackers step in. This combo is more than trendy; it’s comfort in a bite. Whether you’re diving into a Netflix marathon, prepping appetizers for friends, or snacking between Zoom calls, this duo delivers every time.

If you haven’t yet embraced the guac-and-cracker lifestyle, you’re missing out on a guilt-free, flavor-rich experience. Let’s break down why this is the snack of 2025—and why it belongs on your table.


Why Guacamole & Crackers Are the Perfect Pair

You might wonder: why not tortilla chips? Or just avocado toast? Here’s the magic of guacamole with crackers:

  • Texture Harmony: Creamy guac meets crispy crunch.
  • Flavor Balance: Salted, herbed, or spicy crackers enhance guacamole’s earthy richness.
  • Healthier Option: Most crackers come baked, not fried.
  • Convenience: No toaster required—just dip and snack.

Whether it’s post-workout hunger or a midday slump, this combo checks all the boxes.


How to Make the Perfect Homemade Guacamole

You don’t need to be a chef to make guacamole that stops people in their tracks. Just five minutes, a few ripe avocados, and a fork.

Ingredients Table

IngredientQuantity
Ripe avocados2–3
Fresh lime juice1–2 tablespoons
Chopped cilantro2 tablespoons
Diced red onion¼ cup
Diced tomato (optional)½ cup
Minced garlic1 clove
Salt and pepperTo taste

Instructions

  1. Slice avocados in half and remove pits. Scoop flesh into a bowl.
  2. Mash to your desired texture—chunky or smooth.
  3. Stir in lime juice, onion, tomato, garlic, and cilantro.
  4. Add salt and pepper. Taste and adjust.
  5. Let chill for 10–15 minutes, or serve right away.

Choosing the Right Crackers for Your Guac

Crackers aren’t just filler. They bring flavor, structure, and personality to every bite.

Top Cracker Choices:

  • Whole Grain: Earthy taste and packed with fiber.
  • Seeded or Nut-Based: Adds texture and healthy fats.
  • Gluten-Free: For those watching gluten, rice and quinoa crackers are top picks.
  • Spiced or Herbed: Adds depth to mild guacamole.
  • Homemade: Customize seasoning and skip preservatives.

Pro Tip:

Create a cracker board—a mix of options to suit every palate.


Guacamole & Crackers: A Nutritional Power Combo

Snacks don’t have to be empty calories. With the right ingredients, you’re fueling your body.

Health Benefits:

  • Avocados: Rich in heart-healthy monounsaturated fats, potassium, and fiber.
  • Cilantro & Lime: Detoxifying and full of antioxidants.
  • Crackers: Whole grain varieties provide complex carbs and fiber.

Together, they offer a satisfying, nutrient-dense snack that keeps you energized.


Elevate Snack Time: Serving Ideas for Parties

Want to impress your guests or elevate your weekday snacking? Here are ideas you’ll want to copy:

  • Mini Guac Cups: Serve guacamole in small clear cups, each with a cracker inserted.
  • Cracker Toppers: Spread guacamole on crackers, then add cherry tomatoes, olives, or even feta.
  • Colorful Platters: Offer bowls of guacamole with a rainbow of cracker types around the edge.

Bonus: add a touch of chili oil or smoked paprika for flair.


Flavor Variations to Try

Craving something different? Don’t stop at basic guac. Let your creativity shine.

Flavor Twists:

  • Spicy Jalapeño: Add diced jalapeños or hot sauce.
  • Tropical Twist: Mix in mango or pineapple chunks.
  • Greek Fusion: Feta, olives, and cucumber give it a Mediterranean flair.
  • Tex-Mex Vibe: Black beans, corn, and cumin bring Southwest heat.

Swap crackers to match the mood—think cinnamon crisps with tropical guac!


Can this snack be keto-friendly?

FAQs: Everything You Wanted to Know About Guacamole & Crackers

Can I make guacamole in advance?

Yes, but minimize browning by storing it with plastic wrap pressed against the surface. Add extra lime for freshness.

What crackers pair best with guacamole?

Whole grain and gluten-free crackers are perfect. Try ones with herbs or spices for extra punch.

Absolutely. Use seed-based or almond flour crackers.

How long does guacamole last?

Best within 1–2 days. For parties, make it fresh that morning.


Conclusion: The Snack That Does It All

Guacamole and crackers aren’t just trendy—they’re practical, delicious, and endlessly versatile. Whether you’re feeding a crowd or just treating yourself, this is the snack that fits every lifestyle. It’s clean, quick, and customizable. Best of all, you control every ingredient.

Once you taste the balance of creamy and crunchy, there’s no turning back.


✅ Call to Action

Now it’s your turn! Whip up your favorite guacamole blend, try it with a cracker you’ve never used before, and post your creation on Facebook or Instagram using the tag #GuacAndCrackLove. Let your flavor story inspire others! & Crackers Are the Perfect Pair

You might wonder: why not tortilla chips? Or just avocado toast? Here’s the magic of guacamole with crackers:

  • Texture Harmony: Creamy guac meets crispy crunch.
  • Flavor Balance: Salted, herbed, or spicy crackers enhance guacamole’s earthy richness.
  • Healthier Option: Most crackers come baked, not fried.
  • Convenience: No toaster required—just dip and snack.

Whether it’s post-workout hunger or a midday slump, this combo checks all the boxes.


How to Make the Perfect Homemade Guacamole

You don’t need to be a chef to make guacamole that stops people in their tracks. Just five minutes, a few ripe avocados, and a fork.

Ingredients Table

IngredientQuantity
Ripe avocados2–3
Fresh lime juice1–2 tablespoons
Chopped cilantro2 tablespoons
Diced red onion¼ cup
Diced tomato (optional)½ cup
Minced garlic1 clove
Salt and pepperTo taste

Instructions

  1. Slice avocados in half and remove pits. Scoop flesh into a bowl.
  2. Mash to your desired texture—chunky or smooth.
  3. Stir in lime juice, onion, tomato, garlic, and cilantro.
  4. Add salt and pepper. Taste and adjust.
  5. Let chill for 10–15 minutes, or serve right away.

Choosing the Right Crackers for Your Guac

Crackers aren’t just filler. They bring flavor, structure, and personality to every bite.

Top Cracker Choices:

  • Whole Grain: Earthy taste and packed with fiber.
  • Seeded or Nut-Based: Adds texture and healthy fats.
  • Gluten-Free: For those watching gluten, rice and quinoa crackers are top picks.
  • Spiced or Herbed: Adds depth to mild guacamole.
  • Homemade: Customize seasoning and skip preservatives.

Pro Tip:

Create a cracker board—a mix of options to suit every palate.


Guacamole & Crackers: A Nutritional Power Combo

Snacks don’t have to be empty calories. With the right ingredients, you’re fueling your body.

Health Benefits:

  • Avocados: Rich in heart-healthy monounsaturated fats, potassium, and fiber.
  • Cilantro & Lime: Detoxifying and full of antioxidants.
  • Crackers: Whole grain varieties provide complex carbs and fiber.

Together, they offer a satisfying, nutrient-dense snack that keeps you energized.


Elevate Snack Time: Serving Ideas for Parties

Want to impress your guests or elevate your weekday snacking? Here are ideas you’ll want to copy:

  • Mini Guac Cups: Serve guacamole in small clear cups, each with a cracker inserted.
  • Cracker Toppers: Spread guacamole on crackers, then add cherry tomatoes, olives, or even feta.
  • Colorful Platters: Offer bowls of guacamole with a rainbow of cracker types around the edge.

Bonus: add a touch of chili oil or smoked paprika for flair.


Flavor Variations to Try

Craving something different? Don’t stop at basic guac. Let your creativity shine.

Flavor Twists:

  • Spicy Jalapeño: Add diced jalapeños or hot sauce.
  • Tropical Twist: Mix in mango or pineapple chunks.
  • Greek Fusion: Feta, olives, and cucumber give it a Mediterranean flair.
  • Tex-Mex Vibe: Black beans, corn, and cumin bring Southwest heat.

Swap crackers to match the mood—think cinnamon crisps with tropical guac!


FAQs: Everything You Wanted to Know About Guacamole & Crackers

Can I make guacamole in advance?

Yes, but minimize browning by storing it with plastic wrap pressed against the surface. Add extra lime for freshness.

What crackers pair best with guacamole?

Whole grain and gluten-free crackers are perfect. Try ones with herbs or spices for extra punch.

Can this snack be keto-friendly?

Absolutely. Use seed-based or almond flour crackers.

How long does guacamole last?

Best within 1–2 days. For parties, make it fresh that morning.


Conclusion: The Snack That Does It All

Guacamole and crackers aren’t just trendy—they’re practical, delicious, and endlessly versatile. Whether you’re feeding a crowd or just treating yourself, this is the snack that fits every lifestyle. It’s clean, quick, and customizable. Best of all, you control every ingredient.

Once you taste the balance of creamy and crunchy, there’s no turning back.


✅ Call to Action

Now it’s your turn! Whip up your favorite guacamole blend, try it with a cracker you’ve never used before, and post your creation on Facebook or Instagram using the tag #GuacAndCrackLove. Let your flavor story inspire others!

guacamole-and-crackers-

🍰 Irresistible no-Bake cakes – The Ultimate Easy Dessert for Every Occasion

✨ The Joy of Effortless Desserts

no-bake cakes

You know those warm afternoons when you crave something sweet, but turning on the oven feels like a chore? That’s exactly where no-bake cakes come to the rescue. These delightful desserts deliver all the indulgence of traditional cakes without the fuss of baking. Whether you’re in a rush, lack baking experience, or just don’t want to heat up your kitchen, no-bake cakes give you that sweet fix with minimal effort.

They’re ideal for busy parents, dorm-room dwellers, and anyone living life on the go. With a few simple ingredients and your fridge doing the heavy lifting, you can whip up an eye-catching, crowd-pleasing dessert that looks like it came from a bakery.


🍰 What Are no-Bake cakes?

No-bake cakes are desserts that don’t require oven time. Instead, they rely on refrigeration or freezing to set and hold their structure. Think cheesecake without the cracks, or tiramisu without the water bath. These cakes are smooth, creamy, and often layered—delivering incredible textures with half the effort.

Common Ingredients in no-Bake cakes

  • Crust base: Graham crackers, Oreos, or digestive biscuits
  • Binding agents: Melted butter, condensed milk
  • Creamy elements: Cream cheese, mascarpone, whipped cream, yogurt
  • Sweeteners: Powdered sugar, honey, maple syrup
  • Add-ins: Fruits, chocolate, nuts, or jams

You can even tweak the ingredients for dietary preferences—vegan, gluten-free, or keto variations are all possible.


Top Reasons for Popularity

  1. Time-saving – Most recipes take under 30 minutes to prepare
  2. Kid-friendly – No ovens mean safer baking for little helpers
  3. Versatile – Easy to adapt for food allergies or preferences
  4. Minimal equipment – No need for stand mixers or baking trays
  5. Chill factor – Ideal for warmer climates and summer parties

Social Media & Culture Shift

TikTok, Instagram, and Pinterest are packed with creative spins on no-bake cakes—from mason jar cheesecakes to viral no-bake tiramisu cups. In 2025, the theme is clear: convenience meets aesthetic.

Popular hashtags include:

  • #NoBakeDessert
  • #FridgeCakeMagic
  • #EasySweets

🥒 Top 5 Must-Try no-Bake cake Recipes

These recipes blend simplicity and flavor to help you impress without stress. Each comes with an ingredient table and tips.

1. No-Bake Cheesecake

IngredientQuantity
Cream cheese2 cups
Graham cracker crumbs1.5 cups
Butter (melted)½ cup
Powdered sugar¾ cup
Vanilla extract1 tsp
Whipping cream1 cup
  • Mix crumbs and butter for the base, press into a pan, and chill.
  • Whip cream cheese, sugar, and vanilla; fold in whipped cream.
  • Spread over crust and refrigerate overnight.

2. Chocolate Biscuit Cake

  • Digestive biscuits
  • Melted dark chocolate
  • Butter and golden syrup
  • Optional: dried fruits, chopped nuts

Break biscuits, mix with warm chocolate mixture, pour into mold, refrigerate.

3. Strawberry Icebox Cake

  • Graham crackers, whipped cream, sliced strawberries
  • Layer: crackers, cream, berries
  • Refrigerate 8 hours

4. Oreo No-Bake Cake

  • Whole Oreos
  • Milk
  • Whipped cream or pudding mix
  • Layer and freeze; slice like an ice cream cake

5. Vegan Mango Coconut Cake

  • Cashew cream, coconut milk, mango puree
  • Crust: dates and almonds blended
  • Chill for 6 hours minimum

🎂 Tips for Perfect no-Bake cakes

1. Full-Fat Ingredients Work Best

Using full-fat cream cheese or coconut milk ensures a richer texture that holds up better.

2. Don’t Rush the Chill Time

Refrigerate for at least 6 hours or overnight to allow flavors to meld and layers to firm.

3. Layer with Intention

Add crunch with nuts or cookie bits between creamy layers.

4. Presentation Matters

Use transparent dishes or glasses for visual appeal, especially if you’re posting on social media.


🎁 no-Bake cakes for Every Occasion

No-bake cakes aren’t just for summer. You can tweak them year-round:

  • Birthdays: Add funfetti to cheesecake filling
  • Summer BBQs: Lemon blueberry or strawberry themes
  • Ramadan or Eid: Date and pistachio with rose water
  • Valentine’s Day: Raspberry and white chocolate

❓ FAQ: Everything You Need to Know About No-Bake Cakes

Can you freeze no-bake cakes?

Yes. Wrap them well and store for up to 2 weeks. Thaw in the fridge before serving.

Are no-bake cakes safe?

Absolutely. Most recipes skip eggs entirely, and the chilled ingredients stay fresh for days.

Can I make them vegan or gluten-free?

Yes! Use plant-based dairy and gluten-free cookies or oats.

How do I prevent a runny filling?

Chill longer, use gelatin or agar if needed, and go for thicker cream bases.


📅 Final Thoughts: Your Sweet Shortcut to Joy

You don’t need a mixer, oven, or culinary school degree to make a stunning dessert. No-bake cakes offer you simplicity, flexibility, and a whole lot of joy. Perfect for any celebration or an indulgent weekend treat, these cakes are a trend that’s here to stay.

Why not try one today and treat yourself to effortless sweetness?


📢 Call to Action

Tried a recipe? Share your masterpiece using the hashtag #ChillCakeChallenge and tag us for a chance to be featured!

Subscribe to our newsletter for more no-bake ideas, and never miss the latest dessert trend!

no-bake cakes

no-bake cakes

Best Puff Pastry Cream Cake: A Light & Flaky Dessert You’ll Fall in Love With

There’s something unforgettable about a dessert that blends delicate crunch with smooth, cloud-like cream. Maybe it reminds you of childhood birthdays, your first dinner party success, or just a quiet weekend when you needed comfort. The best puff pastry cream cake delivers all that nostalgia and luxury in one bite. And the best part? You don’t need a culinary degree to make it.

best puff pastry cream cake

Whether you’re hosting friends or treating yourself, this recipe is a foolproof way to create something truly impressive. Let’s explore everything you need to master this delicious dessert—from ingredients and assembly tips to creative variations and expert hacks.


What Is a Puff Pastry Cream Cake?

A Flaky Classic with a Creamy Twist

The puff pastry cream cake is exactly what its name promises—a beautiful stack of golden, flaky pastry sheets layered with rich, lightly sweetened cream. It’s often topped with fruit, dusted with powdered sugar, or drizzled with chocolate. The texture contrast is what makes it irresistible.

Why Everyone’s Obsessed

This cake is trending for a reason:

  • Minimal ingredients with maximum impact
  • Elegant presentation without complicated steps
  • Endlessly customizable to fit your taste or dietary needs

Instagram-worthy? Definitely. Effort-heavy? Not at all.


Why You’ll Love This Puff Pastry Cream Cake Recipe

Perfect for Any Occasion

Whether you’re planning a dinner party or looking to upgrade your weekend dessert lineup, this cake fits every scene. It’s light enough to serve after a heavy meal, yet impressive enough to steal the spotlight.

Beginner-Friendly

You don’t need fancy equipment or advanced baking knowledge. If you can handle a whisk and an oven, you’re already halfway there.

Easily Customizable

Love strawberries? Prefer chocolate? You can switch up the filling, toppings, or even the shape of the cake to match the season or your mood.


Ingredients You’ll Need

Here’s everything you need to create the best puff pastry cream cake:

IngredientQuantityNotes
Puff pastry sheets2 sheetsStore-bought or homemade
Heavy cream1 cupChilled, for whipping
Powdered sugar1/3 cupAdjust for sweetness
Vanilla extract1 tspOptional but flavorful
Cornstarch1 tbspHelps stabilize the cream
Fresh berries1/2 cupOptional topping

Optional Additions:

  • Lemon zest
  • Melted chocolate
  • Edible flowers

Step-by-Step Instructions

Preparing the Puff Pastry

  1. Preheat your oven to 400°F (200°C).
  2. Roll out the puff pastry on a lightly floured surface.
  3. Dock the dough (prick with a fork) to prevent excessive puffing.
  4. Place on parchment-lined baking trays.
  5. Bake for 15-18 minutes or until golden and crisp.
  6. Let cool completely before layering.

Making the Cream Filling

  1. In a chilled bowl, pour the cold heavy cream.
  2. Add powdered sugar and vanilla extract.
  3. Sprinkle in the cornstarch.
  4. Whip until soft peaks form.
  5. Chill in the refrigerator for at least 15 minutes.

Assembling the Cake

  1. Cut each pastry sheet into equal rectangular pieces.
  2. Start with one pastry layer on your serving tray.
  3. Pipe or spread a thick layer of whipped cream.
  4. Repeat with additional layers (2-3 is ideal).
  5. Top with fresh berries or a dusting of powdered sugar.

Tip: Use a serrated knife when slicing for clean edges.


Variations to Try

Fruit-Filled Puff Pastry Cream Cake

Add sliced strawberries, blueberries, or peaches between the layers.

Chocolate Hazelnut Delight

Mix a spoonful of Nutella into the whipped cream.

Vegan Adaptation

  • Use plant-based puff pastry.
  • Substitute coconut cream for the filling.
  • Sweeten with maple syrup or agave.

Expert Tips for Success

  • Chill everything: Cream whips better when cold.
  • Use parchment paper to prevent sticking.
  • Layer quickly before the cream warms.
  • Decorate just before serving for best visual appeal.
  • Don’t skip docking—it keeps your pastry layers flat and crispy.

Storing and Serving

How to Store

  • Store leftovers in an airtight container in the fridge.
  • Best enjoyed within 2–3 days.
  • Avoid freezing; cream doesn’t thaw well.

Serving Suggestions

  • Pair with a hot espresso.
  • Serve chilled or at room temperature.
  • Garnish with mint leaves or edible flowers.

FAQ: Best Puff Pastry Cream Cake

Can I freeze the puff pastry cream cake?

It’s not recommended. Freezing will affect the texture of both the pastry and the cream.

What’s the best cream to use?

Cold heavy whipping cream with a bit of cornstarch works best. You can also use pastry cream for a richer taste.

Can I use store-bought puff pastry?

Absolutely. Just make sure to follow baking instructions and dock the dough.

How do I keep the pastry from getting soggy?

Let pastry cool before adding cream, and only assemble shortly before serving.

Is this recipe kid-friendly?

Yes! It’s light, sweet, and simple. Plus, kids will enjoy helping with layering and decorating.


Conclusion: Your New Go-To Dessert

You don’t need to visit a bakery or flip through a French cookbook to make something this delightful. The best puff pastry cream cake is just a few ingredients and simple steps away. It’s a treat that feels luxurious, but fits perfectly into your everyday kitchen.

So why not impress your family, wow your friends, or simply treat yourself? This dessert checks every box—light, creamy, flaky, and full of flavor.


Call to Action

Have you made this puff pastry cream cake? Share your masterpiece with us on Instagram using #PuffPastryBliss. Or leave a comment below telling us how you personalized it. Hungry for more? Subscribe to get weekly dessert inspiration straight to your inbo

best puff pastry cream cake

Strawberry Crunch Cake

Strawberry Crunch Cake: The Viral Dessert You Need to Try This Weekend

Why Strawberry Crunch Cake Brings Back Sweet Summer Memories

Strawberry Crunch Cake

There’s something deeply nostalgic about strawberries and cream. Maybe it’s the memory of enjoying a frozen strawberry bar during a hot summer day, or perhaps the way strawberry desserts always seemed to appear at the best family gatherings. If you’re looking for a dessert that brings that same joyful feeling to your kitchen—and tastes like pure happiness—you’ve found it. Strawberry Crunch Cake blends everything you loved as a kid with the ease and elegance you need as a home baker today.

This article will guide you through everything you need to know to recreate this trending dessert—from ingredients to storage, and even customization tips. Whether you’re new to baking or a kitchen pro, this recipe is designed with you in mind.


What Is Strawberry Crunch Cake?

Strawberry Crunch Cake is a delightful hybrid between a traditional strawberry shortcake and those nostalgic ice cream bars from your childhood. It features soft vanilla or strawberry cake layers, a luscious whipped cream or cream cheese frosting, and a crisp, buttery crumble made from crushed cookies and strawberry gelatin.

You’ve probably seen versions of it pop up all over social media—TikTok, Pinterest, and Instagram reels are filled with happy bakers showing off their vibrant pink-and-cream creations. It’s no surprise. This cake isn’t just gorgeous to look at; it’s also irresistibly delicious.

Key Features:

  • Soft, moist cake (vanilla or strawberry flavored)
  • Whipped topping or cream cheese frosting
  • Crunchy strawberry crumble topping
  • Perfect for birthdays, summer BBQs, brunches, or just because

Ingredients You’ll Need

Let’s break it down so you can prepare your shopping list.

Base Ingredients Table

ComponentIngredients
Cake LayerAll-purpose flour, baking powder, salt, granulated sugar, eggs, milk, vanilla, butter (or use a boxed cake mix)
Frosting LayerHeavy whipping cream or cream cheese, powdered sugar, vanilla extract
Crunch ToppingGolden Oreos or vanilla cookies, butter, strawberry gelatin powder, optional freeze-dried strawberries

Make sure to gather everything before you start. Having a well-organized prep space saves you time and stress.


How to Make Strawberry Crunch Cake: Step-by-Step

This is where the magic happens. Follow these steps closely, and you’ll have a show-stopping cake in no time.

Step 1: Prepare Your Cake Layer

If using a boxed mix:

  • Follow package instructions. Let cool completely before decorating.

For homemade:

  1. Preheat your oven to 350°F (175°C). Grease and flour your pan.
  2. In a bowl, whisk dry ingredients: flour, baking powder, salt.
  3. In another bowl, beat sugar and butter until creamy. Add eggs one at a time.
  4. Add milk and vanilla, then combine with dry ingredients.
  5. Pour batter into pan and bake for 30–35 minutes. Let cool fully.

Step 2: Make the Frosting

For a whipped version:

  • Beat cold heavy cream with powdered sugar and vanilla until stiff peaks form.

For a cream cheese version:

  • Beat softened cream cheese, powdered sugar, and vanilla until smooth. Fold in whipped cream.

Chill until ready to use.

Step 3: Prepare the Crunch Topping

  1. Crush cookies in a zip bag or food processor.
  2. Mix with strawberry gelatin powder.
  3. Add melted butter and stir until crumbly.
  4. Optional: Add crushed freeze-dried strawberries for color and flavor.
  5. Toast in the oven at 300°F for 5–8 minutes for extra crunch.

Step 4: Assemble Your Cake

  1. Place cake layer on a serving dish.
  2. Frost generously with your whipped topping.
  3. Sprinkle the strawberry crunch over the top.
  4. For two layers: repeat with another cake round.
  5. Chill for 1–2 hours before serving.

Pro Tips to Elevate Your Strawberry Crunch Cake

  • Add real strawberries: Thinly slice strawberries between layers.
  • No-bake version: Use pound cake and cool whip if you’re short on time.
  • Flavor twist: Add lemon zest or almond extract to your frosting.
  • Color control: Use natural pink food coloring if avoiding artificial dyes.

Storage & Serving Suggestions

Storage

  • Refrigerate cake in an airtight container.
  • Best eaten within 3 days.
  • Add topping right before serving to avoid sogginess.

Serving

  • Serve chilled for best flavor.
  • Pair with iced coffee or lemonade on warm days.
  • Perfect slice size: about 1.5 inches wide.

Nutritional Snapshot (Per Slice Estimate)

NutrientApproximate Amount
Calories350–450
Sugars28g
Fat22g
Protein4g

Note: Values vary based on ingredients used.


Why Strawberry Crunch Cake Deserves a Spot on Your Dessert Table

Think about it—how often do you find a dessert that’s:

  • Easy to make
  • Visually stunning
  • Full of nostalgic flavor
  • Flexible for all occasions

You’re not just baking a cake. You’re making a moment. Whether you post it online or serve it quietly at home, Strawberry Crunch Cake turns ordinary days into something memorable.


FAQ – Strawberry Crunch Cake

Can I make this in advance?

Yes, you can prepare the cake and frosting up to 2 days ahead. Just add the crunch topping fresh.

Can I freeze Strawberry Crunch Cake?

You can freeze the cake and frosting separately. Assembled cake is best fresh.

What if I don’t have strawberry gelatin?

Try using freeze-dried strawberries crushed with sugar as a natural substitute.

Can I make it gluten-free?

Yes, use gluten-free cake mix and cookies.


Final Thoughts: It’s Time to Bake!

You’ve got everything you need—from ingredients to inspiration—to create a Strawberry Crunch Cake that looks impressive and tastes even better. Now it’s your turn.

Call to Action:
Ready to bake this beautiful cake? Snap a picture and tag it with #StrawberryCrunchCakeMagic. Share your creation with your friends—or just savor every bite yourself. Either way, you’ve earned it.

🍰 French Yogurt Cake: The Secret to a Simple Yet Unforgettable Dessert

Introduction: A Taste of Childhood at Your Fingertips

Imagine a rainy afternoon where the sweet aroma of a warm cake fills your kitchen. You, standing on a stool, holding a pot of yogurt, ready to measure the ingredients. The French yogurt cake isn’t just a recipe — it’s a feeling, a family tradition that you can easily bring back into your home. No fancy scale needed, just your craving for something homemade and a simple yogurt container to guide you. Ready to relive this classic?


🥄 Why Yogurt Cake Is a French Family Classic

You might wonder why yogurt cake is so beloved in French households. Its beauty lies in its simplicity. Every family has a slightly different version, but the heart of it remains the same: a moist, flavorful cake that’s almost impossible to mess up.

This cake is often the first recipe French children learn because it teaches them that baking doesn’t have to be complicated. By using the yogurt container as a measuring cup, you free yourself from technical stress and let your creativity shine.

Key Points:

  • Quick and easy recipe — no scales needed
  • Perfect for beginners and family moments
  • A flexible base for endless variations

🧈 Essential Ingredients for an Authentic French Yogurt Cake

Before you roll up your sleeves, here’s what you’ll need:

IngredientQuantityNotes
Plain yogurt1 container (125 g)Use the container for measurements
All-purpose flour3 containersSift for a lighter texture
Sugar2 containersAdjust based on your sweetness preference
Vegetable oil1 containerSunflower or canola recommended
Eggs3Best at room temperature
Baking powder1 packet (10 g)Ensures a light, fluffy cake
Vanilla extract1 teaspoonOptional but adds great flavor
Lemon zest1Optional for a fresher taste

Chances are, you already have everything you need right in your pantry!


🥣 Easy Step-by-Step Instructions for a Perfect French Yogurt Cake

Ready to bake? Follow these simple steps:

🧁 Directions:

  1. Preheat your oven to 180°C (350°F).
  2. Empty the yogurt into a large bowl.
  3. Use the empty container to measure the sugar, and mix it in.
  4. Add the eggs one by one, beating well after each addition.
  5. Slowly pour in the oil, mixing thoroughly.
  6. Gradually add the flour and baking powder, stirring gently.
  7. Add vanilla extract and, if desired, lemon zest.
  8. Pour the batter into a greased and floured cake pan.
  9. Bake for about 30–35 minutes or until a toothpick inserted in the center comes out clean.

Pro Tips for Success:

  • Sift the flour to avoid lumps.
  • Don’t overmix once the flour is added — this keeps the cake soft and airy.

🍋 Delicious Variations of the Classic Yogurt Cake

Love customizing your desserts? This cake adapts beautifully:

  • Citrus Version: Add 2 tablespoons of fresh lemon juice and extra zest.
  • Chocolate Chip Version: Fold in 150g of chocolate chips.
  • Marble Cake: Divide the batter and add cocoa powder to one half. Layer the two batters for a marbled effect.
  • Fruit-Infused Version: Add chopped apples, pears, or berries for a fruity twist.

🧁 Creative Tips to Personalize Your French Yogurt Cake

Want to elevate your cake even further?

  • Swap the oil for melted butter for a richer flavor.
  • Spice it up with cinnamon, nutmeg, or cardamom.
  • Top with chopped nuts for a lovely crunch.
  • Drizzle a lemon or vanilla glaze for extra sweetness.

📋 FAQ Section: Everything You Need to Know About French Yogurt Cake

Can I use flavored yogurt?

Absolutely! Vanilla or coconut yogurt works beautifully and adds a subtle flavor twist. Feel free to experiment based on your mood.

How should I store the yogurt cake?

Once cooled, wrap your cake tightly in plastic wrap. It stays moist for 2 to 3 days at room temperature.

Can I freeze French yogurt cake?

Yes! Slice it into portions, wrap each piece well, and freeze. Let it thaw at room temperature before enjoying — it’ll still be deliciously soft.

Why is my cake dry?

Overbaking is usually the culprit. Keep a close eye on your oven and check doneness early. You can also add a tablespoon of crème fraîche to the batter to make it extra moist.


📝 Conclusion: Rediscover the Simple Joy of French Yogurt Cake

Now you’ve rediscovered a true culinary treasure: the French yogurt cake. Easy to make, customizable, and incredibly satisfying, it captures everything home baking should be — a moment of joy, simplicity, and connection.

So, what are you waiting for? Grab your yogurt container and start baking this beloved classic. Experiment with your favorite flavors, enjoy the process, and most of all, share it with your loved ones.

🍓 Homemade Strawberry Shortcake Ice Cream Bars Recipe

Introduction

Imagine biting into a cool, creamy strawberry shortcake ice cream bar on a hot summer day — just like the ones from your childhood!
These homemade Strawberry Shortcake Ice Cream Bars bring back all those memories, but even better because they’re made fresh in your kitchen.
If you love easy summer desserts, nostalgia, and crowd-pleasers, you’re going to absolutely adore this recipe.


Why You’ll Love These Strawberry Shortcake Ice Cream Bars

  • Nostalgic Flavor: Taste just like the ice cream truck favorites!
  • Super Easy: Only a few simple steps — no ice cream maker needed.
  • Fresh Ingredients: Strawberries, cream, and real vanilla.
  • Perfect for Parties: Kids and adults will love them.

Ingredients You’ll Need

IngredientAmount
Vanilla Ice Cream3 cups (softened)
Strawberry Ice Cream3 cups (softened)
Golden Oreos20 cookies (crushed)
Freeze-Dried Strawberries½ cup (crushed)
Butter (melted)3 tbsp
Optional: fresh strawberriesFor garnish

Step-by-Step Instructions

  1. Prepare the Crumb Coating
  • Crush the Golden Oreos and freeze-dried strawberries together.
  • Mix with melted butter until crumbly. Set aside.
  1. Layer the Ice Cream
  • Line a baking dish with parchment paper.
  • Spread the softened vanilla ice cream in an even layer. Freeze for 30 minutes.
  • Add a layer of softened strawberry ice cream on top. Freeze for another 30 minutes.
  1. Cut and Coat
  • Once firm, cut the layered ice cream into bars.
  • Quickly roll each bar in the crumb mixture until fully coated.
  1. Freeze Again
  • Freeze the coated bars for at least 1 hour before serving.

Tips for the Perfect Ice Cream Bars

  • Slightly soften the ice cream for easy layering, but don’t let it melt.
  • Use a hot knife (run under warm water) to slice clean bars.
  • Double the crumb coating if you like extra crunch!

Variations and Substitutions

  • Chocolate Lovers: Use chocolate ice cream instead of vanilla.
  • Vegan Option: Choose dairy-free ice cream and plant-based butter.
  • Other Berries: Try freeze-dried raspberries or blueberries for a twist.

Storage Tips

  • Store the bars in an airtight container with parchment between layers.
  • Best eaten within 2 weeks for maximum freshness.

FAQ About Strawberry Shortcake Ice Cream Bars

Can I make these ahead of time?

Yes! Prepare them up to a week ahead. Just keep them tightly sealed in the freezer.

Can I use fresh strawberries instead of freeze-dried?

Fresh strawberries will add moisture. It’s better to use freeze-dried for the crunch coating.

What if I don’t have Golden Oreos?

You can substitute with shortbread cookies or vanilla wafers.


Conclusion

There’s just something magical about recreating a childhood favorite in your own kitchen.
With these Homemade Strawberry Shortcake Ice Cream Bars, you’ll bring smiles to everyone around — and probably make some new memories too.
Don’t forget to share your creations on social media and tag us! We can’t wait to see your beautiful bars.

🧁 Mini Cheesecake Jar Recipe: The Sweetest Way to Celebrate Life’s Moments

✨ Tiny Jars, Big Joy — A Dessert That Feels Like a Hug

You know those desserts that make you pause for a second, smile, and remember a moment? That’s what mini cheesecake jars recipe do. These little treats aren’t just about flavor—they’re a whole experience. Whether you’re prepping for a birthday bash, surprising someone special, or just treating yourself (because yes, you deserve it), these creamy, no-bake cheesecake jars check all the boxes: simple, adorable, delicious.

Mini Cheesecake Jar Recipe

And the best part? You don’t need to turn on the oven.


🧁 Why You’ll Love Mini Cheesecake Jars RECIP

🎉 Elegant, Easy, and Loved by Everyone

  • These jars require no baking—less time, less cleanup.
  • They’re individually portioned, making them perfect for parties or gifting.
  • Kid-friendly, adult-approved, and completely customizable.

Right now, mini desserts are making waves on Pinterest and TikTok. From rustic weddings to birthday brunches, these mini cheesecake jars are stealing the spotlight. With search interest for “cheesecake in a jar” up over 40%, you’re not just making a dessert—you’re joining a sweet trend.


🍰 Your No-Bake Mini Cheesecake Jar Recipe

✨ Ingredients at a Glance

IngredientAmountNotes
Graham crackers1 ½ cupsFinely crushed
Butter (melted)⅓ cupSalted or unsalted
Cream cheese1 ½ cupsRoom temperature
Powdered sugar½ cupSifted
Vanilla extract1 tspPure, not imitation
Heavy cream1 cupVery cold
Whipped creamOptionalFor topping
Rainbow sprinklesOptionalFor flair

🍝 Step-by-Step Assembly

  1. Start with the crust
  • Mix your crushed graham crackers with melted butter.
  • Spoon 2 tablespoons into each jar and press down to form the crust.
  • Chill in the fridge while you prep the filling.
  1. Whip it good
  • Whip the cold heavy cream until stiff peaks form. Set aside.
  1. Creamy base magic
  • Beat cream cheese until smooth.
  • Add powdered sugar and vanilla extract. Mix until creamy.
  • Gently fold in the whipped cream to keep the mixture airy.
  1. Jar it up
  • Pipe or spoon the filling over the crust layer in each jar.
  • Top with whipped cream and sprinkles.
  1. Chill to set
  • Refrigerate for at least 2 hours before serving.
  • These stay perfect for up to 3 days.

😍 Insider Tips for Flawless Results

✔️ Storage Tips

  • Use 4 oz or 6 oz jars with lids for freshness and portability.
  • Best enjoyed within 48-72 hours.

🍒 Flavor Twists to Try

  • Berry swirl: Add fresh jam between layers.
  • Cookies & cream: Use crushed Oreos instead of graham crackers.
  • Citrus burst: Add lemon zest to the filling.

☕ Occasions That Deserve Cheesecake Jars

  • Birthday parties
  • Baby showers
  • Dessert tables
  • Corporate events or gift boxes

❓ Frequently Asked Questions (FAQs)

Can I make this mini cheesecake jar recipe in advance?

Absolutely! These jars can be made a day or two in advance and stored in the fridge. Just add the whipped topping and decorations before serving to keep them fresh.

Are these jars freezer-friendly?

Yes—freeze them without the toppings. When ready, thaw in the fridge for a few hours.

How do I make this recipe dairy-free?

You can use plant-based cream cheese and coconut cream. Double-check that your crust ingredients are also dairy-free.

What jar sizes work best?

We recommend 4 oz to 6 oz jars. They’re easy to fill, serve, and stack in the fridge.

Is this recipe good for kids to help make?

Absolutely! Crushing crackers, spooning layers, and decorating with sprinkles make this a fun and safe kitchen activity.


📍 Final Thought: Your Spoonful of Celebration

Every once in a while, a dessert comes along that feels a little magical. These mini cheesecake jars are exactly that. They’re cute, creamy, endlessly customizable, and totally unforgettable.

Whether you’re a pro in the kitchen or a beginner just testing the waters, you can pull these off with ease. So go ahead, mix up some love, chill a few jars, and serve joy by the sp

Mini Cheesecake Jar Recipe

Old-Fashioned Banana Cake That Tastes Like Grandma’s Kitchen

old-fashioned banana cake

You know that comforting feeling you get when you walk into a room and catch the scent of something sweet and nostalgic baking in the oven? That scent might just be a homemade old-fashioned banana cake—a timeless dessert that never fails to bring back memories. Whether you’re reminiscing about your childhood kitchen or simply craving something classic, this recipe brings the warmth of tradition right into your home.

Let’s dive into how you can recreate this delicious throwback that tastes just as good as you remember.


What Makes an Old-Fashioned Banana Recipe So Special?

What sets an old-fashioned banana cake apart from modern versions? It’s not just the simplicity of the ingredients, but the intention behind every bite. This cake is all about using ripe bananas at their sweetest stage, real butter, and no fancy tricks—just pure, homemade goodness.

The tradition of banana cake dates back to the early 20th century when home bakers started using overripe bananas to avoid waste. Its popularity only grew as families passed down their favorite versions, making it a treasured dessert in countless households.


Ingredients for the Perfect Old-Fashioned Banana Cake

Getting your ingredients right is the key to nailing this nostalgic treat. Use fresh, whole ingredients whenever possible for the most authentic flavor.

Classic Banana Cake Ingredients Table

IngredientQuantityNotes
Ripe bananas3 mediumThe spottier, the better
All-purpose flour2 cupsSifted for a lighter texture
Baking soda1 tspHelps with rise
Salt1/2 tspBalances sweetness
Unsalted butter1/2 cupRoom temperature
Sugar1 cupCan substitute brown sugar
Eggs2 largeRoom temperature
Vanilla extract1 tspAdds depth of flavor
Buttermilk or yogurt1/2 cupFor moisture and tang

How to Make an Old-Fashioned Banana Cake Step by Step

You don’t need fancy equipment or culinary school techniques. Just follow these simple instructions and you’ll be savoring a slice of homemade bliss in no time.

Instructions

  1. Preheat your oven to 350°F (175°C).
  2. Grease and lightly flour an 8-inch round or square baking pan.
  3. Mash the ripe bananas in a small bowl and set aside.
  4. In a large bowl, cream the butter and sugar until light and fluffy.
  5. Add eggs one at a time, mixing well after each addition. Stir in vanilla.
  6. In a separate bowl, whisk together the flour, baking soda, and salt.
  7. Gradually add the dry ingredients to the creamed mixture, alternating with buttermilk.
  8. Gently fold in the mashed bananas.
  9. Pour the batter into your prepared pan and smooth the top.
  10. Bake for 35–40 minutes, or until a toothpick inserted into the center comes out clean.
  11. Cool for at least 10 minutes before removing from the pan. Let it cool completely on a wire rack before frosting.

Optional Add-ins

  • 🥜 Chopped walnuts
  • 🍫 Dark chocolate chips
  • ☕ A pinch of cinnamon or nutmeg

Frosting Options for Your Banana Cake

The beauty of this cake is its versatility. You can enjoy it plain, or add a frosting that complements its flavor.

  • Cream Cheese Frosting: A tangy and smooth choice that pairs beautifully with the sweetness.
  • Brown Butter Icing: Adds a rich, nutty flavor that elevates the entire cake.
  • Classic Buttercream: A simple vanilla buttercream for that extra touch of sweetness.

Frosting Tips

  • Always let the cake cool completely before frosting.
  • Store frosted cake in the fridge to maintain freshness.

Storage and Make-Ahead Tips

Life gets busy, but that doesn’t mean you can’t plan ahead. Here’s how you can store your cake for later enjoyment:

  • ☕ Store the cake at room temperature (unfrosted) for 2 days in an airtight container.
  • ❄️ Refrigerate frosted cake for up to 5 days.
  • 🌧️ Freeze unfrosted cake layers for up to 3 months. Wrap in parchment and then foil.

Variations of Old-Fashioned Banana Desserts

Feeling inspired? There are many delicious ways to give the classic banana flavor a fresh twist:

  • 🍪 Banana Cream Pie with a buttery graham cracker crust and whipped topping.
  • Banana Bread Pudding using leftover banana bread.
  • 🍬 Mini Banana Cupcakes with chocolate or caramel drizzle.

Healthier Swaps for a Guilt-Free Banana Cake

Looking to lighten things up? You can tweak this recipe without sacrificing flavor:

  • Replace butter with Greek yogurt or mashed avocado.
  • Swap sugar with honey or maple syrup.
  • Use whole wheat flour or oat flour.

These changes make it easier to enjoy your favorite treat while sticking to your health goals.


FAQ – Old-Fashioned Banana Recipes

Can I use frozen bananas in old-fashioned banana cake?

Absolutely! Thawed frozen bananas work perfectly. Just drain any excess liquid before mashing.

What’s the difference between banana bread and banana cake?

Banana bread is denser and usually not frosted, while banana cake is lighter, fluffier, and often topped with frosting.

How ripe should bananas be for old-fashioned banana cake?

The riper, the better. You want bananas that are heavily spotted or even blackened on the outside.

Can I make this cake gluten-free?

Yes, by using a 1:1 gluten-free flour blend and ensuring other ingredients are certified gluten-free.


Perfect Pairings – What to Serve with Old-Fashioned Banana Cake

This cake is delicious on its own, but these sides can elevate your dessert experience:

  • ☕ A hot cup of tea or coffee
  • 🍦 A scoop of vanilla or cinnamon ice cream
  • 🍇 Fresh berries or caramel drizzle

Reader Tips & Memories – Share Yours!

Have your own version of this cake? Maybe a family story behind it? Share your memories in the comments or on social media. Your twist could inspire someone else!


Conclusion – Why You’ll Always Come Back to This Old-Fashioned Favorite

There’s something timeless about an old-fashioned banana cake. It’s more than just dessert—it’s a reminder of the joy in simplicity. Whether you’re baking for a special occasion or a cozy night in, this cake delivers the comfort you didn’t know you needed.

So go ahead, let those bananas ripen on the counter, gather your ingredients, and bring a piece of the past into your present.


Call to Action

Ready to turn your ripe bananas into something unforgettable? Bake this old-fashioned banana cake today and tag your creation on Instagram using #HeltRecipes. We can’t wait to see your version of this sweet classic!

Irresistible Nutella Swirl Banana Bread – A Guilt-Free Treat You’ll Love

Introduction – Why You’ll Fall in Love With Nutella Swirl Banana Bread

There’s something about the comforting aroma of banana bread baking in the oven that takes you back to warm, familiar moments. Now, imagine elevating that classic recipe with swirls of rich, velvety Nutella. That’s what this guide is all about—helping you make the ultimate Nutella Swirl Banana Bread, naturally sweetened, perfectly moist, and entirely irresistible. Whether you’re baking for your family, impressing guests, or just treating yourself, this recipe brings together comfort and indulgence in every bite.

What Makes Nutella Swirl Banana Bread So Special?

You may be wondering, what’s the big deal about adding Nutella to banana bread? Here’s why this recipe is so beloved:

  • Naturally Sweetened: Thanks to ripe bananas, you won’t need to add refined sugar.
  • Rich Flavor: The chocolate-hazelnut swirl enhances the banana flavor without overpowering it.
  • Soft and Moist Texture: Yogurt helps achieve that perfectly tender crumb.
  • Visual Appeal: The Nutella swirl gives it a bakery-style look right at home.

Whether you enjoy it as breakfast, a snack, or dessert, this bread suits any time of day.

Ingredients Breakdown – What You Need to Make Nutella Swirl Banana Bread

Table of Ingredients

IngredientQuantity
Ripe bananas (mashed)3 medium
Eggs2
Greek yogurt (plain)1/3 cup
Vanilla extract1 tsp
Whole wheat flour1 1/2 cups
Baking soda1 tsp
Ground cinnamon (optional)1/2 tsp
Salt1/4 tsp
Nutella (slightly warmed)1/4 cup

Ingredient Notes

  • Overripe bananas give maximum sweetness and flavor.
  • You can swap Greek yogurt for unsweetened applesauce for a dairy-free version.
  • Want a healthier twist? Opt for sugar-free hazelnut spread instead of Nutella.

Step-by-Step Instructions for the Perfect Nutella Swirl Banana Bread

Nutella Swirl Banana Bread

Preparation Method

Follow these easy steps and you’ll have a gorgeous, delicious loaf in under an hour.

  1. Preheat your oven to 350°F (175°C). Grease a 9×5-inch loaf pan or line with parchment.
  2. Mash the bananas in a large bowl until smooth.
  3. Add the eggs, yogurt, and vanilla. Mix until well combined.
  4. In another bowl, whisk together flour, baking soda, cinnamon, and salt.
  5. Stir the dry ingredients into the wet mixture until just combined—do not overmix.
  6. Pour the batter into the prepared loaf pan.
  7. Drizzle warmed Nutella on top of the batter.
  8. Swirl gently using a knife or toothpick to create a marbled pattern.
  9. Bake for 50-60 minutes or until a toothpick inserted in the center comes out clean.
  10. Cool on a wire rack before slicing and serving.

Storage Tips

  • Room temperature: Store in an airtight container for 2–3 days.
  • Refrigerator: Keeps fresh up to 5 days.
  • Freezer: Wrap slices in plastic and store for up to 3 months.

Healthier Swaps for Your Nutella Banana Bread Recipe

Want to make your banana bread even more nourishing? Here are a few ideas:

  • Flour: Swap with oat flour or almond flour for a gluten-free version.
  • Nutella: Choose no-added-sugar spreads or make your own using hazelnuts and cocoa.
  • Oil-free version: Greek yogurt or applesauce keeps it moist without the fat.
  • Add-ins: Mix in flaxseed, chopped walnuts, or dark chocolate chips for an extra health boost.

Serving Suggestions and Pairing Ideas

  • Warm a slice and top with Greek yogurt and a drizzle of honey.
  • Serve with a cup of almond milk latte or herbal tea for a cozy breakfast.
  • Add a scoop of sugar-free vanilla ice cream for a balanced dessert.
  • Toast it lightly and spread with almond butter for a protein-rich snack.

Bonus Tips for Making the Best Banana Bread Every Time

Baking Advice

  • Always use very ripe bananas with brown spots.
  • Don’t overmix the batter; it makes the bread dense.
  • Let it rest before slicing to keep it from crumbling.
  • Use parchment paper to lift it easily from the pan.

FAQ – Nutella Swirl Banana Bread

Can I make Nutella Swirl Banana Bread gluten-free?

Yes! Use a gluten-free all-purpose flour blend or oat flour. Ensure it’s designed for baking to maintain texture.

Is there a sugar-free version of Nutella I can use?

Definitely. Look for hazelnut spreads sweetened with stevia or monk fruit, or make your own.

Can I bake this recipe as muffins instead of a loaf?

Absolutely. Pour batter into a muffin tin and bake for 20-25 minutes at 350°F.

How ripe should the bananas be?

The best bananas are heavily spotted or almost black. They’re easier to mash and naturally sweet.

Printable Recipe Card

Nutella Swirl Banana Bread (No Sugar Added)

  • Prep time: 10 minutes
  • Cook time: 50-60 minutes
  • Total time: ~1 hour
  • Servings: 8 slices

Ingredients:

  • 3 ripe bananas
  • 2 eggs
  • 1/3 cup Greek yogurt
  • 1 tsp vanilla
  • 1 1/2 cups whole wheat flour
  • 1 tsp baking soda
  • 1/2 tsp cinnamon
  • 1/4 tsp salt
  • 1/4 cup Nutella, slightly warmed

Instructions:

  1. Preheat oven and prep pan.
  2. Mix wet and dry ingredients separately.
  3. Combine and pour batter into pan.
  4. Swirl in Nutella.
  5. Bake for 50-60 minutes.
  6. Cool and enjoy!

Conclusion – Your New Favorite Banana Bread Recipe

Now you have everything you need to make a better-for-you banana bread that looks fancy but is totally doable. With its natural sweetness and Nutella magic, this is one recipe you’ll keep returning to. Don’t be surprised if it disappears in minutes!